
"2024 Approved How to Achieve Collaborative Efficiency Using Skype’s Screen-Share Feature"
How to Achieve Collaborative Efficiency Using Skype’s Screen-Share Feature
How to Share Screen on Skype When Working at Home


Richard Bennett
Mar 27, 2024• Proven solutions
Currently, many countries are under lockdown, due to the COVID 19. Work at home is a term we have been hearing now, a lot more than never before. But the easy availability of internet, advancement in technology and development of online applications like Skype have enabled a large number of people to be able to carry out their work from home.
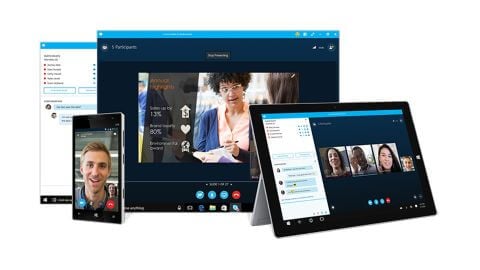
Image source: TechRadar reviews
Apart from video calls, online meetings or group conversations, Skype also has a Share Screen feature which is very useful for all the people that work from home. The share screen on Skype allows you to share the screen of your PC as a live video while you operate, with any other person you are on call with. Imagine the benefits of this feature! An easy demonstration of work or work progress to your fellow mates who are far away, as if they were sitting just beside you. Skype has made working from home easier than ever, provided you have an internet connection.
Now let us see how your screen can be shared using Skype. You will learn:
How to Share Screen on Skype
Here we will learn how your PC screen can be shared as a live video with another person through Skype. Before sharing, please check your window once to makes sure that you don’t have anything that you wish to be shared with the other person.
Note:
Once sharing the screen is started all your activities on the screen will be shown to the other person.
- 1. Open Skype and start a video or audio call with the person you want to share your screen with


- 2. While on the call, tap the + button on the screen and click the Share screens… option

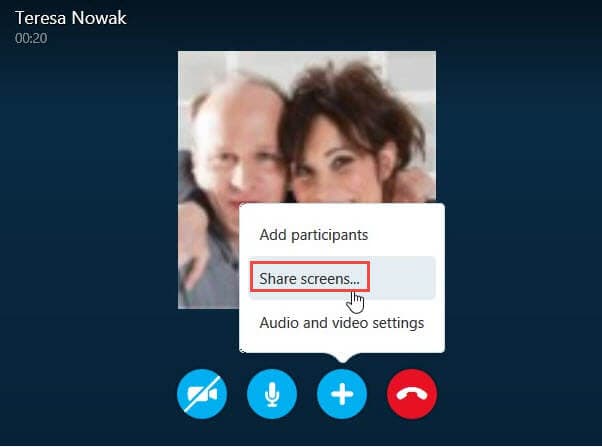
- 3. A preview of your present screen will appear under which there will be two options, Cancel and Share Screen. Tap on the Share Screen option to continue
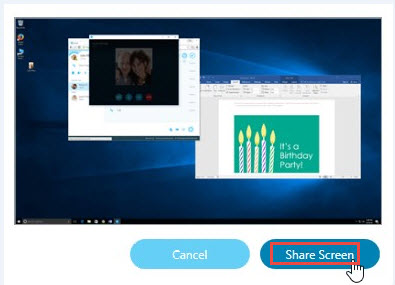
- 4. Now the person on the other side will be able to view all that is on the screen and all the functions you are going to perform on the screen including the programs you are going to open
Note:
The person will only be able to view the activities you perform but won’t be able to access your files in any way.
- 5. Once you are done, to stop sharing the screen tap again on the + button and click on the Stop sharing option
 SwifDoo PDF 2-Year Plan
The screen sharing session will be ended and you will be able to continue on the voice or video call without sharing your screen.
A Live Recording for Screen Sharing on Skype
What if you want to record a video of your screen sharing on Skype with your fellow mate? Skype does not have such a feature and you will have to depend on other applications like Filmora, which is one of the best and widely used video editing applications in the market.
The screen recorder in Filmora allows you to record the screen of your desktop including the audio and save it on your computer.
Here we will be discussing how the screen record function works on Windows.
Note:
Start recording on Filmora before you start sharing the screen on Skype if you don’t want the other person to know that you are recording.
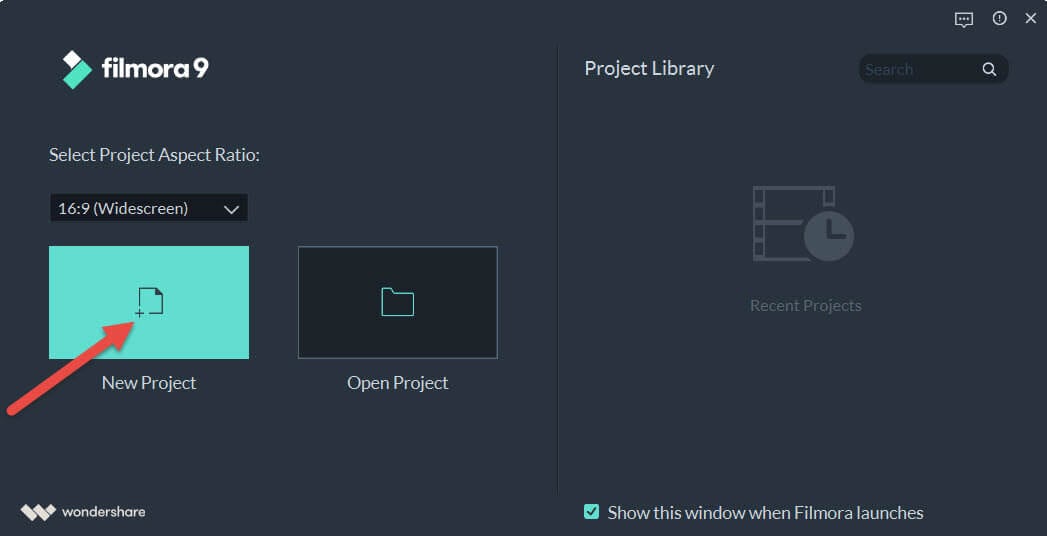
- 1. Download Filmora from here , then open it and click New Project to enter the editing mode
- 2. Click the Record button and from the options select the Record PC Screen

- 3. The built-in screen recorder will pop up

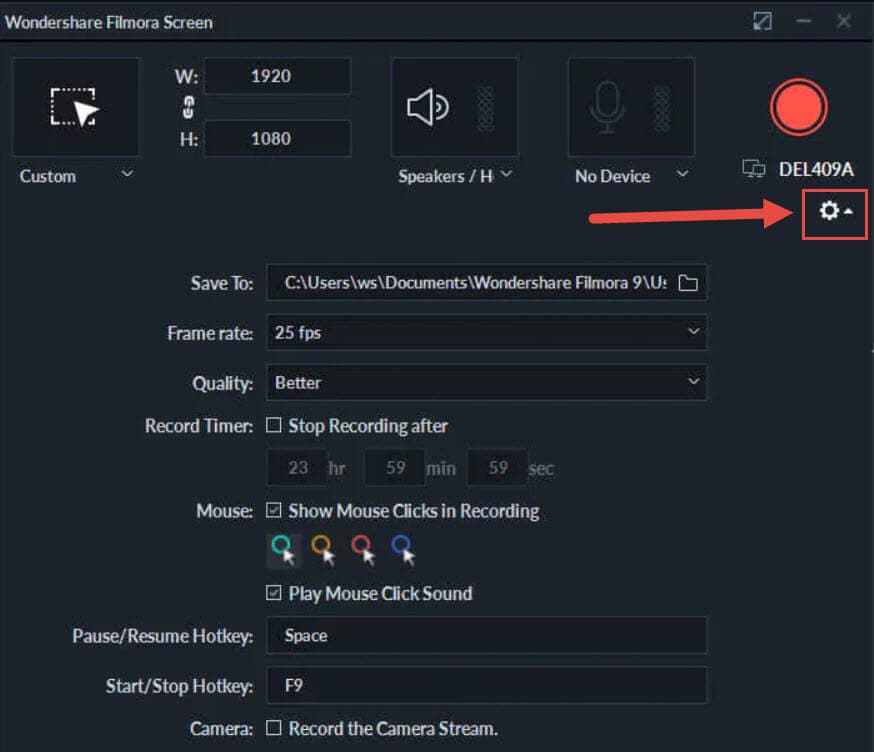
- 4. You can go to the recording settings by the Settings icon, and set the hotkeys for your recording. Or you can also enable the option by checking the Record the Camera Stream to record your webcam simultaneously and also adjust the frame rate.
- 5. Once you are done with the settings, Click the Red button to start the recording.

- 6. Now you can call your mate and start video sharing on Skype. The whole screen sharing process will be recorded by Filmora. After you finish the recording, the recorded file will show up in the media library automatically. You can right-click it, select Reveal in Explorer to target it on your Desktop folders.
 Video Converter Factory Pro
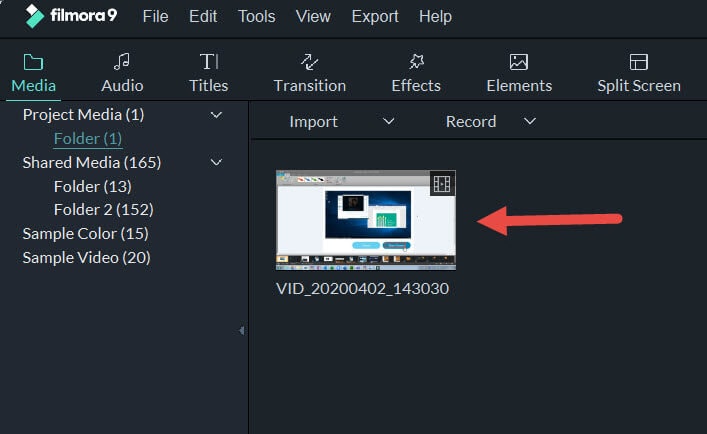
Note:
The steps to record screen on Mac are similar to Windows.
To Sum up
The use of applications like Skype and Filmora has made working from home easier than ever before. Sharing screen, online meetings, seminars, demonstrations, etc. can easily be done sitting at home with the help of these apps. Please do let us know what you think about our suggestion and feel free to drop in your comments and opinions below.

Key features:
• Import from any devices and cams, including GoPro and drones. All formats supported. Сurrently the only free video editor that allows users to export in a new H265/HEVC codec, something essential for those working with 4K and HD.
• Everything for hassle-free basic editing: cut, crop and merge files, add titles and favorite music
• Visual effects, advanced color correction and trendy Instagram-like filters
• All multimedia processing done from one app: video editing capabilities reinforced by a video converter, a screen capture, a video capture, a disc burner and a YouTube uploader
• Non-linear editing: edit several files with simultaneously
• Easy export to social networks: special profiles for YouTube, Facebook, Vimeo, Twitter and Instagram
• High quality export – no conversion quality loss, double export speed even of HD files due to hardware acceleration
• Stabilization tool will turn shaky or jittery footage into a more stable video automatically.
• Essential toolset for professional video editing: blending modes, Mask tool, advanced multiple-color Chroma Key
Richard Bennett
Richard Bennett is a writer and a lover of all things video.
Follow @Richard Bennett
Richard Bennett
Mar 27, 2024• Proven solutions
Currently, many countries are under lockdown, due to the COVID 19. Work at home is a term we have been hearing now, a lot more than never before. But the easy availability of internet, advancement in technology and development of online applications like Skype have enabled a large number of people to be able to carry out their work from home.
Image source: TechRadar reviews
Apart from video calls, online meetings or group conversations, Skype also has a Share Screen feature which is very useful for all the people that work from home. The share screen on Skype allows you to share the screen of your PC as a live video while you operate, with any other person you are on call with. Imagine the benefits of this feature! An easy demonstration of work or work progress to your fellow mates who are far away, as if they were sitting just beside you. Skype has made working from home easier than ever, provided you have an internet connection.
Now let us see how your screen can be shared using Skype. You will learn:
How to Share Screen on Skype
Here we will learn how your PC screen can be shared as a live video with another person through Skype. Before sharing, please check your window once to makes sure that you don’t have anything that you wish to be shared with the other person.
Note:
Once sharing the screen is started all your activities on the screen will be shown to the other person.
- 1. Open Skype and start a video or audio call with the person you want to share your screen with
- 2. While on the call, tap the + button on the screen and click the Share screens… option
- 3. A preview of your present screen will appear under which there will be two options, Cancel and Share Screen. Tap on the Share Screen option to continue
- 4. Now the person on the other side will be able to view all that is on the screen and all the functions you are going to perform on the screen including the programs you are going to open
Note:
The person will only be able to view the activities you perform but won’t be able to access your files in any way.
- 5. Once you are done, to stop sharing the screen tap again on the + button and click on the Stop sharing option
The screen sharing session will be ended and you will be able to continue on the voice or video call without sharing your screen.
A Live Recording for Screen Sharing on Skype
What if you want to record a video of your screen sharing on Skype with your fellow mate? Skype does not have such a feature and you will have to depend on other applications like Filmora, which is one of the best and widely used video editing applications in the market.
The screen recorder in Filmora allows you to record the screen of your desktop including the audio and save it on your computer.
Here we will be discussing how the screen record function works on Windows.
Note:
Start recording on Filmora before you start sharing the screen on Skype if you don’t want the other person to know that you are recording.
- 1. Download Filmora from here , then open it and click New Project to enter the editing mode
- 2. Click the Record button and from the options select the Record PC Screen

- 3. The built-in screen recorder will pop up
- 4. You can go to the recording settings by the Settings icon, and set the hotkeys for your recording. Or you can also enable the option by checking the Record the Camera Stream to record your webcam simultaneously and also adjust the frame rate.
- 5. Once you are done with the settings, Click the Red button to start the recording.
- 6. Now you can call your mate and start video sharing on Skype. The whole screen sharing process will be recorded by Filmora. After you finish the recording, the recorded file will show up in the media library automatically. You can right-click it, select Reveal in Explorer to target it on your Desktop folders.
Note:
The steps to record screen on Mac are similar to Windows.
To Sum up
The use of applications like Skype and Filmora has made working from home easier than ever before. Sharing screen, online meetings, seminars, demonstrations, etc. can easily be done sitting at home with the help of these apps. Please do let us know what you think about our suggestion and feel free to drop in your comments and opinions below.
Richard Bennett
Richard Bennett is a writer and a lover of all things video.
Follow @Richard Bennett
Richard Bennett
Mar 27, 2024• Proven solutions
Currently, many countries are under lockdown, due to the COVID 19. Work at home is a term we have been hearing now, a lot more than never before. But the easy availability of internet, advancement in technology and development of online applications like Skype have enabled a large number of people to be able to carry out their work from home.
Image source: TechRadar reviews
Apart from video calls, online meetings or group conversations, Skype also has a Share Screen feature which is very useful for all the people that work from home. The share screen on Skype allows you to share the screen of your PC as a live video while you operate, with any other person you are on call with. Imagine the benefits of this feature! An easy demonstration of work or work progress to your fellow mates who are far away, as if they were sitting just beside you. Skype has made working from home easier than ever, provided you have an internet connection.
Now let us see how your screen can be shared using Skype. You will learn:

How to Share Screen on Skype
Here we will learn how your PC screen can be shared as a live video with another person through Skype. Before sharing, please check your window once to makes sure that you don’t have anything that you wish to be shared with the other person.
Note:
Once sharing the screen is started all your activities on the screen will be shown to the other person.
- 1. Open Skype and start a video or audio call with the person you want to share your screen with
- 2. While on the call, tap the + button on the screen and click the Share screens… option
- 3. A preview of your present screen will appear under which there will be two options, Cancel and Share Screen. Tap on the Share Screen option to continue

- 4. Now the person on the other side will be able to view all that is on the screen and all the functions you are going to perform on the screen including the programs you are going to open
Note:
The person will only be able to view the activities you perform but won’t be able to access your files in any way.
- 5. Once you are done, to stop sharing the screen tap again on the + button and click on the Stop sharing option
The screen sharing session will be ended and you will be able to continue on the voice or video call without sharing your screen.
## A Live Recording for Screen Sharing on SkypeWhat if you want to record a video of your screen sharing on Skype with your fellow mate? Skype does not have such a feature and you will have to depend on other applications like Filmora, which is one of the best and widely used video editing applications in the market.
The screen recorder in Filmora allows you to record the screen of your desktop including the audio and save it on your computer.
Here we will be discussing how the screen record function works on Windows.
Note:
Start recording on Filmora before you start sharing the screen on Skype if you don’t want the other person to know that you are recording.
- 1. Download Filmora from here , then open it and click New Project to enter the editing mode
- 2. Click the Record button and from the options select the Record PC Screen
- 3. The built-in screen recorder will pop up
- 4. You can go to the recording settings by the Settings icon, and set the hotkeys for your recording. Or you can also enable the option by checking the Record the Camera Stream to record your webcam simultaneously and also adjust the frame rate.
- 5. Once you are done with the settings, Click the Red button to start the recording.
- 6. Now you can call your mate and start video sharing on Skype. The whole screen sharing process will be recorded by Filmora. After you finish the recording, the recorded file will show up in the media library automatically. You can right-click it, select Reveal in Explorer to target it on your Desktop folders.
Note:
The steps to record screen on Mac are similar to Windows.
To Sum up
The use of applications like Skype and Filmora has made working from home easier than ever before. Sharing screen, online meetings, seminars, demonstrations, etc. can easily be done sitting at home with the help of these apps. Please do let us know what you think about our suggestion and feel free to drop in your comments and opinions below.

Richard Bennett
Richard Bennett is a writer and a lover of all things video.
Follow @Richard Bennett
Richard Bennett
Mar 27, 2024• Proven solutions
Currently, many countries are under lockdown, due to the COVID 19. Work at home is a term we have been hearing now, a lot more than never before. But the easy availability of internet, advancement in technology and development of online applications like Skype have enabled a large number of people to be able to carry out their work from home.
Image source: TechRadar reviews
Apart from video calls, online meetings or group conversations, Skype also has a Share Screen feature which is very useful for all the people that work from home. The share screen on Skype allows you to share the screen of your PC as a live video while you operate, with any other person you are on call with. Imagine the benefits of this feature! An easy demonstration of work or work progress to your fellow mates who are far away, as if they were sitting just beside you. Skype has made working from home easier than ever, provided you have an internet connection.
Now let us see how your screen can be shared using Skype. You will learn:
How to Share Screen on Skype
Here we will learn how your PC screen can be shared as a live video with another person through Skype. Before sharing, please check your window once to makes sure that you don’t have anything that you wish to be shared with the other person.
Note:
Once sharing the screen is started all your activities on the screen will be shown to the other person.
- 1. Open Skype and start a video or audio call with the person you want to share your screen with
 PDF application, powered by AI-based OCR, for unified workflows with both digital and scanned documents.
- 2. While on the call, tap the + button on the screen and click the Share screens… option
- 3. A preview of your present screen will appear under which there will be two options, Cancel and Share Screen. Tap on the Share Screen option to continue
- 4. Now the person on the other side will be able to view all that is on the screen and all the functions you are going to perform on the screen including the programs you are going to open
Note:
The person will only be able to view the activities you perform but won’t be able to access your files in any way.
- 5. Once you are done, to stop sharing the screen tap again on the + button and click on the Stop sharing option
The screen sharing session will be ended and you will be able to continue on the voice or video call without sharing your screen.
A Live Recording for Screen Sharing on Skype
What if you want to record a video of your screen sharing on Skype with your fellow mate? Skype does not have such a feature and you will have to depend on other applications like Filmora, which is one of the best and widely used video editing applications in the market.
The screen recorder in Filmora allows you to record the screen of your desktop including the audio and save it on your computer.
Here we will be discussing how the screen record function works on Windows.
Note:
Start recording on Filmora before you start sharing the screen on Skype if you don’t want the other person to know that you are recording.
- 1. Download Filmora from here , then open it and click New Project to enter the editing mode
- 2. Click the Record button and from the options select the Record PC Screen
- 3. The built-in screen recorder will pop up
- 4. You can go to the recording settings by the Settings icon, and set the hotkeys for your recording. Or you can also enable the option by checking the Record the Camera Stream to record your webcam simultaneously and also adjust the frame rate.
- 5. Once you are done with the settings, Click the Red button to start the recording.
 dotConnect for Oracle is an ADO.NET data provider for Oracle with Entity Framework Support.
- 6. Now you can call your mate and start video sharing on Skype. The whole screen sharing process will be recorded by Filmora. After you finish the recording, the recorded file will show up in the media library automatically. You can right-click it, select Reveal in Explorer to target it on your Desktop folders.
Parental Control Software
Note:
The steps to record screen on Mac are similar to Windows.
To Sum up
The use of applications like Skype and Filmora has made working from home easier than ever before. Sharing screen, online meetings, seminars, demonstrations, etc. can easily be done sitting at home with the help of these apps. Please do let us know what you think about our suggestion and feel free to drop in your comments and opinions below.
Richard Bennett
Richard Bennett is a writer and a lover of all things video.
Follow @Richard Bennett
- Title: 2024 Approved How to Achieve Collaborative Efficiency Using Skype’s Screen-Share Feature
- Author: Princess Diana
- Created at : 2024-07-24 04:01:12
- Updated at : 2024-07-25 04:01:12
- Link: https://digital-screen-recording.techidaily.com/2024-approved-how-to-achieve-collaborative-efficiency-using-skypes-screen-share-feature/
- License: This work is licensed under CC BY-NC-SA 4.0.