
"Hands-Free Tricks Capturing GoToMeetings on the Fly for 2024"
Hands-Free Tricks: Capturing GoToMeetings on the Fly
GoToMeeting is a web conferencing software that enables users to hold online meetings for 250 people. Users may meet face to face, communicate with associates via in-meeting chatting or conference call, & share their presentations via screen sharing.
Meetings may be accessed via a PC, Mac, iOS, or Android device. All GoToMeeting sessions (also known as webinars) can be recorded. This article explains how to record a gotomeeting recording session in detail, including a step-by-step approach.
Part 1. How to Record in GoToMeeting with Built-in Recorder
Part 2. Use the Best GoToMeeting Recorder on PC
Part 3. Record GoToMeeting with an Online Recorder
Part 4. Record GoToMeeting on iPhone and Android
Part 1. How to Record in GoToMeeting with Built-in Recorder
Meetings can be recorded using the built-in gotomeeting recording option, but there are limits.
However, recording options must be set up before the commencement of the session. You can only record meetings using GoToMeeting’s meeting recorder if you have a premium account and admin authorization, making it a much less convenient option to record meetings.
Step 1. Just click over the “REC” icon at the top of the GoToMeeting screen once you have joined a meeting to record.
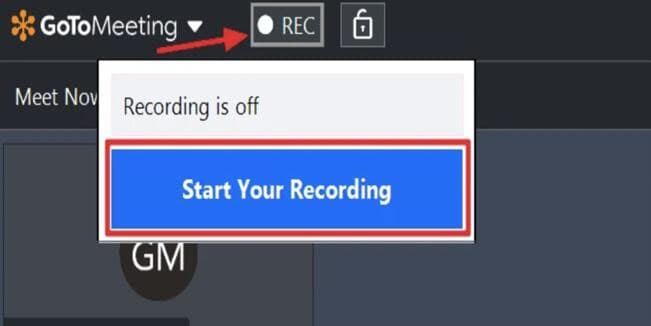
Step 2. While recording, click “Start Your Recording,” and the “REC” icon will become red. The recording of the meeting will be announced to all participants.
Step 3. Click over the “REC” icon and choose “Stop Your Recording” to stop the recording. If you’re making a local recording, the Recording Manager will open up and ask you to convert the video. However, if you’re doing a cloud recording, you’ll be sent to your online account to retrieve the footage. It takes some time for new recordings to appear in the cloud recording history.
Step 4. However, what if other participants, such as not account owners or organizers, wish to record live sessions? In this instance, you’ll need a video-recording program that works on both PCs and Macs.
Part 2. Use the Best GoToMeeting Recorder on PC
The built-in recorder for GoToMeeting has several restrictions that make many users look for a third-party application to record meetings. Work is cumbersome due to constraints. As a result, it is preferable to seek a substitute. A good screen recorder Filmora to record gotomeeting webinar may make your job a lot simpler and more productive.
Wondershare Filmora is a suitable alternative. It includes a lot of handy capabilities, such as video recording from the computer screen. It may assist you in recording a voiceover for videos, recording videos with the webcam, or recording anything on your computer screen. Your GoToMeeting activity may be converted into HD video in only a few clicks.
For Win 7 or later (64-bit)
For macOS 10.12 or later
Step 1: Launch Filmora:
After you’ve installed the program on your computer, just double-click on its desktop icon to access the Full Feature mode. After the program has been launched, go to the Record menu and pick the option to record the computer screen.

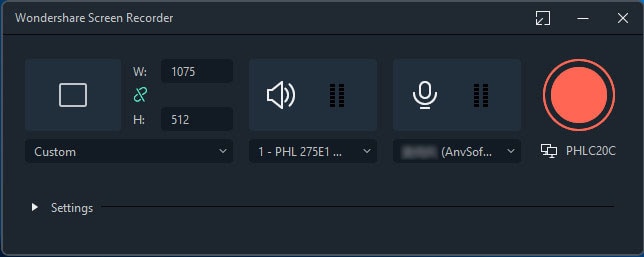
Step 2: Adjust your window:
The Wondershare Screen Recorder will appear on your screen, allowing you to make any necessary adjustments before your forthcoming screencasting session. It’s possible to record your screen in three ways: Full Screen, Custom, or Target Window.
Step 3: Custom your settings:
Following that, if you want audio recorded through a microphone or computer system, please choose the appropriate icons to switch them on or off as needed. Finally, hit Settings to see if there’s anything else you need to tweak before you start recording.
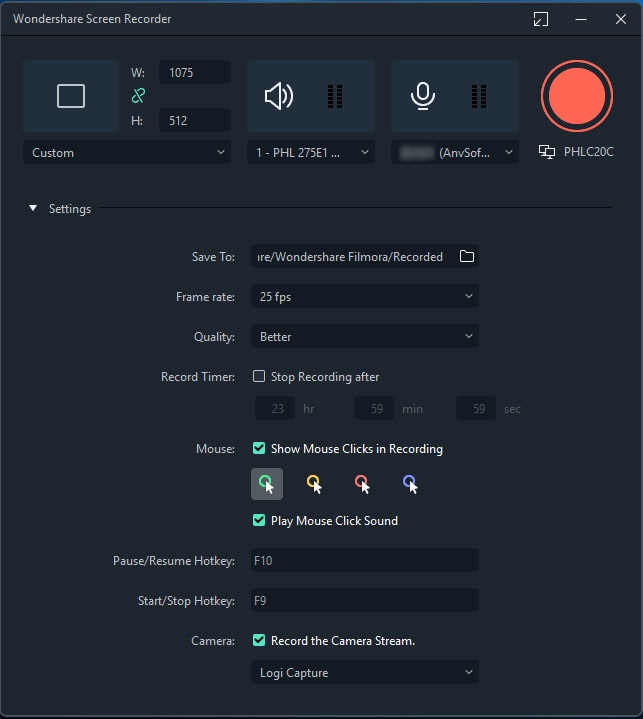
Video and audio may be recorded with the Screen Recorder. You may use the microphone or even the audio on your computer system to record sound or speech. If you choose, you may turn off the audio recording.
Step 4: Record your GoToMeeting seasons

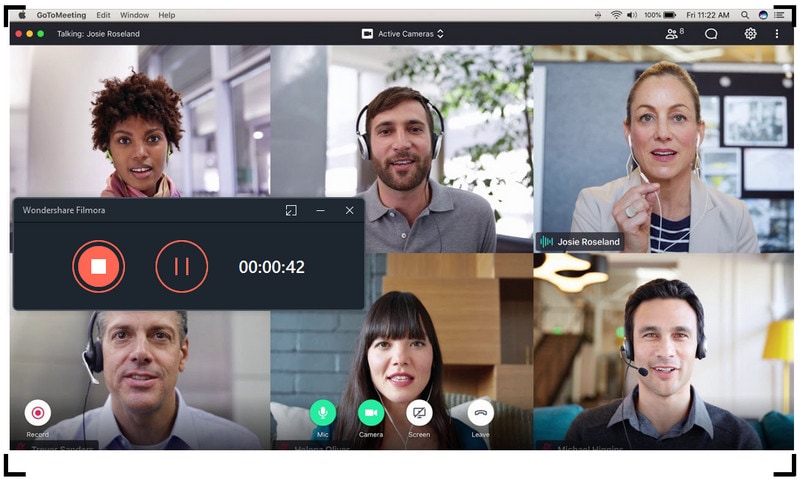
Please click the REC button once everything is ready, and the application will count down 3,2,1 and begin recording. To stop recording, hit F9 or go to Settings and configure your Start/Stop Hotkey. Finally, the video will be instantly uploaded to the media library.
Part 3. Record GoToMeeting with an Online Recorder
Meanwhile, Screen Capture is an online version of the program that enables you to use it straight on a website. You may quickly and conveniently record gotomeeting webinar on Mac and Windows. Furthermore, with a single click of a button, you may record any screen action. There is no limit to the number of recordings you can make or the length of time you may keep them.
It’s straightforward to use this program; follow the steps below to get started:
Step 1. Before your GoToMeeting starts, go to their website <www.screencapture.com>. After visiting the website, you will first see a welcome or home page.

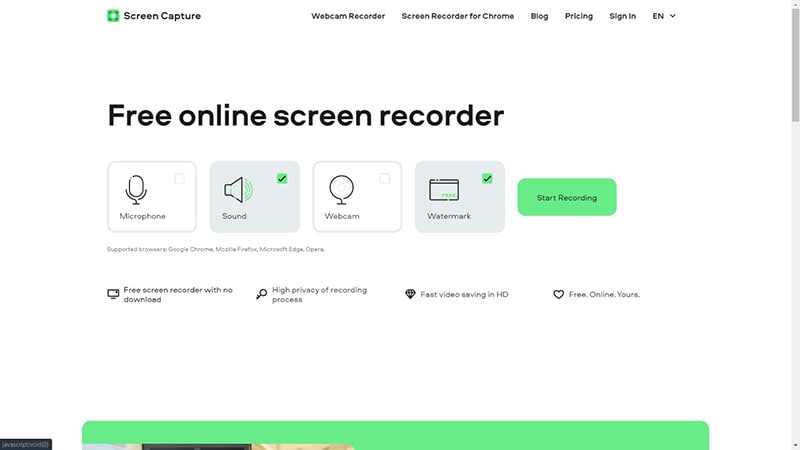
Step 2. After the window appears, you may customize the parameters such as hotkeys such as Microphone, Sound, Webcam, and Watermark. Select those as your requirement for screen activities and or webcam recording.
Step 3. To begin the program, click “Start Recording.” You have to choose what kind of screen you want to share, such as an Entire Screen, a window, or just. And you’ll need to select ‘Share system audio’ for audio input recording.
Step 4. Then just click the Start button to record the screen activities. Open Gotomeeting and set the recording area to fit the window. While the recording process, there will be a floating tab called ‘Stop sharing’ to stop the recording. You can also come to the website’s tab and click ‘Stop Recording.’
Step 5. The recorded file will be immediately played. The recorded file can be downloaded by clicking the ‘Download’ option. The file may then be downloaded to your device storage.
 The BootIt Collection covers multi-booting, partitioning, and disk imaging on traditional PC’s using the standard BIOS and newer PC’s using UEFI. The collection includes BootIt Bare Metal (BIBM) for standard BIOS systems and BootIt UEFI (BIU) for UEFI system.
Part 4. Record GoToMeeting on iPhone and Android
Now that we’ve covered how to do a gotomeeting recording on a PC, it’s time to talk about how to do it on an iOS or Android smartphone. There are different recording solutions available on the market when it comes to screen recorders for phones. DU Screen Recorder is one of them, and you may already be familiar with it. It’s a popular free screen recorder for smartphones since it allows users to record high-quality recordings for free. In addition, there are several video and picture editing options.
For Android:
You can record GoToMeeting meetings on Android by using the DU Screen Recorder application. To begin, go to the Google Play Store and download the DU Screen Recorder application from there.
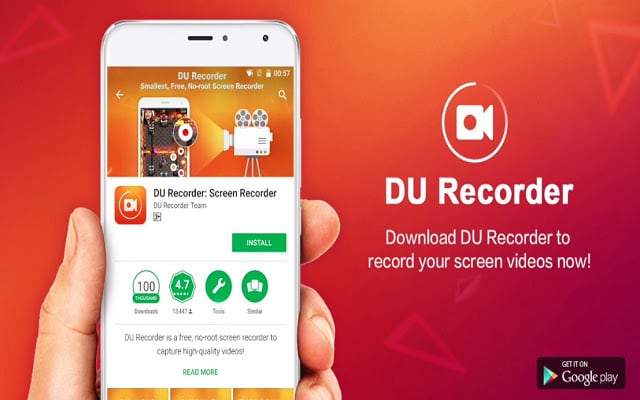
- DU Screen Recorder is available for download from Google Play or other sources for Android phones. On your Android device, open the app.
- There are settings for video quality and resolution for recording on Android devices, recording audio, showing touch, sharing recordings, and more.
- With DU Screen Recorder, click the left-hand “Record” button to record anything, including video tutorials, gaming, and other activities.
- You may use DU Screen Recorder’s trimming, cropping, blurring, stitching, and audio narration features to make your films even better.
For iOS:
To begin, go to the App Store and get DU Screen Recorder. Using DU Screen Recorder for iOS to record the screen on an iPhone is similar to using Apple’s own built-in screen recording feature.
- Firstly, on your iPhone/iPad, install DU Recorder. Then navigate to Control Center, Customize Controls, and then Settings. Add Screen Recording to your Control Center by finding it and clicking on it.
- Your Control Center should now be open. Hold the Record icon down for a long time. If necessary, activate your Microphone and choose the DU Recorder Live option. Begin taping.
- To stop recording, just hit the red bar above or the Record button in Control Center again. You may locate the recorded movie in your Photos folder when it has been appropriately captured.
Wrapping UP
When more activities, such as education, live entertainment, and conferencing, occur electronically, GoToMeeting becomes more popular. The option to record in GoToMeeting is essential for individuals who cannot attend due to a time difference, a tight schedule, or illness and who need to follow or share the meeting or webinar. Simply follow the easy instructions above to capture your gotomeeting recording on PC, iOS, or Android. You may begin by using a built-in utility and then go to different applications as your needs change.
Part 2. Use the Best GoToMeeting Recorder on PC
Part 3. Record GoToMeeting with an Online Recorder
Part 4. Record GoToMeeting on iPhone and Android
Part 1. How to Record in GoToMeeting with Built-in Recorder
Meetings can be recorded using the built-in gotomeeting recording option, but there are limits.
However, recording options must be set up before the commencement of the session. You can only record meetings using GoToMeeting’s meeting recorder if you have a premium account and admin authorization, making it a much less convenient option to record meetings.
Step 1. Just click over the “REC” icon at the top of the GoToMeeting screen once you have joined a meeting to record.
Step 2. While recording, click “Start Your Recording,” and the “REC” icon will become red. The recording of the meeting will be announced to all participants.
Step 3. Click over the “REC” icon and choose “Stop Your Recording” to stop the recording. If you’re making a local recording, the Recording Manager will open up and ask you to convert the video. However, if you’re doing a cloud recording, you’ll be sent to your online account to retrieve the footage. It takes some time for new recordings to appear in the cloud recording history.
Step 4. However, what if other participants, such as not account owners or organizers, wish to record live sessions? In this instance, you’ll need a video-recording program that works on both PCs and Macs.
Part 2. Use the Best GoToMeeting Recorder on PC
The built-in recorder for GoToMeeting has several restrictions that make many users look for a third-party application to record meetings. Work is cumbersome due to constraints. As a result, it is preferable to seek a substitute. A good screen recorder Filmora to record gotomeeting webinar may make your job a lot simpler and more productive.
Wondershare Filmora is a suitable alternative. It includes a lot of handy capabilities, such as video recording from the computer screen. It may assist you in recording a voiceover for videos, recording videos with the webcam, or recording anything on your computer screen. Your GoToMeeting activity may be converted into HD video in only a few clicks.
For Win 7 or later (64-bit)
For macOS 10.12 or later
Step 1: Launch Filmora:
After you’ve installed the program on your computer, just double-click on its desktop icon to access the Full Feature mode. After the program has been launched, go to the Record menu and pick the option to record the computer screen.
Step 2: Adjust your window:
The Wondershare Screen Recorder will appear on your screen, allowing you to make any necessary adjustments before your forthcoming screencasting session. It’s possible to record your screen in three ways: Full Screen, Custom, or Target Window.
Step 3: Custom your settings:
Following that, if you want audio recorded through a microphone or computer system, please choose the appropriate icons to switch them on or off as needed. Finally, hit Settings to see if there’s anything else you need to tweak before you start recording.

Video and audio may be recorded with the Screen Recorder. You may use the microphone or even the audio on your computer system to record sound or speech. If you choose, you may turn off the audio recording.
Step 4: Record your GoToMeeting seasons
Please click the REC button once everything is ready, and the application will count down 3,2,1 and begin recording. To stop recording, hit F9 or go to Settings and configure your Start/Stop Hotkey. Finally, the video will be instantly uploaded to the media library.
Part 3. Record GoToMeeting with an Online Recorder
Meanwhile, Screen Capture is an online version of the program that enables you to use it straight on a website. You may quickly and conveniently record gotomeeting webinar on Mac and Windows. Furthermore, with a single click of a button, you may record any screen action. There is no limit to the number of recordings you can make or the length of time you may keep them.
It’s straightforward to use this program; follow the steps below to get started:
Step 1. Before your GoToMeeting starts, go to their website <www.screencapture.com>. After visiting the website, you will first see a welcome or home page.
Step 2. After the window appears, you may customize the parameters such as hotkeys such as Microphone, Sound, Webcam, and Watermark. Select those as your requirement for screen activities and or webcam recording.
Step 3. To begin the program, click “Start Recording.” You have to choose what kind of screen you want to share, such as an Entire Screen, a window, or just. And you’ll need to select ‘Share system audio’ for audio input recording.
Step 4. Then just click the Start button to record the screen activities. Open Gotomeeting and set the recording area to fit the window. While the recording process, there will be a floating tab called ‘Stop sharing’ to stop the recording. You can also come to the website’s tab and click ‘Stop Recording.’
Step 5. The recorded file will be immediately played. The recorded file can be downloaded by clicking the ‘Download’ option. The file may then be downloaded to your device storage.
Part 4. Record GoToMeeting on iPhone and Android
Now that we’ve covered how to do a gotomeeting recording on a PC, it’s time to talk about how to do it on an iOS or Android smartphone. There are different recording solutions available on the market when it comes to screen recorders for phones. DU Screen Recorder is one of them, and you may already be familiar with it. It’s a popular free screen recorder for smartphones since it allows users to record high-quality recordings for free. In addition, there are several video and picture editing options.
For Android:
You can record GoToMeeting meetings on Android by using the DU Screen Recorder application. To begin, go to the Google Play Store and download the DU Screen Recorder application from there.
- DU Screen Recorder is available for download from Google Play or other sources for Android phones. On your Android device, open the app.
- There are settings for video quality and resolution for recording on Android devices, recording audio, showing touch, sharing recordings, and more.
- With DU Screen Recorder, click the left-hand “Record” button to record anything, including video tutorials, gaming, and other activities.
- You may use DU Screen Recorder’s trimming, cropping, blurring, stitching, and audio narration features to make your films even better.
For iOS:
To begin, go to the App Store and get DU Screen Recorder. Using DU Screen Recorder for iOS to record the screen on an iPhone is similar to using Apple’s own built-in screen recording feature.
- Firstly, on your iPhone/iPad, install DU Recorder. Then navigate to Control Center, Customize Controls, and then Settings. Add Screen Recording to your Control Center by finding it and clicking on it.
- Your Control Center should now be open. Hold the Record icon down for a long time. If necessary, activate your Microphone and choose the DU Recorder Live option. Begin taping.
- To stop recording, just hit the red bar above or the Record button in Control Center again. You may locate the recorded movie in your Photos folder when it has been appropriately captured.
Wrapping UP
When more activities, such as education, live entertainment, and conferencing, occur electronically, GoToMeeting becomes more popular. The option to record in GoToMeeting is essential for individuals who cannot attend due to a time difference, a tight schedule, or illness and who need to follow or share the meeting or webinar. Simply follow the easy instructions above to capture your gotomeeting recording on PC, iOS, or Android. You may begin by using a built-in utility and then go to different applications as your needs change.
Part 2. Use the Best GoToMeeting Recorder on PC
Part 3. Record GoToMeeting with an Online Recorder
Part 4. Record GoToMeeting on iPhone and Android
Part 1. How to Record in GoToMeeting with Built-in Recorder
Meetings can be recorded using the built-in gotomeeting recording option, but there are limits.
However, recording options must be set up before the commencement of the session. You can only record meetings using GoToMeeting’s meeting recorder if you have a premium account and admin authorization, making it a much less convenient option to record meetings.
Step 1. Just click over the “REC” icon at the top of the GoToMeeting screen once you have joined a meeting to record.
Step 2. While recording, click “Start Your Recording,” and the “REC” icon will become red. The recording of the meeting will be announced to all participants.
Step 3. Click over the “REC” icon and choose “Stop Your Recording” to stop the recording. If you’re making a local recording, the Recording Manager will open up and ask you to convert the video. However, if you’re doing a cloud recording, you’ll be sent to your online account to retrieve the footage. It takes some time for new recordings to appear in the cloud recording history.
Step 4. However, what if other participants, such as not account owners or organizers, wish to record live sessions? In this instance, you’ll need a video-recording program that works on both PCs and Macs.
Part 2. Use the Best GoToMeeting Recorder on PC
The built-in recorder for GoToMeeting has several restrictions that make many users look for a third-party application to record meetings. Work is cumbersome due to constraints. As a result, it is preferable to seek a substitute. A good screen recorder Filmora to record gotomeeting webinar may make your job a lot simpler and more productive.
Wondershare Filmora is a suitable alternative. It includes a lot of handy capabilities, such as video recording from the computer screen. It may assist you in recording a voiceover for videos, recording videos with the webcam, or recording anything on your computer screen. Your GoToMeeting activity may be converted into HD video in only a few clicks.
For Win 7 or later (64-bit)
For macOS 10.12 or later
Step 1: Launch Filmora:
After you’ve installed the program on your computer, just double-click on its desktop icon to access the Full Feature mode. After the program has been launched, go to the Record menu and pick the option to record the computer screen.
Step 2: Adjust your window:
The Wondershare Screen Recorder will appear on your screen, allowing you to make any necessary adjustments before your forthcoming screencasting session. It’s possible to record your screen in three ways: Full Screen, Custom, or Target Window.
Step 3: Custom your settings:
Following that, if you want audio recorded through a microphone or computer system, please choose the appropriate icons to switch them on or off as needed. Finally, hit Settings to see if there’s anything else you need to tweak before you start recording.

Video and audio may be recorded with the Screen Recorder. You may use the microphone or even the audio on your computer system to record sound or speech. If you choose, you may turn off the audio recording.
Step 4: Record your GoToMeeting seasons
Please click the REC button once everything is ready, and the application will count down 3,2,1 and begin recording. To stop recording, hit F9 or go to Settings and configure your Start/Stop Hotkey. Finally, the video will be instantly uploaded to the media library.
Part 3. Record GoToMeeting with an Online Recorder
Meanwhile, Screen Capture is an online version of the program that enables you to use it straight on a website. You may quickly and conveniently record gotomeeting webinar on Mac and Windows. Furthermore, with a single click of a button, you may record any screen action. There is no limit to the number of recordings you can make or the length of time you may keep them.
It’s straightforward to use this program; follow the steps below to get started:
Step 1. Before your GoToMeeting starts, go to their website <www.screencapture.com>. After visiting the website, you will first see a welcome or home page.
Step 2. After the window appears, you may customize the parameters such as hotkeys such as Microphone, Sound, Webcam, and Watermark. Select those as your requirement for screen activities and or webcam recording.
Step 3. To begin the program, click “Start Recording.” You have to choose what kind of screen you want to share, such as an Entire Screen, a window, or just. And you’ll need to select ‘Share system audio’ for audio input recording.
Step 4. Then just click the Start button to record the screen activities. Open Gotomeeting and set the recording area to fit the window. While the recording process, there will be a floating tab called ‘Stop sharing’ to stop the recording. You can also come to the website’s tab and click ‘Stop Recording.’
Step 5. The recorded file will be immediately played. The recorded file can be downloaded by clicking the ‘Download’ option. The file may then be downloaded to your device storage.

Part 4. Record GoToMeeting on iPhone and Android
Now that we’ve covered how to do a gotomeeting recording on a PC, it’s time to talk about how to do it on an iOS or Android smartphone. There are different recording solutions available on the market when it comes to screen recorders for phones. DU Screen Recorder is one of them, and you may already be familiar with it. It’s a popular free screen recorder for smartphones since it allows users to record high-quality recordings for free. In addition, there are several video and picture editing options.
For Android:
You can record GoToMeeting meetings on Android by using the DU Screen Recorder application. To begin, go to the Google Play Store and download the DU Screen Recorder application from there.
- DU Screen Recorder is available for download from Google Play or other sources for Android phones. On your Android device, open the app.
- There are settings for video quality and resolution for recording on Android devices, recording audio, showing touch, sharing recordings, and more.
- With DU Screen Recorder, click the left-hand “Record” button to record anything, including video tutorials, gaming, and other activities.
- You may use DU Screen Recorder’s trimming, cropping, blurring, stitching, and audio narration features to make your films even better.
For iOS:
To begin, go to the App Store and get DU Screen Recorder. Using DU Screen Recorder for iOS to record the screen on an iPhone is similar to using Apple’s own built-in screen recording feature.
- Firstly, on your iPhone/iPad, install DU Recorder. Then navigate to Control Center, Customize Controls, and then Settings. Add Screen Recording to your Control Center by finding it and clicking on it.
- Your Control Center should now be open. Hold the Record icon down for a long time. If necessary, activate your Microphone and choose the DU Recorder Live option. Begin taping.
- To stop recording, just hit the red bar above or the Record button in Control Center again. You may locate the recorded movie in your Photos folder when it has been appropriately captured.
When more activities, such as education, live entertainment, and conferencing, occur electronically, GoToMeeting becomes more popular. The option to record in GoToMeeting is essential for individuals who cannot attend due to a time difference, a tight schedule, or illness and who need to follow or share the meeting or webinar. Simply follow the easy instructions above to capture your gotomeeting recording on PC, iOS, or Android. You may begin by using a built-in utility and then go to different applications as your needs change.
Part 2. Use the Best GoToMeeting Recorder on PC
Part 3. Record GoToMeeting with an Online Recorder
Part 4. Record GoToMeeting on iPhone and Android
Part 1. How to Record in GoToMeeting with Built-in Recorder
Meetings can be recorded using the built-in gotomeeting recording option, but there are limits.
However, recording options must be set up before the commencement of the session. You can only record meetings using GoToMeeting’s meeting recorder if you have a premium account and admin authorization, making it a much less convenient option to record meetings.
Step 1. Just click over the “REC” icon at the top of the GoToMeeting screen once you have joined a meeting to record.
Step 2. While recording, click “Start Your Recording,” and the “REC” icon will become red. The recording of the meeting will be announced to all participants.
Step 3. Click over the “REC” icon and choose “Stop Your Recording” to stop the recording. If you’re making a local recording, the Recording Manager will open up and ask you to convert the video. However, if you’re doing a cloud recording, you’ll be sent to your online account to retrieve the footage. It takes some time for new recordings to appear in the cloud recording history.
Step 4. However, what if other participants, such as not account owners or organizers, wish to record live sessions? In this instance, you’ll need a video-recording program that works on both PCs and Macs.
 With Screensaver Wonder you can easily make a screensaver from your own pictures and video files. Create screensavers for your own computer or create standalone, self-installing screensavers for easy sharing with your friends. Together with its sister product Screensaver Factory, Screensaver Wonder is one of the most popular screensaver software products in the world, helping thousands of users decorate their computer screens quickly and easily.
Part 2. Use the Best GoToMeeting Recorder on PC
The built-in recorder for GoToMeeting has several restrictions that make many users look for a third-party application to record meetings. Work is cumbersome due to constraints. As a result, it is preferable to seek a substitute. A good screen recorder Filmora to record gotomeeting webinar may make your job a lot simpler and more productive.
Wondershare Filmora is a suitable alternative. It includes a lot of handy capabilities, such as video recording from the computer screen. It may assist you in recording a voiceover for videos, recording videos with the webcam, or recording anything on your computer screen. Your GoToMeeting activity may be converted into HD video in only a few clicks.
For Win 7 or later (64-bit)
For macOS 10.12 or later
Step 1: Launch Filmora:
After you’ve installed the program on your computer, just double-click on its desktop icon to access the Full Feature mode. After the program has been launched, go to the Record menu and pick the option to record the computer screen.

Step 2: Adjust your window:
The Wondershare Screen Recorder will appear on your screen, allowing you to make any necessary adjustments before your forthcoming screencasting session. It’s possible to record your screen in three ways: Full Screen, Custom, or Target Window.
Step 3: Custom your settings:
Following that, if you want audio recorded through a microphone or computer system, please choose the appropriate icons to switch them on or off as needed. Finally, hit Settings to see if there’s anything else you need to tweak before you start recording.
Video and audio may be recorded with the Screen Recorder. You may use the microphone or even the audio on your computer system to record sound or speech. If you choose, you may turn off the audio recording.
Step 4: Record your GoToMeeting seasons
Please click the REC button once everything is ready, and the application will count down 3,2,1 and begin recording. To stop recording, hit F9 or go to Settings and configure your Start/Stop Hotkey. Finally, the video will be instantly uploaded to the media library.

Part 3. Record GoToMeeting with an Online Recorder
Meanwhile, Screen Capture is an online version of the program that enables you to use it straight on a website. You may quickly and conveniently record gotomeeting webinar on Mac and Windows. Furthermore, with a single click of a button, you may record any screen action. There is no limit to the number of recordings you can make or the length of time you may keep them.
It’s straightforward to use this program; follow the steps below to get started:
Step 1. Before your GoToMeeting starts, go to their website <www.screencapture.com>. After visiting the website, you will first see a welcome or home page.
Step 2. After the window appears, you may customize the parameters such as hotkeys such as Microphone, Sound, Webcam, and Watermark. Select those as your requirement for screen activities and or webcam recording.
Step 3. To begin the program, click “Start Recording.” You have to choose what kind of screen you want to share, such as an Entire Screen, a window, or just. And you’ll need to select ‘Share system audio’ for audio input recording.
Step 4. Then just click the Start button to record the screen activities. Open Gotomeeting and set the recording area to fit the window. While the recording process, there will be a floating tab called ‘Stop sharing’ to stop the recording. You can also come to the website’s tab and click ‘Stop Recording.’
Step 5. The recorded file will be immediately played. The recorded file can be downloaded by clicking the ‘Download’ option. The file may then be downloaded to your device storage.
Part 4. Record GoToMeeting on iPhone and Android
Now that we’ve covered how to do a gotomeeting recording on a PC, it’s time to talk about how to do it on an iOS or Android smartphone. There are different recording solutions available on the market when it comes to screen recorders for phones. DU Screen Recorder is one of them, and you may already be familiar with it. It’s a popular free screen recorder for smartphones since it allows users to record high-quality recordings for free. In addition, there are several video and picture editing options.
For Android:
You can record GoToMeeting meetings on Android by using the DU Screen Recorder application. To begin, go to the Google Play Store and download the DU Screen Recorder application from there.
- DU Screen Recorder is available for download from Google Play or other sources for Android phones. On your Android device, open the app.
- There are settings for video quality and resolution for recording on Android devices, recording audio, showing touch, sharing recordings, and more.
- With DU Screen Recorder, click the left-hand “Record” button to record anything, including video tutorials, gaming, and other activities.
- You may use DU Screen Recorder’s trimming, cropping, blurring, stitching, and audio narration features to make your films even better.
For iOS:
To begin, go to the App Store and get DU Screen Recorder. Using DU Screen Recorder for iOS to record the screen on an iPhone is similar to using Apple’s own built-in screen recording feature.
- Firstly, on your iPhone/iPad, install DU Recorder. Then navigate to Control Center, Customize Controls, and then Settings. Add Screen Recording to your Control Center by finding it and clicking on it.
- Your Control Center should now be open. Hold the Record icon down for a long time. If necessary, activate your Microphone and choose the DU Recorder Live option. Begin taping.
- To stop recording, just hit the red bar above or the Record button in Control Center again. You may locate the recorded movie in your Photos folder when it has been appropriately captured.
Wrapping UP
When more activities, such as education, live entertainment, and conferencing, occur electronically, GoToMeeting becomes more popular. The option to record in GoToMeeting is essential for individuals who cannot attend due to a time difference, a tight schedule, or illness and who need to follow or share the meeting or webinar. Simply follow the easy instructions above to capture your gotomeeting recording on PC, iOS, or Android. You may begin by using a built-in utility and then go to different applications as your needs change.
- Title: Hands-Free Tricks Capturing GoToMeetings on the Fly for 2024
- Author: Princess Diana
- Created at : 2024-07-24 04:25:37
- Updated at : 2024-07-25 04:25:37
- Link: https://digital-screen-recording.techidaily.com/hands-free-tricks-capturing-gotomeetings-on-the-fly-for-2024/
- License: This work is licensed under CC BY-NC-SA 4.0.