![[New] 2024 Approved Ultimate Mac Guide to Saving Roblox Adventures](https://thmb.techidaily.com/271cc892260da7f0b1d8f207b3fb271cd7c70ce8ff0fa954ebc9cead95a6f721.jpg)
"[New] 2024 Approved Ultimate Mac Guide to Saving Roblox Adventures"
Ultimate Mac Guide to Saving Roblox Adventures
Roblox is an innovative gaming platform that not only allows you to play games but also create games and let others play them. In today’s world, the gaming community is on cloud nine with the exceptional popularity of gamers who upload their gameplay online. Following the same trend, you could also record and upload your Roblox gameplay online and get fame as well as money.
The first step is to record Roblox on Mac, if you are a Mac user. You can record and upload only the key moments in your gameplay in the form of short videos. When you have enough followers, you can upload your entire gameplay along with webcam video to show your reactions as well as add your live commentary. In this article, we will illustrate all the possible ways on how to record Roblox gameplay on Mac.
Way 1. Use Filmora Recorder
Wondershare Filmora is the best Roblox screen recorder for Mac. It is a professional video recorder cum video editor. Since it is a premium software, it offers all the different options you need for recording and editing your gameplay on Roblox like the popular gamers. You can record screen gameplay along with your webcam video and capture system as well as mic audio.
Coming to the editing part, you can make your gameplay interesting with custom animations and effects as well as adding different graphical elements and audio effects. Besides, you can trim your video as per requirements. Thereafter, you can export your gameplay video in different file formats. Here are the steps to record Roblox on MacBook with Filmora.
For Win 7 or later (64-bit)
For macOS 10.12 or later
Step 1: Download and install Wondershare Filmora for Mac. Launch Filmora and click on PC Screen option.

Step 2: Choose the recording screen area which is generally full screen when you are playing a game on Roblox. If you are using Roblox in windowed mode, you have to set the recording screen accordingly.
Select the system audio properly. If you want to add your voice and live commentary, select external the mic audio source. If you want to capture your webcam video in PiP mode, enable “Record Camera Stream” option.

Step 3: Once you are ready with Roblox, click on Record button to start recording. When your gameplay is over, press F9 key to stop recording. You can edit and export in the desired file format.

Way 2. Roblox Built-in Recorder
If you do not want to install any third-party application on your Mac, you can use Roblox built-in screen recorder. However, the recorder is not a great one and users have reported performance degradation while recording on Roblox. Hence, user Roblox users opt for an alternative. If you are going to record your gameplay only once or very rarely, Roblox built-in recorder will serve the purpose perfectly. Here are the steps to follow.
Step 1: Launch Roblox and start the game that you want to play and record.
Step 2: Press Esc key and go to Record tab at the top of the screen.
Step 3: Under Record tab, click on Record Video button to start recording.

You will see a thin red border around the screen that indicates that the recording is going on.
Step 4: To stop recording, press Esc and go to Record tab. Click on Stop Recording button.

Way 3. Use OBS Studio
OBS Studio is a completely free software that is available for all desktop operating systems. Most gamers use OBS Studio for live streaming their gameplay on online platforms. You can capture your Roblox gameplay with OBS Studio as well. Not just your gameplay, you can capture webcam video and audio from an external mic. You can also switch between multiple scenes to make the video more interesting. Here are the steps to record Roblox on MacBook using OBS Studio.
Step 1: Download and install OBS Studio for Mac. Launch the software after installation.
Step 2: Under Sources tab and click on “+” icon. Select Display Capture option.
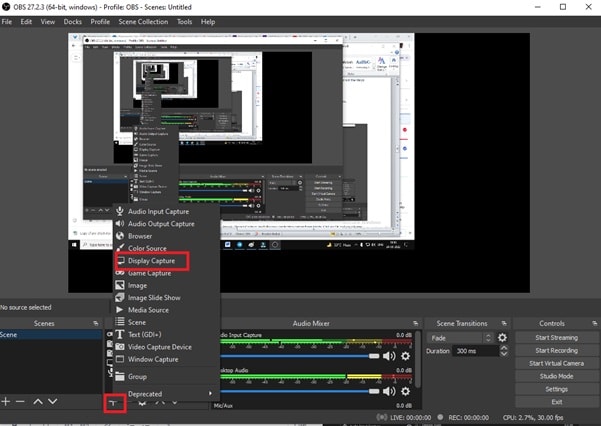
Step 3: You have to enter a name for Roblox gameplay capture session and click on Ok button.

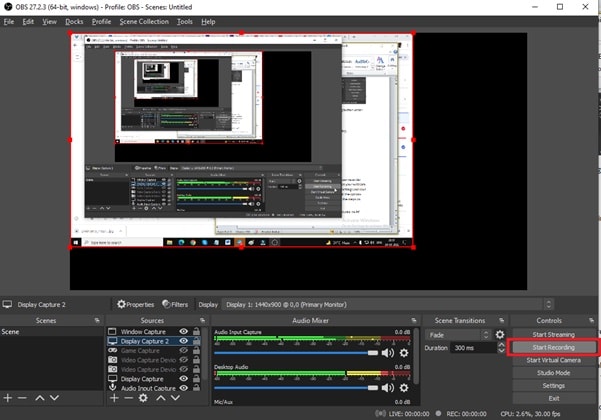
Step 4: Click on Start Recording button under Controls tab and switch to Roblox game and start playing. OBS will keep recording in the background.
Step 5: To stop recording, go back to OBS Studio. Click on Stop Recording under Controls.
Way 4. Use QuickTime Player
MacBook comes with QuickTime Player pre-installed and it is the default media player for Mac users. Not many mac users are aware of the fact that they can use QuickTime Player to record their screen activities easily. When you use QuickTime Player to record Roblox gameplay, you do not need to install any Roblox screen recorder for Mac. Here are the steps to record Roblox gameplay with QuickTime Player.
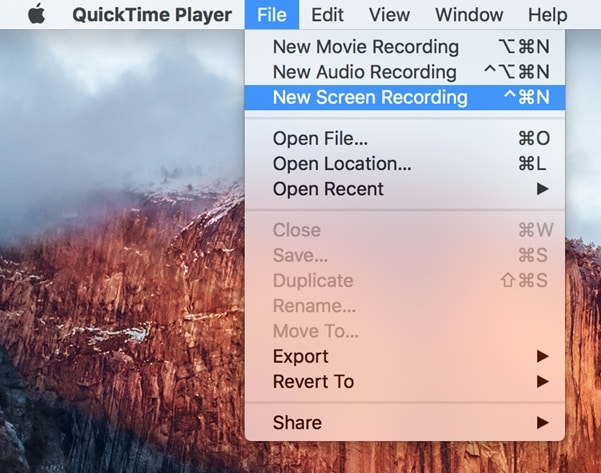
Step 1: From Applications folder, open QuickTime Player. Go to File> New Screen Recording option.
Step 2: Start your Roblox game and click on the Record button instantly from QuickTime widget.

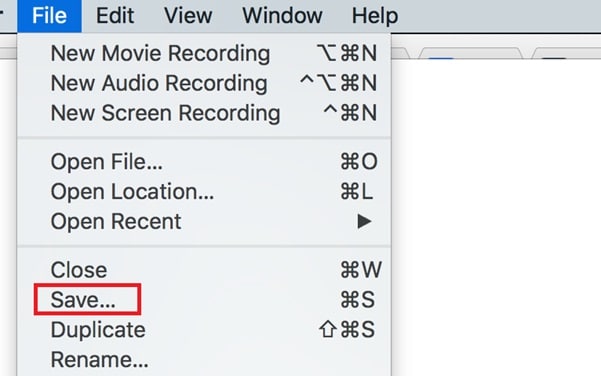
Step 3: When the game gets over, click on Stop button. Go to File> Save option to save the recorded gameplay.
Way 5. Use VLC Screen Recorder
There are many Mac users who prefer VLC Media Player over QuickTime Player for playing any media file. This is because VLC Media Player supports more file formats and you can boost the volume more than usual. However, you can also use VLC Media Player like QuickTime to record Roblox on MacBook. Here are the steps to follow.
Step 1: Open VLC Media Player. Go to Media > Convert/Save option.

Step 2: Click on Capture Device tab. Make Capture Mode to Desktop.

Step 3: Go to Destination section, click on Browser button. Select the destination folder and file name.

Step 4: To start recording, click on Start button. The screen will show controls to stop recording.
Conclusion
We have how to record Roblox gameplay on Mac in all the possible ways. You can use Roblox built-in recorder though it is not that great. If you do not want to install any third-party Roblox screen recorder for Mac, you can use QuickTime. OBS Studio is a great Roblox gameplay recorder with different customizable options. But the best screen recorder for Roblox is Wondershare Filmora where you can also edit your recorded gameplay like a pro.
For macOS 10.12 or later
Step 1: Download and install Wondershare Filmora for Mac. Launch Filmora and click on PC Screen option.
Step 2: Choose the recording screen area which is generally full screen when you are playing a game on Roblox. If you are using Roblox in windowed mode, you have to set the recording screen accordingly.
Select the system audio properly. If you want to add your voice and live commentary, select external the mic audio source. If you want to capture your webcam video in PiP mode, enable “Record Camera Stream” option.
Step 3: Once you are ready with Roblox, click on Record button to start recording. When your gameplay is over, press F9 key to stop recording. You can edit and export in the desired file format.
Way 2. Roblox Built-in Recorder
If you do not want to install any third-party application on your Mac, you can use Roblox built-in screen recorder. However, the recorder is not a great one and users have reported performance degradation while recording on Roblox. Hence, user Roblox users opt for an alternative. If you are going to record your gameplay only once or very rarely, Roblox built-in recorder will serve the purpose perfectly. Here are the steps to follow.
Step 1: Launch Roblox and start the game that you want to play and record.
Step 2: Press Esc key and go to Record tab at the top of the screen.
Step 3: Under Record tab, click on Record Video button to start recording.
You will see a thin red border around the screen that indicates that the recording is going on.
Step 4: To stop recording, press Esc and go to Record tab. Click on Stop Recording button.
Way 3. Use OBS Studio
OBS Studio is a completely free software that is available for all desktop operating systems. Most gamers use OBS Studio for live streaming their gameplay on online platforms. You can capture your Roblox gameplay with OBS Studio as well. Not just your gameplay, you can capture webcam video and audio from an external mic. You can also switch between multiple scenes to make the video more interesting. Here are the steps to record Roblox on MacBook using OBS Studio.
Step 1: Download and install OBS Studio for Mac. Launch the software after installation.
Step 2: Under Sources tab and click on “+” icon. Select Display Capture option.
Step 3: You have to enter a name for Roblox gameplay capture session and click on Ok button.
Step 4: Click on Start Recording button under Controls tab and switch to Roblox game and start playing. OBS will keep recording in the background.
Step 5: To stop recording, go back to OBS Studio. Click on Stop Recording under Controls.
Way 4. Use QuickTime Player
MacBook comes with QuickTime Player pre-installed and it is the default media player for Mac users. Not many mac users are aware of the fact that they can use QuickTime Player to record their screen activities easily. When you use QuickTime Player to record Roblox gameplay, you do not need to install any Roblox screen recorder for Mac. Here are the steps to record Roblox gameplay with QuickTime Player.
Step 1: From Applications folder, open QuickTime Player. Go to File> New Screen Recording option.
Step 2: Start your Roblox game and click on the Record button instantly from QuickTime widget.
Step 3: When the game gets over, click on Stop button. Go to File> Save option to save the recorded gameplay.
Way 5. Use VLC Screen Recorder
There are many Mac users who prefer VLC Media Player over QuickTime Player for playing any media file. This is because VLC Media Player supports more file formats and you can boost the volume more than usual. However, you can also use VLC Media Player like QuickTime to record Roblox on MacBook. Here are the steps to follow.
Step 1: Open VLC Media Player. Go to Media > Convert/Save option.
Step 2: Click on Capture Device tab. Make Capture Mode to Desktop.
Step 3: Go to Destination section, click on Browser button. Select the destination folder and file name.
Step 4: To start recording, click on Start button. The screen will show controls to stop recording.
Conclusion
We have how to record Roblox gameplay on Mac in all the possible ways. You can use Roblox built-in recorder though it is not that great. If you do not want to install any third-party Roblox screen recorder for Mac, you can use QuickTime. OBS Studio is a great Roblox gameplay recorder with different customizable options. But the best screen recorder for Roblox is Wondershare Filmora where you can also edit your recorded gameplay like a pro.
Also read:
- [New] Best Practices for Windows 8 Screenshots and Recordings for 2024
- [New] X-Recorder for PC Free Recording Software for 2024
- [Updated] 2024 Approved 21+ Novel Collage Formulas Amplify Your Mood
- [Updated] Innovative Approaches to PowerPoint Video Capture for 2024
- [Updated] No-Cost Game Recorders The Essential Selection List for 2024
- [Updated] Screen Capture Clarified A Fraps Breakdown for 2024
- 2024 Approved Crafting Cinematic Content with Video Enhance V2.2
- Enhance Your Livestreams Using ManyCam: Professional Virtual Camcorder and Webstreaming Tools
- Evaluating Professional Filmmaking Tools Filmora & Democreator
- How to Install VP9, VP10 & AV1 Video Codecs on Your Windows 10 Machine – A Complete Guide
- How to Transfer Data from Infinix Zero 30 5G to Any iOS Devices | Dr.fone
- In 2024, Unrivaled Recording Experience From Leading Apps
- Present-Day Drones and Their Upcoming Role Evolution
- Title: [New] 2024 Approved Ultimate Mac Guide to Saving Roblox Adventures
- Author: Princess Diana
- Created at : 2024-12-12 20:12:22
- Updated at : 2024-12-15 22:03:22
- Link: https://digital-screen-recording.techidaily.com/new-2024-approved-ultimate-mac-guide-to-saving-roblox-adventures/
- License: This work is licensed under CC BY-NC-SA 4.0.