![[New] In 2024, VisionCapture X High-Quality Edition](https://thmb.techidaily.com/c097990fd37784ce6293a6224fb832fd4d9a7841c40f79ad9e48ab602a74cd56.jpg)
"[New] In 2024, VisionCapture X High-Quality Edition"
VisionCapture X High-Quality Edition
Movavi is a handy PC game recording software that empowers you to record different interactive experiences. It upholds goals up to 4K, and you can make a top-notch game recording. Need screen catch software you can depend on? Use Movavi screen recorder 11 for Windows! Utilize this video catcher to make great video guides and get online occasions, motion pictures, or some other film from your PC screen. Regardless you need to record: a screencast for a video instructional exercise, online video, Flash activity from a site, or a video visit with your loved ones, Screen Recorder will assist you with recording it as an excellent video at a speed of up to 60 edges each second.
Movavi Screen Recorder Studio 10 is a definitive screencasting software - it empowers you to record all that occurs on your screen, change accounts utilizing the strong video proofreader, save documents in any organization, send out them to your cell phone, or transfer them on the web - this in one program! Other than that, this game catch software gives a great deal of video altering highlights so you can alter the recorded game video, for instance, convert a video into GIF; trim, cut, and join recordings; add enlivened titles and enhancements, and considerably more. As usual, Movavi screen recorder 11 software is exceptionally easy to utilize. Making an expert looking screencast with Movavi Screen Recorder Studio makes four simple strides: set the catching boundaries, get the screen video, alter it if fundamental, and save the outcomes in the proper configuration.
Part 1. Key Features of Movavi Recorder
Part 2. How to Use Movavi Screen Recorder 11
Part 3. Pros and Cons
Part 4. Best Alternative to Movavi Screen Recorder
 SwifDoo PDF 2-Year Plan
Part 1. Key Features of Movavi Recorder
Many streaming TV and film stages don’t permit you to record or screen capture the recording you’re watching. To record what you’re looking for disconnected use, you’ll need to check whether the streaming stage permits this or on the other hand assuming that they support outsider software. Movavi Screen Recorder is to be sure one of the most helpful, convenient apparatuses that give you screen recording and progressed altering, all at a similar spot. The best part is, it gives extraordinary command over video projects.
Customized Screen Recording: With Movavi Screen Recorder, screen recording resembles a piece of cake, in any event, for beginner clients. While recording, you can without much of a stretch deal with the onscreen connection point and respite, stop, and begin utilizing hotkeys or console easy routes. It doesn’t catch any undesirable cursor development It’s a single tick, do-it. Regardless of whether you need to record the whole screen, or a particular program, or even only a piece of your work area, you have the freedom to do it tall.
Webcam and Audio Recording: Pick any position, goal, size and casing rate, and you can undoubtedly involve the webcam video as a piece of the recording. New tones, new text styles, new boards - all that you want from a high-level screen recorder. With regards to screen recording, there are plenty of elements that become an integral factor. So regardless of whether it’s a Skype assemble or a video gathering conference, you can catch every one of the occasions.
Altering the Recordings: We have investigated a lot of screen recorders previously, however for this one, we should say, the altering apparatuses are superior. Movavi Screen Recorder software comes in with an assortment of sound and video improvement devices. Channels, impacts, titles, inscriptions, advances, video adjustment, and slow movement: everything a video decent altering apparatus must-have. Truly, Movavi Screen Recorder can make life surprisingly difficult for any video altering program.
Frame Rate: With Movavi Screen Recorder, you can record recordings with a casing pace of 5 to 60 casings/second. The higher the casing rate, the better the video quality. Changing the recurrence is simple as well. It additionally gives you the freedom to get individual sound streams if you need to record both the inner sound and framework sound.
Scheduler Feature: This is one of the most amazing screen recording highlights that we can’t get enough of. Set your clock, and your screen recorder will naturally record your screen when you’re away from your work area. That is not it! You can set the recording term, and your PC will naturally go to close down or rest once the catching is finished.

Part 2. How to Use Movavi Screen Recorder 11
Movavi Screen Recorder lets you rapidly and effectively record sound and video. You can do this all the while or independently rely upon your necessities. At the snap of a button, you can begin recording your receiver, webcam, and framework sounds.
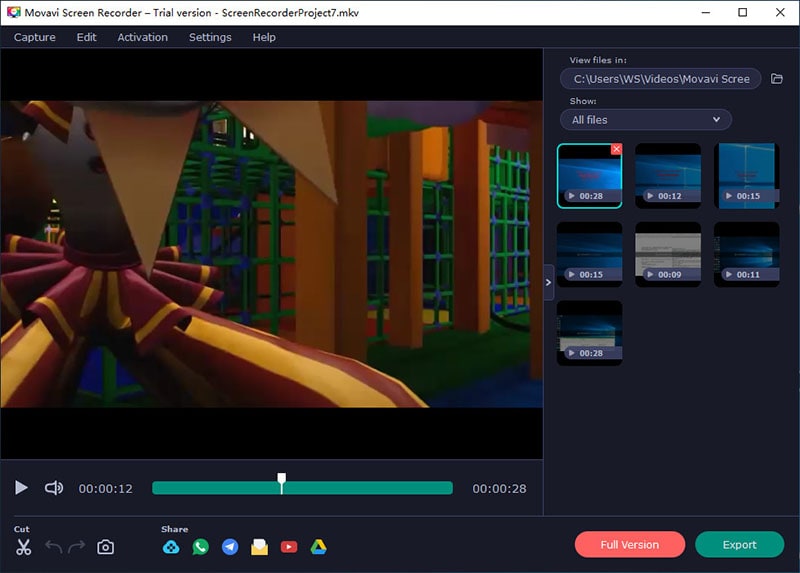
Step 1. Install and Launch Movavi Recorder 11
At the point when you take a screen recording, you’ll initially have to change the size of your screen. Essentially press the space button assuming that you need full screen.
Step 2: Customize Screen Recording
Movavi Screen Recorder allows you to plan the recording from the specific second you need, and decide the time the recording will endure, and even what your PC ought to do when it gets done with recording, like rest or shut down. an extremely helpful device for Gamers and for making instructional exercises. You can even pick which corner of the screen you need the webcam picture to show up in.
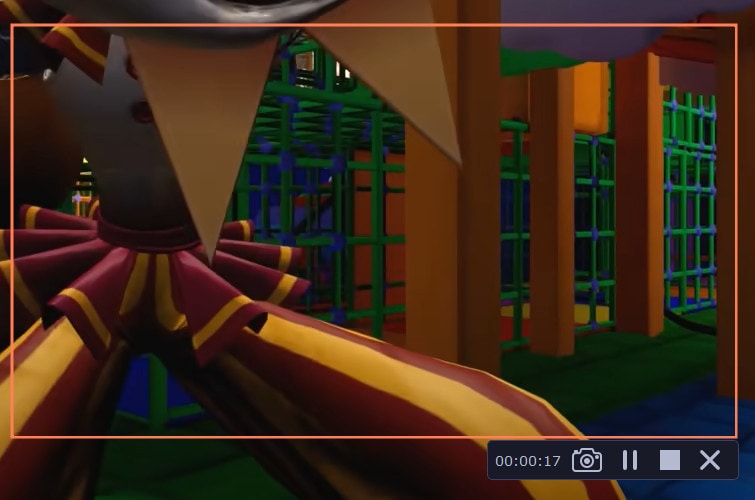
Step 3. Start and Stop the Recording
Lastly, press the red circle when you’re prepared to record. You likewise have the choice to record sound and turn on your webcam. After recording, you have new choices. This incorporates stopping and halting your recording. When the screen is recorded, Movavi Screen Recorder allows you to browse a few videos output formats, including AVI, JPEG, MP4, MKV, and even Gif. Among the arrangement choices, you can decide to utilize your video card to accelerate the change of recordings to your beloved organization.
Part 3. Pros and Cons
Movavi Screen Recorder brings a complete and shortsighted UI that is not difficult to follow and adaptable, permitting you to add devices to a unique bar for speedy access. Moreover, the product permits you to tweak your accounts, pick either unique sound and video yields, change catch screen size, just as setting up key ties.
Pros:
- Current UI and more straightforward route
- Records video and sound at the same time
- Catch screencasts, online video, webcam, video talks
- Record smooth video at up to 60 fps
- Set recording boundaries: change speed, change catch region
- Catch console and mouse activities
- Accompany numerous altering apparatuses
- Support screen resolution goal up to 4K
Cons:
- Somewhat costly in terms of feature availability
- Restricted elements in the free preliminary adaptation
- Buy the program to eliminate the watermark and access more elements

WPS Office Premium ( File Recovery, Photo Scanning, Convert PDF)–Yearly
Part 4. The Best Alternative to Movavi Screen Recorder
Since an ever-increasing number of individuals are getting acclimated with the web-based climate, deciding to work or study from home, the interest for screen recorder software that helps them with their undertakings has additionally expanded. This is the place where Filmora Screen Recorder becomes possibly the most important factor. The Filmora screen catch apparatus accompanies various settings that let you change your sound and video quality and add impacts to your accounts. You can likewise choose your edge rate, and empower various sorts of equipment speed increase that will make your recording as smooth as could be expected. Pick where you save your accounts and screen captures, and browse one of the PNG, BMP, JPG default screen capture designs.
How to Record Video with Filmora
To know how to use this powerful Movavi screen recorder 11 alternatives here’s the detailed step-by-step guide for you to begin with:
For Win 7 or later (64-bit)
For macOS 10.12 or later
Step 1: Download, Install and Launch Filmora Toolkit
To kickstart your recording journey with the Filmora, firstly, you need to visit the official website and download the latest version of Wondershare Filmora. As soon as the download has been completed, open the software and hit the New Project catch and you will see the underlying window interface of this product.

Step 2: Customize the Screen Interface
Inside the Filmora Video Editor, you can click on the record button and select the recorder window. Here you can choose the best video capturing settings for your screen to be recorded. Filmora gives you the choice to enable the microphone, system sounds, webcam and another setting for your screen recording handily.
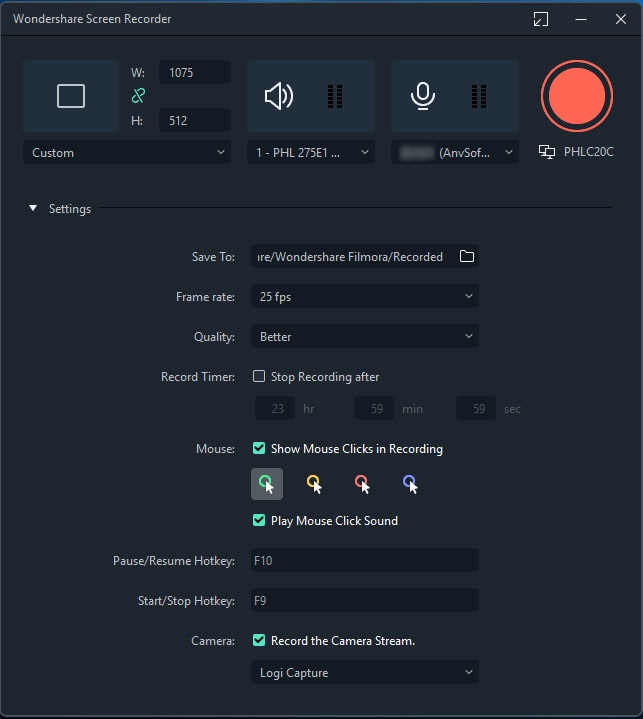
Step 3: Start the Recording
Whenever you’re done with the screen customization, you can directly hit the Record button that will start the recording right after giving you a 3-second delay. You can start recording your screen activity afterwards as shown here:

Step 4: Save or Broadcast the Recording
Lastly, when you’re done with the recording, you can now utilize the editor to the fullest. And to share your work of art straightforwardly to YouTube or some other renowned stage, go for the Export button and select the platform to share your video recording. Furthermore, if you want, you can also edit the recording before sharing it. Filmora allows you to can use Animated Titles, powerful effects, Audio Enhancements, and much more with the Editor to polish your recorded content.
Conclusion
These days, we use our PCs and different gadgets for work, schooling, and during our extra energy, since they permit us to impart and connect more straightforward. Many would say that such a cost wouldn’t legitimize a product that fundamentally just records your screen. Nonetheless, the program does considerably more than that, offering you full customization of your accounts. By and large, we believe Filmora Screen Recorder to be one of the most mind-blowing premium decisions available, particularly assuming you couple it with other video-related software from the organization. The product permits you to impart examples or gatherings to your partners, and record your framework’s sound and video independently.
Part 2. How to Use Movavi Screen Recorder 11
Part 3. Pros and Cons
Part 4. Best Alternative to Movavi Screen Recorder
Part 1. Key Features of Movavi Recorder
Many streaming TV and film stages don’t permit you to record or screen capture the recording you’re watching. To record what you’re looking for disconnected use, you’ll need to check whether the streaming stage permits this or on the other hand assuming that they support outsider software. Movavi Screen Recorder is to be sure one of the most helpful, convenient apparatuses that give you screen recording and progressed altering, all at a similar spot. The best part is, it gives extraordinary command over video projects.
Customized Screen Recording: With Movavi Screen Recorder, screen recording resembles a piece of cake, in any event, for beginner clients. While recording, you can without much of a stretch deal with the onscreen connection point and respite, stop, and begin utilizing hotkeys or console easy routes. It doesn’t catch any undesirable cursor development It’s a single tick, do-it. Regardless of whether you need to record the whole screen, or a particular program, or even only a piece of your work area, you have the freedom to do it tall.
Webcam and Audio Recording: Pick any position, goal, size and casing rate, and you can undoubtedly involve the webcam video as a piece of the recording. New tones, new text styles, new boards - all that you want from a high-level screen recorder. With regards to screen recording, there are plenty of elements that become an integral factor. So regardless of whether it’s a Skype assemble or a video gathering conference, you can catch every one of the occasions.
Altering the Recordings: We have investigated a lot of screen recorders previously, however for this one, we should say, the altering apparatuses are superior. Movavi Screen Recorder software comes in with an assortment of sound and video improvement devices. Channels, impacts, titles, inscriptions, advances, video adjustment, and slow movement: everything a video decent altering apparatus must-have. Truly, Movavi Screen Recorder can make life surprisingly difficult for any video altering program.
Frame Rate: With Movavi Screen Recorder, you can record recordings with a casing pace of 5 to 60 casings/second. The higher the casing rate, the better the video quality. Changing the recurrence is simple as well. It additionally gives you the freedom to get individual sound streams if you need to record both the inner sound and framework sound.
Scheduler Feature: This is one of the most amazing screen recording highlights that we can’t get enough of. Set your clock, and your screen recorder will naturally record your screen when you’re away from your work area. That is not it! You can set the recording term, and your PC will naturally go to close down or rest once the catching is finished.
Part 2. How to Use Movavi Screen Recorder 11
Movavi Screen Recorder lets you rapidly and effectively record sound and video. You can do this all the while or independently rely upon your necessities. At the snap of a button, you can begin recording your receiver, webcam, and framework sounds.
Step 1. Install and Launch Movavi Recorder 11
At the point when you take a screen recording, you’ll initially have to change the size of your screen. Essentially press the space button assuming that you need full screen.
Step 2: Customize Screen Recording
Movavi Screen Recorder allows you to plan the recording from the specific second you need, and decide the time the recording will endure, and even what your PC ought to do when it gets done with recording, like rest or shut down. an extremely helpful device for Gamers and for making instructional exercises. You can even pick which corner of the screen you need the webcam picture to show up in.
Step 3. Start and Stop the Recording
Lastly, press the red circle when you’re prepared to record. You likewise have the choice to record sound and turn on your webcam. After recording, you have new choices. This incorporates stopping and halting your recording. When the screen is recorded, Movavi Screen Recorder allows you to browse a few videos output formats, including AVI, JPEG, MP4, MKV, and even Gif. Among the arrangement choices, you can decide to utilize your video card to accelerate the change of recordings to your beloved organization.
Part 3. Pros and Cons
Movavi Screen Recorder brings a complete and shortsighted UI that is not difficult to follow and adaptable, permitting you to add devices to a unique bar for speedy access. Moreover, the product permits you to tweak your accounts, pick either unique sound and video yields, change catch screen size, just as setting up key ties.
Pros:
- Current UI and more straightforward route
- Records video and sound at the same time
- Catch screencasts, online video, webcam, video talks
- Record smooth video at up to 60 fps
- Set recording boundaries: change speed, change catch region
- Catch console and mouse activities
- Accompany numerous altering apparatuses
- Support screen resolution goal up to 4K
Cons:
- Somewhat costly in terms of feature availability
- Restricted elements in the free preliminary adaptation
- Buy the program to eliminate the watermark and access more elements
Part 4. The Best Alternative to Movavi Screen Recorder
Since an ever-increasing number of individuals are getting acclimated with the web-based climate, deciding to work or study from home, the interest for screen recorder software that helps them with their undertakings has additionally expanded. This is the place where Filmora Screen Recorder becomes possibly the most important factor. The Filmora screen catch apparatus accompanies various settings that let you change your sound and video quality and add impacts to your accounts. You can likewise choose your edge rate, and empower various sorts of equipment speed increase that will make your recording as smooth as could be expected. Pick where you save your accounts and screen captures, and browse one of the PNG, BMP, JPG default screen capture designs.
How to Record Video with Filmora
To know how to use this powerful Movavi screen recorder 11 alternatives here’s the detailed step-by-step guide for you to begin with:
For Win 7 or later (64-bit)
For macOS 10.12 or later
Step 1: Download, Install and Launch Filmora Toolkit
To kickstart your recording journey with the Filmora, firstly, you need to visit the official website and download the latest version of Wondershare Filmora. As soon as the download has been completed, open the software and hit the New Project catch and you will see the underlying window interface of this product.
Step 2: Customize the Screen Interface
Inside the Filmora Video Editor, you can click on the record button and select the recorder window. Here you can choose the best video capturing settings for your screen to be recorded. Filmora gives you the choice to enable the microphone, system sounds, webcam and another setting for your screen recording handily.
Step 3: Start the Recording
Whenever you’re done with the screen customization, you can directly hit the Record button that will start the recording right after giving you a 3-second delay. You can start recording your screen activity afterwards as shown here:
Step 4: Save or Broadcast the Recording
Lastly, when you’re done with the recording, you can now utilize the editor to the fullest. And to share your work of art straightforwardly to YouTube or some other renowned stage, go for the Export button and select the platform to share your video recording. Furthermore, if you want, you can also edit the recording before sharing it. Filmora allows you to can use Animated Titles, powerful effects, Audio Enhancements, and much more with the Editor to polish your recorded content.
Conclusion
These days, we use our PCs and different gadgets for work, schooling, and during our extra energy, since they permit us to impart and connect more straightforward. Many would say that such a cost wouldn’t legitimize a product that fundamentally just records your screen. Nonetheless, the program does considerably more than that, offering you full customization of your accounts. By and large, we believe Filmora Screen Recorder to be one of the most mind-blowing premium decisions available, particularly assuming you couple it with other video-related software from the organization. The product permits you to impart examples or gatherings to your partners, and record your framework’s sound and video independently.
Part 2. How to Use Movavi Screen Recorder 11
Part 3. Pros and Cons
Part 4. Best Alternative to Movavi Screen Recorder
Part 1. Key Features of Movavi Recorder
Many streaming TV and film stages don’t permit you to record or screen capture the recording you’re watching. To record what you’re looking for disconnected use, you’ll need to check whether the streaming stage permits this or on the other hand assuming that they support outsider software. Movavi Screen Recorder is to be sure one of the most helpful, convenient apparatuses that give you screen recording and progressed altering, all at a similar spot. The best part is, it gives extraordinary command over video projects.
Customized Screen Recording: With Movavi Screen Recorder, screen recording resembles a piece of cake, in any event, for beginner clients. While recording, you can without much of a stretch deal with the onscreen connection point and respite, stop, and begin utilizing hotkeys or console easy routes. It doesn’t catch any undesirable cursor development It’s a single tick, do-it. Regardless of whether you need to record the whole screen, or a particular program, or even only a piece of your work area, you have the freedom to do it tall.
Webcam and Audio Recording: Pick any position, goal, size and casing rate, and you can undoubtedly involve the webcam video as a piece of the recording. New tones, new text styles, new boards - all that you want from a high-level screen recorder. With regards to screen recording, there are plenty of elements that become an integral factor. So regardless of whether it’s a Skype assemble or a video gathering conference, you can catch every one of the occasions.
Altering the Recordings: We have investigated a lot of screen recorders previously, however for this one, we should say, the altering apparatuses are superior. Movavi Screen Recorder software comes in with an assortment of sound and video improvement devices. Channels, impacts, titles, inscriptions, advances, video adjustment, and slow movement: everything a video decent altering apparatus must-have. Truly, Movavi Screen Recorder can make life surprisingly difficult for any video altering program.
Frame Rate: With Movavi Screen Recorder, you can record recordings with a casing pace of 5 to 60 casings/second. The higher the casing rate, the better the video quality. Changing the recurrence is simple as well. It additionally gives you the freedom to get individual sound streams if you need to record both the inner sound and framework sound.
Scheduler Feature: This is one of the most amazing screen recording highlights that we can’t get enough of. Set your clock, and your screen recorder will naturally record your screen when you’re away from your work area. That is not it! You can set the recording term, and your PC will naturally go to close down or rest once the catching is finished.
Part 2. How to Use Movavi Screen Recorder 11
Movavi Screen Recorder lets you rapidly and effectively record sound and video. You can do this all the while or independently rely upon your necessities. At the snap of a button, you can begin recording your receiver, webcam, and framework sounds.
Step 1. Install and Launch Movavi Recorder 11
At the point when you take a screen recording, you’ll initially have to change the size of your screen. Essentially press the space button assuming that you need full screen.
Step 2: Customize Screen Recording
Movavi Screen Recorder allows you to plan the recording from the specific second you need, and decide the time the recording will endure, and even what your PC ought to do when it gets done with recording, like rest or shut down. an extremely helpful device for Gamers and for making instructional exercises. You can even pick which corner of the screen you need the webcam picture to show up in.
Step 3. Start and Stop the Recording
Lastly, press the red circle when you’re prepared to record. You likewise have the choice to record sound and turn on your webcam. After recording, you have new choices. This incorporates stopping and halting your recording. When the screen is recorded, Movavi Screen Recorder allows you to browse a few videos output formats, including AVI, JPEG, MP4, MKV, and even Gif. Among the arrangement choices, you can decide to utilize your video card to accelerate the change of recordings to your beloved organization.

Part 3. Pros and Cons
Movavi Screen Recorder brings a complete and shortsighted UI that is not difficult to follow and adaptable, permitting you to add devices to a unique bar for speedy access. Moreover, the product permits you to tweak your accounts, pick either unique sound and video yields, change catch screen size, just as setting up key ties.
Pros:
- Current UI and more straightforward route
- Records video and sound at the same time
- Catch screencasts, online video, webcam, video talks
- Record smooth video at up to 60 fps
- Set recording boundaries: change speed, change catch region
- Catch console and mouse activities
- Accompany numerous altering apparatuses
- Support screen resolution goal up to 4K
Cons:
- Somewhat costly in terms of feature availability
- Restricted elements in the free preliminary adaptation
- Buy the program to eliminate the watermark and access more elements
Part 4. The Best Alternative to Movavi Screen Recorder
Since an ever-increasing number of individuals are getting acclimated with the web-based climate, deciding to work or study from home, the interest for screen recorder software that helps them with their undertakings has additionally expanded. This is the place where Filmora Screen Recorder becomes possibly the most important factor. The Filmora screen catch apparatus accompanies various settings that let you change your sound and video quality and add impacts to your accounts. You can likewise choose your edge rate, and empower various sorts of equipment speed increase that will make your recording as smooth as could be expected. Pick where you save your accounts and screen captures, and browse one of the PNG, BMP, JPG default screen capture designs.

How to Record Video with Filmora
To know how to use this powerful Movavi screen recorder 11 alternatives here’s the detailed step-by-step guide for you to begin with:
For Win 7 or later (64-bit)
For macOS 10.12 or later
Step 1: Download, Install and Launch Filmora Toolkit
To kickstart your recording journey with the Filmora, firstly, you need to visit the official website and download the latest version of Wondershare Filmora. As soon as the download has been completed, open the software and hit the New Project catch and you will see the underlying window interface of this product.
Step 2: Customize the Screen Interface
Inside the Filmora Video Editor, you can click on the record button and select the recorder window. Here you can choose the best video capturing settings for your screen to be recorded. Filmora gives you the choice to enable the microphone, system sounds, webcam and another setting for your screen recording handily.
Step 3: Start the Recording
Whenever you’re done with the screen customization, you can directly hit the Record button that will start the recording right after giving you a 3-second delay. You can start recording your screen activity afterwards as shown here:
Step 4: Save or Broadcast the Recording
Lastly, when you’re done with the recording, you can now utilize the editor to the fullest. And to share your work of art straightforwardly to YouTube or some other renowned stage, go for the Export button and select the platform to share your video recording. Furthermore, if you want, you can also edit the recording before sharing it. Filmora allows you to can use Animated Titles, powerful effects, Audio Enhancements, and much more with the Editor to polish your recorded content.

Conclusion
These days, we use our PCs and different gadgets for work, schooling, and during our extra energy, since they permit us to impart and connect more straightforward. Many would say that such a cost wouldn’t legitimize a product that fundamentally just records your screen. Nonetheless, the program does considerably more than that, offering you full customization of your accounts. By and large, we believe Filmora Screen Recorder to be one of the most mind-blowing premium decisions available, particularly assuming you couple it with other video-related software from the organization. The product permits you to impart examples or gatherings to your partners, and record your framework’s sound and video independently.
Part 2. How to Use Movavi Screen Recorder 11
Part 3. Pros and Cons
Part 4. Best Alternative to Movavi Screen Recorder
Part 1. Key Features of Movavi Recorder
Many streaming TV and film stages don’t permit you to record or screen capture the recording you’re watching. To record what you’re looking for disconnected use, you’ll need to check whether the streaming stage permits this or on the other hand assuming that they support outsider software. Movavi Screen Recorder is to be sure one of the most helpful, convenient apparatuses that give you screen recording and progressed altering, all at a similar spot. The best part is, it gives extraordinary command over video projects.
Customized Screen Recording: With Movavi Screen Recorder, screen recording resembles a piece of cake, in any event, for beginner clients. While recording, you can without much of a stretch deal with the onscreen connection point and respite, stop, and begin utilizing hotkeys or console easy routes. It doesn’t catch any undesirable cursor development It’s a single tick, do-it. Regardless of whether you need to record the whole screen, or a particular program, or even only a piece of your work area, you have the freedom to do it tall.
Webcam and Audio Recording: Pick any position, goal, size and casing rate, and you can undoubtedly involve the webcam video as a piece of the recording. New tones, new text styles, new boards - all that you want from a high-level screen recorder. With regards to screen recording, there are plenty of elements that become an integral factor. So regardless of whether it’s a Skype assemble or a video gathering conference, you can catch every one of the occasions.
Altering the Recordings: We have investigated a lot of screen recorders previously, however for this one, we should say, the altering apparatuses are superior. Movavi Screen Recorder software comes in with an assortment of sound and video improvement devices. Channels, impacts, titles, inscriptions, advances, video adjustment, and slow movement: everything a video decent altering apparatus must-have. Truly, Movavi Screen Recorder can make life surprisingly difficult for any video altering program.
Frame Rate: With Movavi Screen Recorder, you can record recordings with a casing pace of 5 to 60 casings/second. The higher the casing rate, the better the video quality. Changing the recurrence is simple as well. It additionally gives you the freedom to get individual sound streams if you need to record both the inner sound and framework sound.
Scheduler Feature: This is one of the most amazing screen recording highlights that we can’t get enough of. Set your clock, and your screen recorder will naturally record your screen when you’re away from your work area. That is not it! You can set the recording term, and your PC will naturally go to close down or rest once the catching is finished.
Part 2. How to Use Movavi Screen Recorder 11
Movavi Screen Recorder lets you rapidly and effectively record sound and video. You can do this all the while or independently rely upon your necessities. At the snap of a button, you can begin recording your receiver, webcam, and framework sounds.
Step 1. Install and Launch Movavi Recorder 11
At the point when you take a screen recording, you’ll initially have to change the size of your screen. Essentially press the space button assuming that you need full screen.
Step 2: Customize Screen Recording
Movavi Screen Recorder allows you to plan the recording from the specific second you need, and decide the time the recording will endure, and even what your PC ought to do when it gets done with recording, like rest or shut down. an extremely helpful device for Gamers and for making instructional exercises. You can even pick which corner of the screen you need the webcam picture to show up in.
Step 3. Start and Stop the Recording
Lastly, press the red circle when you’re prepared to record. You likewise have the choice to record sound and turn on your webcam. After recording, you have new choices. This incorporates stopping and halting your recording. When the screen is recorded, Movavi Screen Recorder allows you to browse a few videos output formats, including AVI, JPEG, MP4, MKV, and even Gif. Among the arrangement choices, you can decide to utilize your video card to accelerate the change of recordings to your beloved organization.
 Forex Robotron Basic Package
Part 3. Pros and Cons
Movavi Screen Recorder brings a complete and shortsighted UI that is not difficult to follow and adaptable, permitting you to add devices to a unique bar for speedy access. Moreover, the product permits you to tweak your accounts, pick either unique sound and video yields, change catch screen size, just as setting up key ties.
Pros:
- Current UI and more straightforward route
- Records video and sound at the same time
- Catch screencasts, online video, webcam, video talks
- Record smooth video at up to 60 fps
- Set recording boundaries: change speed, change catch region
- Catch console and mouse activities
- Accompany numerous altering apparatuses
- Support screen resolution goal up to 4K
Cons:
- Somewhat costly in terms of feature availability
- Restricted elements in the free preliminary adaptation
- Buy the program to eliminate the watermark and access more elements

Part 4. The Best Alternative to Movavi Screen Recorder
Since an ever-increasing number of individuals are getting acclimated with the web-based climate, deciding to work or study from home, the interest for screen recorder software that helps them with their undertakings has additionally expanded. This is the place where Filmora Screen Recorder becomes possibly the most important factor. The Filmora screen catch apparatus accompanies various settings that let you change your sound and video quality and add impacts to your accounts. You can likewise choose your edge rate, and empower various sorts of equipment speed increase that will make your recording as smooth as could be expected. Pick where you save your accounts and screen captures, and browse one of the PNG, BMP, JPG default screen capture designs.
 HD Video Converter Factory Pro
How to Record Video with Filmora
To know how to use this powerful Movavi screen recorder 11 alternatives here’s the detailed step-by-step guide for you to begin with:
For Win 7 or later (64-bit)
For macOS 10.12 or later
Step 1: Download, Install and Launch Filmora Toolkit
To kickstart your recording journey with the Filmora, firstly, you need to visit the official website and download the latest version of Wondershare Filmora. As soon as the download has been completed, open the software and hit the New Project catch and you will see the underlying window interface of this product.
Step 2: Customize the Screen Interface
Inside the Filmora Video Editor, you can click on the record button and select the recorder window. Here you can choose the best video capturing settings for your screen to be recorded. Filmora gives you the choice to enable the microphone, system sounds, webcam and another setting for your screen recording handily.
Step 3: Start the Recording
Whenever you’re done with the screen customization, you can directly hit the Record button that will start the recording right after giving you a 3-second delay. You can start recording your screen activity afterwards as shown here:
Step 4: Save or Broadcast the Recording
Lastly, when you’re done with the recording, you can now utilize the editor to the fullest. And to share your work of art straightforwardly to YouTube or some other renowned stage, go for the Export button and select the platform to share your video recording. Furthermore, if you want, you can also edit the recording before sharing it. Filmora allows you to can use Animated Titles, powerful effects, Audio Enhancements, and much more with the Editor to polish your recorded content.
Conclusion
These days, we use our PCs and different gadgets for work, schooling, and during our extra energy, since they permit us to impart and connect more straightforward. Many would say that such a cost wouldn’t legitimize a product that fundamentally just records your screen. Nonetheless, the program does considerably more than that, offering you full customization of your accounts. By and large, we believe Filmora Screen Recorder to be one of the most mind-blowing premium decisions available, particularly assuming you couple it with other video-related software from the organization. The product permits you to impart examples or gatherings to your partners, and record your framework’s sound and video independently.
- Title: [New] In 2024, VisionCapture X High-Quality Edition
- Author: Princess Diana
- Created at : 2024-07-24 05:31:18
- Updated at : 2024-07-25 05:31:18
- Link: https://digital-screen-recording.techidaily.com/new-in-2024-visioncapture-x-high-quality-edition/
- License: This work is licensed under CC BY-NC-SA 4.0.