![[New] Lecturer's Guide to Efficient Classroom Sound Archiving on Macs for 2024](https://thmb.techidaily.com/a9fb2f2e749603e5c7deed59a3dccc2eb82bb973e6c7211350802c91feadcdaf.jpg)
[New] Lecturer's Guide to Efficient Classroom Sound Archiving on Macs for 2024
Lecturer’s Guide to Efficient Classroom Sound Archiving on Macs
Nowadays, students go under a lot of pressure, they not only do studies but many other activities are involved. Their life is not very easy; some need to work for their betterment while studying, and some are offered internships. Many students do learn drawing, dancing, and other extra activities. They miss their lectures and classes and cannot take notes in between all of this. This is causing trouble in their studies.
Specific individuals are terrible at taking notes. Others learn better outwardly or aurally, so enjoying the talk with their pen angrily working ceaselessly on paper won’t get them a decent outcome. For these individuals, recording lectures on their MacBook pro will impact how they approach their university reviews. Here’s the why and how of it all:
Part 1. Why To Record Online Lectures?
- Supports your concentration- This is an essential suggestion for understudies; it’s challenging to concentrate on what the teacher is talking about, assuming your face is covered in a journal, angrily attempting to keep up by recording notes. You want total concentration to ingest what the teacher is talking about. By recording and registering lessons, you choose to focus on the gathering and intent with the understanding that you will have all the information arranged to overview later.
- Discern in your way- There are different learning styles; only one out of every odd individual learns the most information by watching a movement concerning respect to a matter. Assuming you know best aurally, recording addresses on MacBook expert is a phenomenal technique for changing the issue to your original learning style. Additionally, detectable understudies will benefit from a rundown of your recording, and verbal understudies will uphold their learning limit by having the choice to hear.
- Enhance your learning interaction- Recording and deciphering lectures improves your learning. Looking through long periods of talk notes for all notices of the subject while you’re planning for its test is presently extraordinarily basic. Looking for basic terms and sending out the features of your discussion recordings for your center review material will support your usefulness.
Part 2. How to Record Lectures on Mac?

Way 1: Use Quicktime Player
How to record lectures on Mac with the use of QuickTime Player? Well, here’s the process:
The default screen recording, as well as the video player application available on macOS, is QuickTime and it is preinstalled on all the Apple computers and laptops. Also, no matter what version of macOS you are using, you will be able to run it. The application is remarkable at recording high-quality screen recorded videos and since it has easy user-controlled tools, this app is very popular in the Apple community. Moreover, if you are a student or teacher, then with just simple clicks you will be able to record your lecture. Here’s how to do it:
Steps to record lectures with QuickTime:
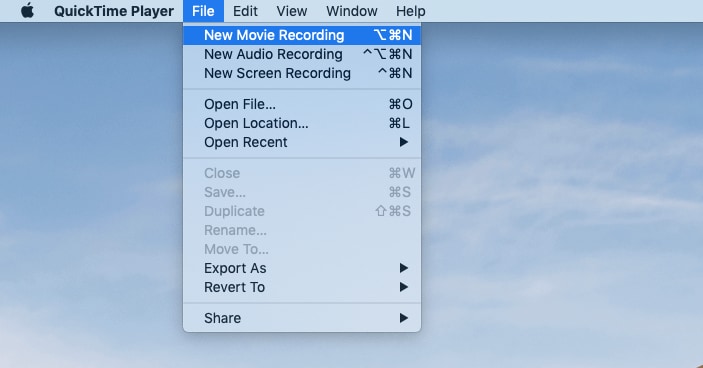
- First, you will need to click on the QuickTime player icon to launch it on your device. In case the QuickTime player isn’t installed on your device, then you can go to Apple’s official web store to download it for free.
- When the user interface opens on your screen, you will see a bunch of different options such as “File”, “View”, “Edit” etc. Choose the “File” option from these items on the menu bar and this will open up a dropdown menu for you containing different options.
- From the list of options available in the dropdown menu, click on “New Movie Recording” and this will start recording your screen instantly.
- When your lecture is completed, click on the stop icon of QuickTime Player and your lecture will be saved successfully.
 DEX 3 RE is Easy-To-Use DJ Mixing Software for MAC and Windows Designed for Today’s Versatile DJ.
Mix from your own library of music, iTunes or use the Pulselocker subsciprtion service for in-app access to over 44 million songs. Use with over 85 supported DJ controllers or mix with a keyboard and mouse.
DEX 3 RE is everything you need without the clutter - the perfect 2-deck mixing software solution for mobile DJs or hard-core hobbiests.
PCDJ DEX 3 RE (DJ Software for Win & MAC - Product Activation For 3 Machines)
Way 2: Use Filmora
Many people ask how to Record lectures on mac, and different professionals are battling to find the needed screen recording tool with the required features. However, with a tool like Filmora, this is no longer an issue as it can help you finish every big or little modification or customization, which you need for a video of yours. Filmora is a high-level device that packs different and advanced functions/options to help you create a video with enough aesthetics. Here’s the process of editing using this tool.
For Win 7 or later (64-bit)
For macOS 10.12 or later
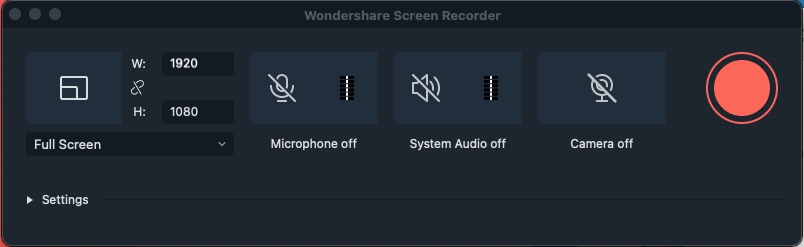
- Step 1: Open the application, and a discourse box will show several choices. To get started with the screen recording, opt for clicking on the option “New Project”.
- Step 2: At this point, in the application, you can just opt to click on the Record button that is basically in the center of the screen.
- Step 3: It would help if you brought about another program by tapping the option “File button” that is from the taskbar at the top. On clicking the same, you will be given some options in the menu. Opt for clicking on the “Record Media”, and now, you will see a menu list. Here, opt for tapping the “Record PC Screen” option.
- Step 4: Another box will show up, and at this point, you will have plenty of screen recording options.
- Step 5: Forthright, you have to opt for the screen area that you have to record. Here, at this point, either opt for the Full-Screen option or you may also choose to put the required details for customization purposes. Moreover, opt for the drag and drop device to select a particular segment.
- Step 6: Right after it, you can opt for the mic button enabling or disabling.
- Step 7: To get to more settings, opt for tapping on the stuff symbol.
- Step 8: When done with the above, opt for hitting the “Record button”, and you will be given the buffer time of 5 seconds.
Way 3. Use Mac Screen Shortcut
Generally, you can consolidate video and sound when you record your screen. Use mouthpiece sound to depict your video from your PC’s introductory speaker or an external mic. Find approaching regions. Whether or not a screencast, video educational activity, or a web-based class, you can, without a doubt, record the screen on your Mac.
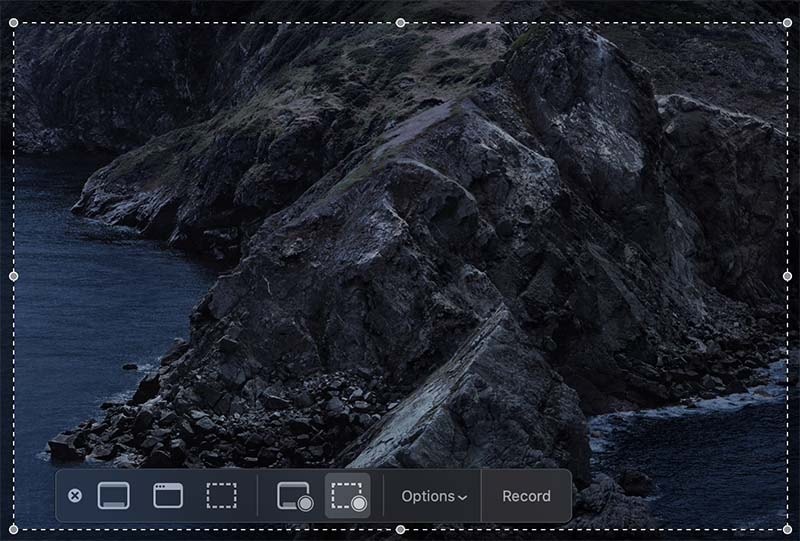
- Step 1: In the decisive initial step, you want to send off the toolbar with every one of the buttons accessible for doing screen recording. Hit the SFT + Command + 5 buttons to send off the Screenshot Shortcut.
- Step 2: In the subsequent stage, the shortcut will ultimately show the different buttons with the predefined activities for each control.
- Step 3: You can redo your screen recording after the suitable button compaction, mainly if you’ve chosen a particular region to record on your MacBook.
- Step 4: At the end, when you’ve redone the recording region of your MacBook, this is the ideal opportunity to hit the Record button and afterward stop the recording; strike the Stop button.
Mac is the working framework known for its flexible usefulness, and every one of the virtual devices is offered preinstalled with the bundle. You generally need to screen record Mac with sound, whether it be a class lecture, ongoing interaction, or educational exercises. Most endeavors that will allow you to record framework sound can be excessive. Screen recording of lectures has become fundamental for online investigations as it helps the understudies comprehensively.
Part 2. How to Record Lectures on Mac?
Way 1: Use Quicktime Player
How to record lectures on Mac with the use of QuickTime Player? Well, here’s the process:
The default screen recording, as well as the video player application available on macOS, is QuickTime and it is preinstalled on all the Apple computers and laptops. Also, no matter what version of macOS you are using, you will be able to run it. The application is remarkable at recording high-quality screen recorded videos and since it has easy user-controlled tools, this app is very popular in the Apple community. Moreover, if you are a student or teacher, then with just simple clicks you will be able to record your lecture. Here’s how to do it:
Steps to record lectures with QuickTime:
- First, you will need to click on the QuickTime player icon to launch it on your device. In case the QuickTime player isn’t installed on your device, then you can go to Apple’s official web store to download it for free.
- When the user interface opens on your screen, you will see a bunch of different options such as “File”, “View”, “Edit” etc. Choose the “File” option from these items on the menu bar and this will open up a dropdown menu for you containing different options.
- From the list of options available in the dropdown menu, click on “New Movie Recording” and this will start recording your screen instantly.
- When your lecture is completed, click on the stop icon of QuickTime Player and your lecture will be saved successfully.
Way 2: Use Filmora
Many people ask how to Record lectures on mac, and different professionals are battling to find the needed screen recording tool with the required features. However, with a tool like Filmora, this is no longer an issue as it can help you finish every big or little modification or customization, which you need for a video of yours. Filmora is a high-level device that packs different and advanced functions/options to help you create a video with enough aesthetics. Here’s the process of editing using this tool.
For Win 7 or later (64-bit)
For macOS 10.12 or later

- Step 1: Open the application, and a discourse box will show several choices. To get started with the screen recording, opt for clicking on the option “New Project”.
- Step 2: At this point, in the application, you can just opt to click on the Record button that is basically in the center of the screen.
- Step 3: It would help if you brought about another program by tapping the option “File button” that is from the taskbar at the top. On clicking the same, you will be given some options in the menu. Opt for clicking on the “Record Media”, and now, you will see a menu list. Here, opt for tapping the “Record PC Screen” option.
- Step 4: Another box will show up, and at this point, you will have plenty of screen recording options.
- Step 5: Forthright, you have to opt for the screen area that you have to record. Here, at this point, either opt for the Full-Screen option or you may also choose to put the required details for customization purposes. Moreover, opt for the drag and drop device to select a particular segment.
- Step 6: Right after it, you can opt for the mic button enabling or disabling.
- Step 7: To get to more settings, opt for tapping on the stuff symbol.
- Step 8: When done with the above, opt for hitting the “Record button”, and you will be given the buffer time of 5 seconds.

Way 3. Use Mac Screen Shortcut
Generally, you can consolidate video and sound when you record your screen. Use mouthpiece sound to depict your video from your PC’s introductory speaker or an external mic. Find approaching regions. Whether or not a screencast, video educational activity, or a web-based class, you can, without a doubt, record the screen on your Mac.
- Step 1: In the decisive initial step, you want to send off the toolbar with every one of the buttons accessible for doing screen recording. Hit the SFT + Command + 5 buttons to send off the Screenshot Shortcut.
- Step 2: In the subsequent stage, the shortcut will ultimately show the different buttons with the predefined activities for each control.
- Step 3: You can redo your screen recording after the suitable button compaction, mainly if you’ve chosen a particular region to record on your MacBook.
- Step 4: At the end, when you’ve redone the recording region of your MacBook, this is the ideal opportunity to hit the Record button and afterward stop the recording; strike the Stop button.
Mac is the working framework known for its flexible usefulness, and every one of the virtual devices is offered preinstalled with the bundle. You generally need to screen record Mac with sound, whether it be a class lecture, ongoing interaction, or educational exercises. Most endeavors that will allow you to record framework sound can be excessive. Screen recording of lectures has become fundamental for online investigations as it helps the understudies comprehensively.
Part 2. How to Record Lectures on Mac?
Way 1: Use Quicktime Player
How to record lectures on Mac with the use of QuickTime Player? Well, here’s the process:
The default screen recording, as well as the video player application available on macOS, is QuickTime and it is preinstalled on all the Apple computers and laptops. Also, no matter what version of macOS you are using, you will be able to run it. The application is remarkable at recording high-quality screen recorded videos and since it has easy user-controlled tools, this app is very popular in the Apple community. Moreover, if you are a student or teacher, then with just simple clicks you will be able to record your lecture. Here’s how to do it:
Steps to record lectures with QuickTime:
- First, you will need to click on the QuickTime player icon to launch it on your device. In case the QuickTime player isn’t installed on your device, then you can go to Apple’s official web store to download it for free.
- When the user interface opens on your screen, you will see a bunch of different options such as “File”, “View”, “Edit” etc. Choose the “File” option from these items on the menu bar and this will open up a dropdown menu for you containing different options.
- From the list of options available in the dropdown menu, click on “New Movie Recording” and this will start recording your screen instantly.
- When your lecture is completed, click on the stop icon of QuickTime Player and your lecture will be saved successfully.
Way 2: Use Filmora
Many people ask how to Record lectures on mac, and different professionals are battling to find the needed screen recording tool with the required features. However, with a tool like Filmora, this is no longer an issue as it can help you finish every big or little modification or customization, which you need for a video of yours. Filmora is a high-level device that packs different and advanced functions/options to help you create a video with enough aesthetics. Here’s the process of editing using this tool.
For Win 7 or later (64-bit)
For macOS 10.12 or later
- Step 1: Open the application, and a discourse box will show several choices. To get started with the screen recording, opt for clicking on the option “New Project”.
- Step 2: At this point, in the application, you can just opt to click on the Record button that is basically in the center of the screen.
- Step 3: It would help if you brought about another program by tapping the option “File button” that is from the taskbar at the top. On clicking the same, you will be given some options in the menu. Opt for clicking on the “Record Media”, and now, you will see a menu list. Here, opt for tapping the “Record PC Screen” option.
- Step 4: Another box will show up, and at this point, you will have plenty of screen recording options.
- Step 5: Forthright, you have to opt for the screen area that you have to record. Here, at this point, either opt for the Full-Screen option or you may also choose to put the required details for customization purposes. Moreover, opt for the drag and drop device to select a particular segment.
- Step 6: Right after it, you can opt for the mic button enabling or disabling.
- Step 7: To get to more settings, opt for tapping on the stuff symbol.
- Step 8: When done with the above, opt for hitting the “Record button”, and you will be given the buffer time of 5 seconds.

Way 3. Use Mac Screen Shortcut
Generally, you can consolidate video and sound when you record your screen. Use mouthpiece sound to depict your video from your PC’s introductory speaker or an external mic. Find approaching regions. Whether or not a screencast, video educational activity, or a web-based class, you can, without a doubt, record the screen on your Mac.

- Step 1: In the decisive initial step, you want to send off the toolbar with every one of the buttons accessible for doing screen recording. Hit the SFT + Command + 5 buttons to send off the Screenshot Shortcut.
- Step 2: In the subsequent stage, the shortcut will ultimately show the different buttons with the predefined activities for each control.
- Step 3: You can redo your screen recording after the suitable button compaction, mainly if you’ve chosen a particular region to record on your MacBook.
- Step 4: At the end, when you’ve redone the recording region of your MacBook, this is the ideal opportunity to hit the Record button and afterward stop the recording; strike the Stop button.
Mac is the working framework known for its flexible usefulness, and every one of the virtual devices is offered preinstalled with the bundle. You generally need to screen record Mac with sound, whether it be a class lecture, ongoing interaction, or educational exercises. Most endeavors that will allow you to record framework sound can be excessive. Screen recording of lectures has become fundamental for online investigations as it helps the understudies comprehensively.
- Title: [New] Lecturer's Guide to Efficient Classroom Sound Archiving on Macs for 2024
- Author: Princess Diana
- Created at : 2024-07-24 05:32:20
- Updated at : 2024-07-25 05:32:20
- Link: https://digital-screen-recording.techidaily.com/new-lecturers-guide-to-efficient-classroom-sound-archiving-on-macs-for-2024/
- License: This work is licensed under CC BY-NC-SA 4.0.