![[New] Overcoming Missed Frames in Real-Time Streaming for 2024](https://thmb.techidaily.com/778dacc021ae6d569afd3e62fa61bf15ba6fe429d937373bba78e772659986e3.jpg)
"[New] Overcoming Missed Frames in Real-Time Streaming for 2024"
Overcoming Missed Frames in Real-Time Streaming
Nothing could be more annoying while recording or streaming than finding out that the frames are getting dropped by the recording or streaming software you are using. Frame drop is a common issue if you are using OBS Studio for recording high-end games or live streaming with high output resolution. You can easily understand about OBS drop frames while streaming when your viewers complain about lagging and stuttering.
In fact, you can even check OBS stream status to find out about OBS Studio drop frames. Dropping frames literally ruins the recording and hence, it needs to be fixed before further operation. You need to understand the reasons behind OBS losing frames and take actions accordingly to fix the issue. In this article, we will explain the reasons and provide all the possible solutions to prevent OBS dropping frames recording and streaming.

Part 1. Why OBS Drops Frames?
OBS can drop the frame rate due to various reasons. When too many frames are dropped, the streaming server is disconnected. Dropped frames are one of the main causes which can affect streaming playback. Besides, a drop in frames leads to bad recording of screen and gameplay. Here are some of the reasons why OBS drops frames while recording or streaming.
- Your computer has an unstable internet connection.
- Your computer has low-end hardware configuration.
- Your video output resolution is very high.
- Your video bitrate is very high.
- Your internet upload speed is rather low.
- antivirus or firewall is messing with OBS Studio.
Part 2. How To Fix OBS Dropping Frame?

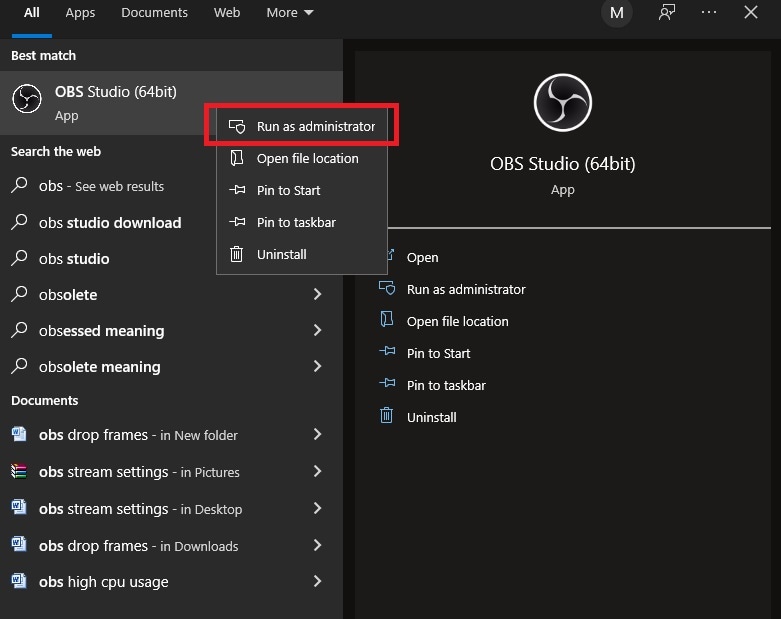
Way 1. Update OBS & Run as an Administrator
It is important to know that you are using the latest version of OBS. This helps to prevent encoding overload as well as problems due to stuttering. Make sure that you run OBS as an administrator. Here are the steps to follow.
Step 1: Download and install the latest version of OBS Studio.
Step 2: Go to Start menu and search for OBS Studio.
Step 3: Right-click on the OBS icon and select Run As Administrator option.
 Nero Burning ROM:
The ultimate burning program for all your needs!

Way 2. Reduce The Output Resolution
When you reduce the resolution, the video quality gets lowered. But for smooth streaming and recording, you have no other option. When you reduce resolution, you require less CPU usage and less internet bandwidth. Here are the steps to follow.
Step 1: Open OBS and go to Settings.
Step 2: Select Video tab. You will see Base and Output resolution.
Step 3: You have to reduce Output Resolution from the current or default setting.
 PCDJ DEX 3 for Windows & MAC is the total entertainment DJ software solution, offering audio, video, and karaoke mixing ability. Automatic beat-sync, smart looping, 4 decks, DJ MIDI controller support, Karaoke Streaming and much more.
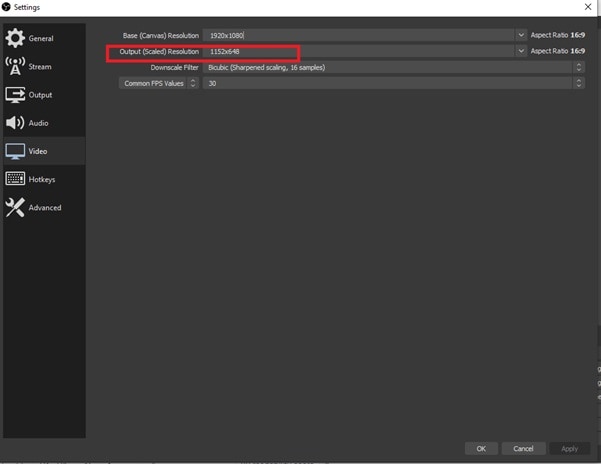
Step 4: Click Apply for saving the changes followed by Ok button.
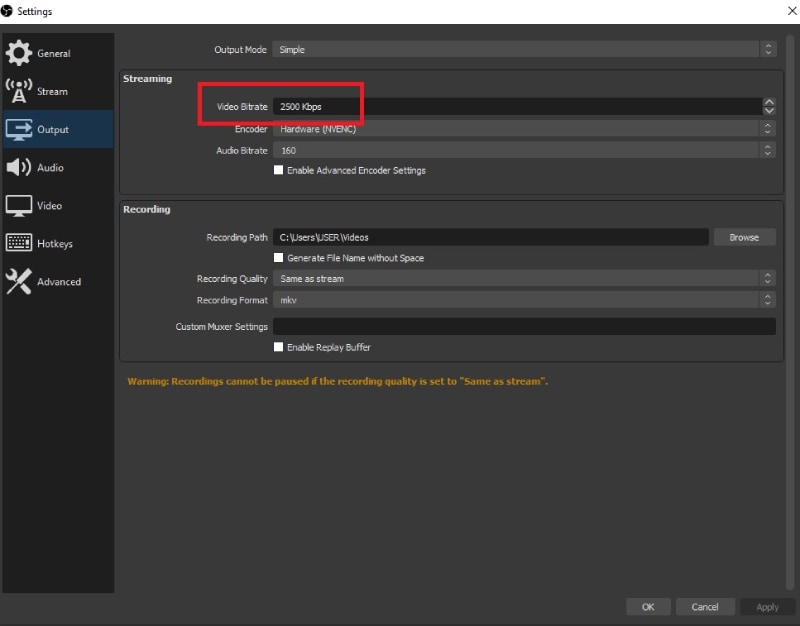
Way 3. Reduce The Video Bitrate
OBS generally does not maintain a specified bitrate. It keeps on changing the bitrate as per the available condition like CPU usage level and bandwidth and speed of internet connection. When there are constant changes in the bitrate, there is a likelihood of stuttering effect. Even though it has come up with Dynamic bitrate which will automatically reduce the bitrate, but it increases the bitrate when there is no congestion. You can reduce the bitrate by going through these steps.
Step 1: Open OBS Studio and click on Settings button.
Step 2: Go to Output tab and look for Video Bitrate option.
Step 3: Lower the video bitrate from the default or current value.
Step 4: Click on Apply and OK button.
 CalendarBudget - Monthly subscription membership to CalendarBudget via web browser or mobile app. Support included.
 Way 4. Change OBS Process Priority
By changing the OBS process priority from Normal to Above Normal, there could be more processing power availability for OBS Studio. It helps in solving the problem of frame drop by driving performance from the system for better encoding and rendering. Here are the steps for changing OBS process priority.
Step 1: Launch OBS and go to Settings.
Step 3: Go to Advanced tab and look for Process Priority.
Step 4: You will have to change it to ‘Above Normal’ from ‘Normal’.
Step 5: Click Apply followed by Ok button.
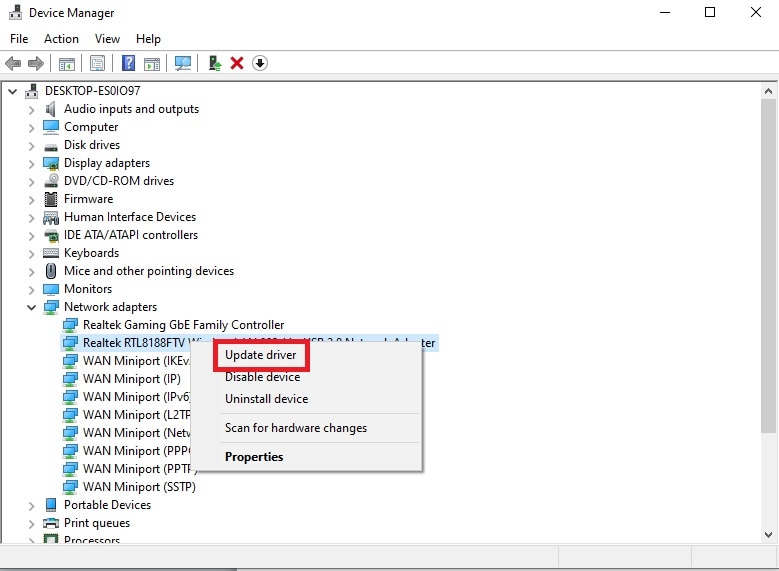
Way 5. Update Network Driver
Dropped frame rates can happen due to the outdated network adapter driver. For this, it is important to look for the latest version of the driver. With up-to-date drivers, there will be a smooth connection when you are streaming or playing online games. Here are the steps to follow.
Step 1: From Start menu, search for Device Manager and open it.
Step 2: Find Network Adapters and click on it to expand.
Step 3: Find your LAN card and right-click on it.
Step 4: From the menu, select Update Driver option.
Follow the onscreen instruction to complete the process and restart your computer.


Way 6. Turn Off Your Firewall and Antivirus
There can be instances where firewalls can block the port for RTMP. It can interfere with the internet connection leading to dropping frames. Similarly, antivirus software messes with any third-party software and prevents regular operations. You have to temporarily turn off real-time protection as well as the antivirus software. Here are the steps to follow.
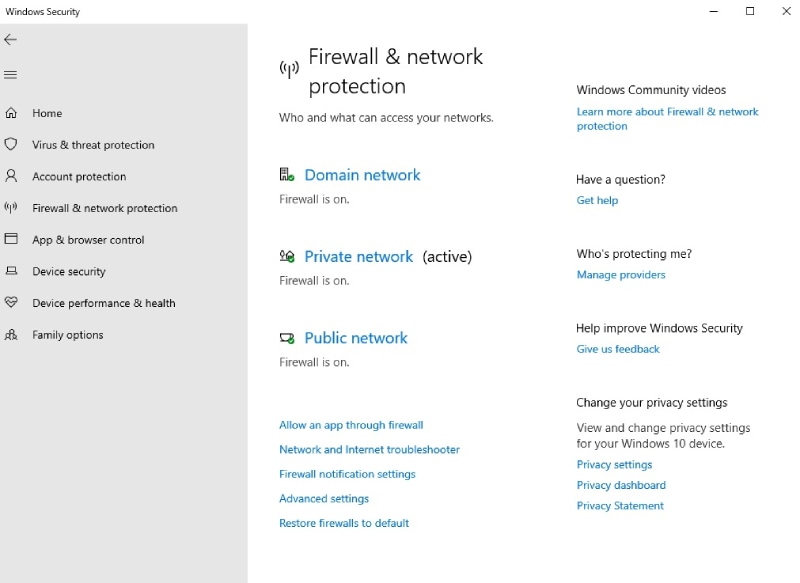
Step 1: Go to Start menu and search for Firewall.
Step 2: Open Firewall & Network Protection.
Step 3: Turn off firewall for domain, private and public network temporarily to fix dropping frame issue.
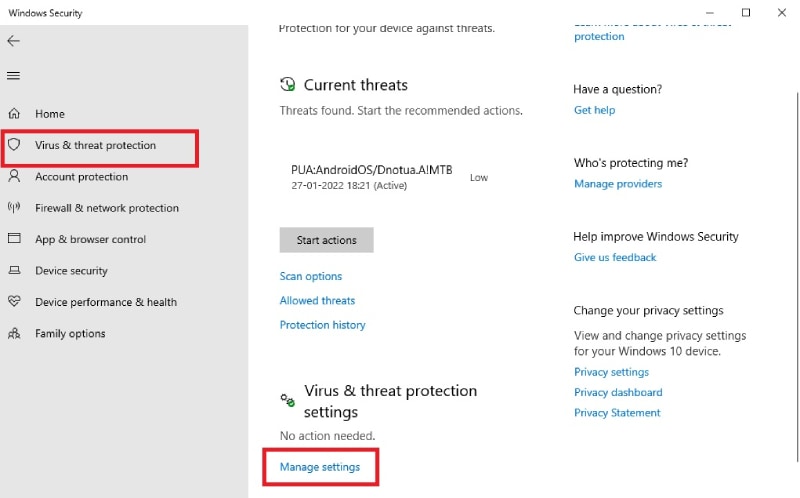
Step 4: Go to Virus & Threat Protection.
Step 5: Under Virus & Threat Protection section. Click on Manage Settings.
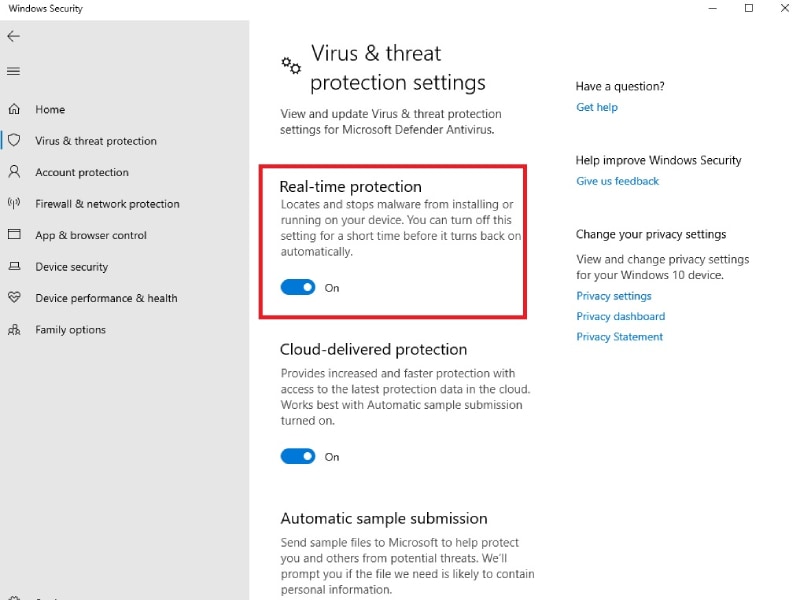
Step 6: Turn on real-time Protection option as well as other available options as applicable.
Way 7. Use OBS Alternative Tool
If the problem is not solved even after trying out all the above-mentioned ways to fix OBS dropping frames recording, you need to switch to a better alternative for recording high-quality videos without drop frame issue. We recommend Wondershare Filmora which is a professional video recorder and video editor application. You can record your screen and webcam at any resolution and record audio from different sources as well. Most importantly, it uses the system resources optimally to avoid frame dropping issues. Here are the steps to record screen with Filmora.
For Win 7 or later (64-bit)
For macOS 10.12 or later
Step 1: Download and install Wondershare Filmora. Launch Filmora and click on PC Screen option for screen recording.
Step 2: Choose recording screen dimensions and audio sources. You can enable Record Camera Stream option to capture your video through picture-in-picture mode.
.png) Kanto Player Professional
Kanto Player Professional
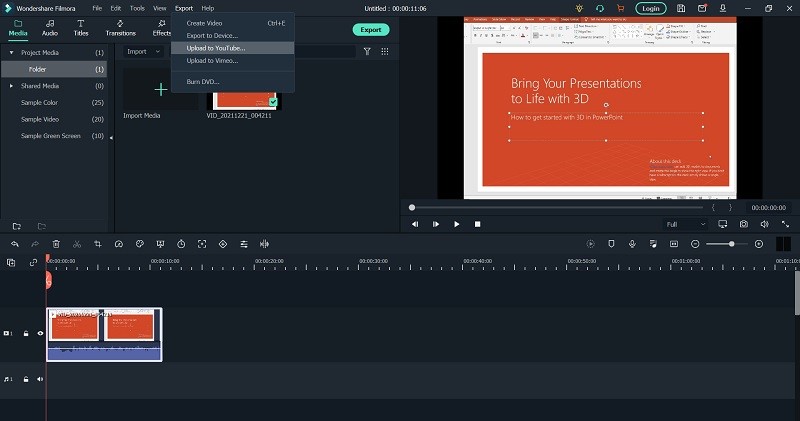
Step 3: Click on Record button to start recording. Use F9 hotkey to stop recording. You can your recording instantly and click on Export button to save on your hard drive.
Conclusion
OBS drop frame is probably the most common issue reported by OBS users. Whenever you try to record high-quality videos such as at 4K resolution or you are streaming at high-quality resolution, OBS losing frames is inevitable unless you have a high-end computer. You should try out all the possible ways to avoid the issue. Otherwise, you can switch to Filmora to record high-quality videos without any frame drop issue.
Part 2. How To Fix OBS Dropping Frame?
Way 1. Update OBS & Run as an Administrator
It is important to know that you are using the latest version of OBS. This helps to prevent encoding overload as well as problems due to stuttering. Make sure that you run OBS as an administrator. Here are the steps to follow.
Step 1: Download and install the latest version of OBS Studio.
Step 2: Go to Start menu and search for OBS Studio.
Step 3: Right-click on the OBS icon and select Run As Administrator option.
 CollageIt Pro
Way 2. Reduce The Output Resolution
When you reduce the resolution, the video quality gets lowered. But for smooth streaming and recording, you have no other option. When you reduce resolution, you require less CPU usage and less internet bandwidth. Here are the steps to follow.
Step 1: Open OBS and go to Settings.
Step 2: Select Video tab. You will see Base and Output resolution.
Step 3: You have to reduce Output Resolution from the current or default setting.
Step 4: Click Apply for saving the changes followed by Ok button.
Way 3. Reduce The Video Bitrate
OBS generally does not maintain a specified bitrate. It keeps on changing the bitrate as per the available condition like CPU usage level and bandwidth and speed of internet connection. When there are constant changes in the bitrate, there is a likelihood of stuttering effect. Even though it has come up with Dynamic bitrate which will automatically reduce the bitrate, but it increases the bitrate when there is no congestion. You can reduce the bitrate by going through these steps.
Step 1: Open OBS Studio and click on Settings button.
Step 2: Go to Output tab and look for Video Bitrate option.
Step 3: Lower the video bitrate from the default or current value.
Step 4: Click on Apply and OK button.

Way 4. Change OBS Process Priority
By changing the OBS process priority from Normal to Above Normal, there could be more processing power availability for OBS Studio. It helps in solving the problem of frame drop by driving performance from the system for better encoding and rendering. Here are the steps for changing OBS process priority.
Step 1: Launch OBS and go to Settings.
Step 3: Go to Advanced tab and look for Process Priority.
Step 4: You will have to change it to ‘Above Normal’ from ‘Normal’.
Step 5: Click Apply followed by Ok button.
 Easy GIF Animator is a powerful animated GIF editor and the top tool for creating animated pictures, banners, buttons and GIF videos. You get extensive animation editing features, animation effects, unmatched image quality and optimization for the web. No other GIF animation software matches our features and ease of use, that’s why Easy GIF Animator is so popular.
Way 5. Update Network Driver
Dropped frame rates can happen due to the outdated network adapter driver. For this, it is important to look for the latest version of the driver. With up-to-date drivers, there will be a smooth connection when you are streaming or playing online games. Here are the steps to follow.
Step 1: From Start menu, search for Device Manager and open it.
Step 2: Find Network Adapters and click on it to expand.
Step 3: Find your LAN card and right-click on it.
Step 4: From the menu, select Update Driver option.
Follow the onscreen instruction to complete the process and restart your computer.
Way 6. Turn Off Your Firewall and Antivirus
There can be instances where firewalls can block the port for RTMP. It can interfere with the internet connection leading to dropping frames. Similarly, antivirus software messes with any third-party software and prevents regular operations. You have to temporarily turn off real-time protection as well as the antivirus software. Here are the steps to follow.
Step 1: Go to Start menu and search for Firewall.
Step 2: Open Firewall & Network Protection.
Step 3: Turn off firewall for domain, private and public network temporarily to fix dropping frame issue.
Step 4: Go to Virus & Threat Protection.
Step 5: Under Virus & Threat Protection section. Click on Manage Settings.
Step 6: Turn on real-time Protection option as well as other available options as applicable.
Way 7. Use OBS Alternative Tool
If the problem is not solved even after trying out all the above-mentioned ways to fix OBS dropping frames recording, you need to switch to a better alternative for recording high-quality videos without drop frame issue. We recommend Wondershare Filmora which is a professional video recorder and video editor application. You can record your screen and webcam at any resolution and record audio from different sources as well. Most importantly, it uses the system resources optimally to avoid frame dropping issues. Here are the steps to record screen with Filmora.
For Win 7 or later (64-bit)
For macOS 10.12 or later
Step 1: Download and install Wondershare Filmora. Launch Filmora and click on PC Screen option for screen recording.
Step 2: Choose recording screen dimensions and audio sources. You can enable Record Camera Stream option to capture your video through picture-in-picture mode.
Step 3: Click on Record button to start recording. Use F9 hotkey to stop recording. You can your recording instantly and click on Export button to save on your hard drive.
Conclusion
OBS drop frame is probably the most common issue reported by OBS users. Whenever you try to record high-quality videos such as at 4K resolution or you are streaming at high-quality resolution, OBS losing frames is inevitable unless you have a high-end computer. You should try out all the possible ways to avoid the issue. Otherwise, you can switch to Filmora to record high-quality videos without any frame drop issue.
Part 2. How To Fix OBS Dropping Frame?
 ZoneAlarm Pro Antivirus + Firewall NextGen
Way 1. Update OBS & Run as an Administrator
It is important to know that you are using the latest version of OBS. This helps to prevent encoding overload as well as problems due to stuttering. Make sure that you run OBS as an administrator. Here are the steps to follow.
Step 1: Download and install the latest version of OBS Studio.
Step 2: Go to Start menu and search for OBS Studio.
Step 3: Right-click on the OBS icon and select Run As Administrator option.
Way 2. Reduce The Output Resolution
When you reduce the resolution, the video quality gets lowered. But for smooth streaming and recording, you have no other option. When you reduce resolution, you require less CPU usage and less internet bandwidth. Here are the steps to follow.
Step 1: Open OBS and go to Settings.
Step 2: Select Video tab. You will see Base and Output resolution.
Step 3: You have to reduce Output Resolution from the current or default setting.
Step 4: Click Apply for saving the changes followed by Ok button.
Way 3. Reduce The Video Bitrate
OBS generally does not maintain a specified bitrate. It keeps on changing the bitrate as per the available condition like CPU usage level and bandwidth and speed of internet connection. When there are constant changes in the bitrate, there is a likelihood of stuttering effect. Even though it has come up with Dynamic bitrate which will automatically reduce the bitrate, but it increases the bitrate when there is no congestion. You can reduce the bitrate by going through these steps.
Step 1: Open OBS Studio and click on Settings button.
Step 2: Go to Output tab and look for Video Bitrate option.
Step 3: Lower the video bitrate from the default or current value.
Step 4: Click on Apply and OK button.

WPS Office Premium ( File Recovery, Photo Scanning, Convert PDF)–Yearly
Way 4. Change OBS Process Priority
By changing the OBS process priority from Normal to Above Normal, there could be more processing power availability for OBS Studio. It helps in solving the problem of frame drop by driving performance from the system for better encoding and rendering. Here are the steps for changing OBS process priority.
Step 1: Launch OBS and go to Settings.
Step 3: Go to Advanced tab and look for Process Priority.
Step 4: You will have to change it to ‘Above Normal’ from ‘Normal’.
Step 5: Click Apply followed by Ok button.

Way 5. Update Network Driver
Dropped frame rates can happen due to the outdated network adapter driver. For this, it is important to look for the latest version of the driver. With up-to-date drivers, there will be a smooth connection when you are streaming or playing online games. Here are the steps to follow.
Step 1: From Start menu, search for Device Manager and open it.
Step 2: Find Network Adapters and click on it to expand.
Step 3: Find your LAN card and right-click on it.
Step 4: From the menu, select Update Driver option.
Follow the onscreen instruction to complete the process and restart your computer.

Way 6. Turn Off Your Firewall and Antivirus
There can be instances where firewalls can block the port for RTMP. It can interfere with the internet connection leading to dropping frames. Similarly, antivirus software messes with any third-party software and prevents regular operations. You have to temporarily turn off real-time protection as well as the antivirus software. Here are the steps to follow.
Step 1: Go to Start menu and search for Firewall.
Step 2: Open Firewall & Network Protection.
Step 3: Turn off firewall for domain, private and public network temporarily to fix dropping frame issue.
Step 4: Go to Virus & Threat Protection.
Step 5: Under Virus & Threat Protection section. Click on Manage Settings.
 Simple and intuitive video editing
Step 6: Turn on real-time Protection option as well as other available options as applicable.
Way 7. Use OBS Alternative Tool
If the problem is not solved even after trying out all the above-mentioned ways to fix OBS dropping frames recording, you need to switch to a better alternative for recording high-quality videos without drop frame issue. We recommend Wondershare Filmora which is a professional video recorder and video editor application. You can record your screen and webcam at any resolution and record audio from different sources as well. Most importantly, it uses the system resources optimally to avoid frame dropping issues. Here are the steps to record screen with Filmora.
For Win 7 or later (64-bit)
For macOS 10.12 or later
Step 1: Download and install Wondershare Filmora. Launch Filmora and click on PC Screen option for screen recording.
Step 2: Choose recording screen dimensions and audio sources. You can enable Record Camera Stream option to capture your video through picture-in-picture mode.
Step 3: Click on Record button to start recording. Use F9 hotkey to stop recording. You can your recording instantly and click on Export button to save on your hard drive.
Conclusion
OBS drop frame is probably the most common issue reported by OBS users. Whenever you try to record high-quality videos such as at 4K resolution or you are streaming at high-quality resolution, OBS losing frames is inevitable unless you have a high-end computer. You should try out all the possible ways to avoid the issue. Otherwise, you can switch to Filmora to record high-quality videos without any frame drop issue.
Part 2. How To Fix OBS Dropping Frame?

Way 1. Update OBS & Run as an Administrator
It is important to know that you are using the latest version of OBS. This helps to prevent encoding overload as well as problems due to stuttering. Make sure that you run OBS as an administrator. Here are the steps to follow.
Step 1: Download and install the latest version of OBS Studio.
Step 2: Go to Start menu and search for OBS Studio.
Step 3: Right-click on the OBS icon and select Run As Administrator option.
Way 2. Reduce The Output Resolution
When you reduce the resolution, the video quality gets lowered. But for smooth streaming and recording, you have no other option. When you reduce resolution, you require less CPU usage and less internet bandwidth. Here are the steps to follow.
Step 1: Open OBS and go to Settings.
Step 2: Select Video tab. You will see Base and Output resolution.
Step 3: You have to reduce Output Resolution from the current or default setting.

Step 4: Click Apply for saving the changes followed by Ok button.
Way 3. Reduce The Video Bitrate
OBS generally does not maintain a specified bitrate. It keeps on changing the bitrate as per the available condition like CPU usage level and bandwidth and speed of internet connection. When there are constant changes in the bitrate, there is a likelihood of stuttering effect. Even though it has come up with Dynamic bitrate which will automatically reduce the bitrate, but it increases the bitrate when there is no congestion. You can reduce the bitrate by going through these steps.
Step 1: Open OBS Studio and click on Settings button.
Step 2: Go to Output tab and look for Video Bitrate option.
Step 3: Lower the video bitrate from the default or current value.
Step 4: Click on Apply and OK button.
Way 4. Change OBS Process Priority
By changing the OBS process priority from Normal to Above Normal, there could be more processing power availability for OBS Studio. It helps in solving the problem of frame drop by driving performance from the system for better encoding and rendering. Here are the steps for changing OBS process priority.
Step 1: Launch OBS and go to Settings.
Step 3: Go to Advanced tab and look for Process Priority.
Step 4: You will have to change it to ‘Above Normal’ from ‘Normal’.
Step 5: Click Apply followed by Ok button.
Way 5. Update Network Driver
Dropped frame rates can happen due to the outdated network adapter driver. For this, it is important to look for the latest version of the driver. With up-to-date drivers, there will be a smooth connection when you are streaming or playing online games. Here are the steps to follow.
Step 1: From Start menu, search for Device Manager and open it.
Step 2: Find Network Adapters and click on it to expand.
Step 3: Find your LAN card and right-click on it.
Step 4: From the menu, select Update Driver option.
Follow the onscreen instruction to complete the process and restart your computer.

Way 6. Turn Off Your Firewall and Antivirus
There can be instances where firewalls can block the port for RTMP. It can interfere with the internet connection leading to dropping frames. Similarly, antivirus software messes with any third-party software and prevents regular operations. You have to temporarily turn off real-time protection as well as the antivirus software. Here are the steps to follow.
Step 1: Go to Start menu and search for Firewall.
Step 2: Open Firewall & Network Protection.
Step 3: Turn off firewall for domain, private and public network temporarily to fix dropping frame issue.
Step 4: Go to Virus & Threat Protection.
Step 5: Under Virus & Threat Protection section. Click on Manage Settings.
Step 6: Turn on real-time Protection option as well as other available options as applicable.
Way 7. Use OBS Alternative Tool
If the problem is not solved even after trying out all the above-mentioned ways to fix OBS dropping frames recording, you need to switch to a better alternative for recording high-quality videos without drop frame issue. We recommend Wondershare Filmora which is a professional video recorder and video editor application. You can record your screen and webcam at any resolution and record audio from different sources as well. Most importantly, it uses the system resources optimally to avoid frame dropping issues. Here are the steps to record screen with Filmora.
For Win 7 or later (64-bit)
For macOS 10.12 or later
Step 1: Download and install Wondershare Filmora. Launch Filmora and click on PC Screen option for screen recording.
Step 2: Choose recording screen dimensions and audio sources. You can enable Record Camera Stream option to capture your video through picture-in-picture mode.
 Jet Profiler for MySQL, Enterprise Version: Jet Profiler for MySQL is real-time query performance and diagnostics tool for the MySQL database server. Its detailed query information, graphical interface and ease of use makes this a great tool for finding performance bottlenecks in your MySQL databases.
Step 3: Click on Record button to start recording. Use F9 hotkey to stop recording. You can your recording instantly and click on Export button to save on your hard drive.
Conclusion
OBS drop frame is probably the most common issue reported by OBS users. Whenever you try to record high-quality videos such as at 4K resolution or you are streaming at high-quality resolution, OBS losing frames is inevitable unless you have a high-end computer. You should try out all the possible ways to avoid the issue. Otherwise, you can switch to Filmora to record high-quality videos without any frame drop issue.
- Title: [New] Overcoming Missed Frames in Real-Time Streaming for 2024
- Author: Princess Diana
- Created at : 2024-07-24 04:11:27
- Updated at : 2024-07-25 04:11:27
- Link: https://digital-screen-recording.techidaily.com/new-overcoming-missed-frames-in-real-time-streaming-for-2024/
- License: This work is licensed under CC BY-NC-SA 4.0.