
"Optimizing Video Sequences Blend Modes Application for 2024"
Optimizing Video Sequences: Blend Modes Application
How to Use The Blending Modes To Composite Clips
 SwifDoo PDF Perpetual (2-PC) Free upgrade. No monthly fees ever.

Max Wales
Mar 27, 2024• Proven solutions
Producing a visually impressive video requires much more effort than just recording the footage and posting it online as fast as possible. Combining several images or videos into a single shot is one of the most frequently used techniques which allows you to create videos that meet the highest aesthetic standards. A layer can be described as any type of image, moving or still, that is superimposed over a background image. However, just adding one layer over another will not create a strong visual impact on the spectator, which is why using Blending Modes is recommended if you want to blend two overlaying videos or images seamlessly.
It is a widely accepted opinion that Blend Modes can only be used in Adobe Premiere Pro or After Effects, but in this article, we are going to bust that myth and show you how to utilize Blending Modes in Filmora Scrn. Before we get started, let’s figure out what blending modes is.
 Software Update Pro - Check and update software installed on your computer.
![]()

The All-in-One Screen Recorder & Video Editor
- Record desktop screen, voiceover, and webcam simultaneously
- Edit recorded clips quickly with a wide range of professional tools
- Built-in plentiful templates and effects
- Export to MP4, MOV, MKV, GIF and multiple formats
For Win 7 or later (64-bit)
For macOS 10.12 or later
 Secure Download
What are Blending Modes in Filmora?
Combining videos or images into a single frame is an art that is much older than digital pictures, so when trying to understand Blend Modes in Filmora Scrn it is best to try to visualize two pieces of celluloid film, one over another. Two pieces of film are transparent, but the images they contain do not mix with each other, that is why when you are using Blend Modes in Filmora Scrn you are actually merging videos and allowing their pixels to mix.
Different ways of combining pixels are called modes, and for that reason, the properties of the Linear Burn mode are not the same as the properties of the Multiply blending mode. Each mode you select, brings preset image transparency as well as brightness, contrast and color values. Which mode you will use depends mostly on the context and the images you want to use in your video.
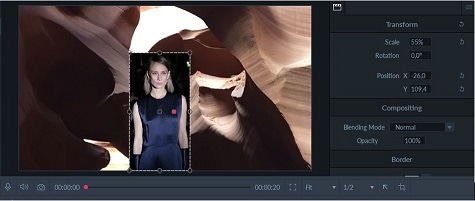
The Normal mode is a part of the standard set of blending modes in almost all photo and video editing programs. It enables you to keep the top layer intact, by preventing the pixels from two images to merge. It is a perfect PIP blending mode since it allows you to keep two overlaying images separate and have two different narratives within the same shot. Producers of YouTube videos and tutorials of any kind or gamers who want to entertain their audiences should use the Normal mode when editing their footage captured with Filmora Scrn.

The Screen Mode is best used when you are working with dark monochrome backgrounds because it reduces the dark areas in the video thus enabling you to blend the top layer into the background seamlessly.
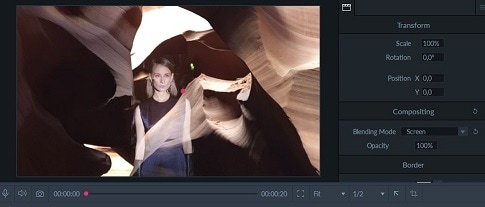
Utilizing this mode successfully requires previous preparation because the effects you’ll get if you use the Screen mode with a footage that is not best suited for this mode are far from impressive. Therefore, the video clips you want to overlay and blend with each other must be recorded perfectly in order to get the best results.
The Multiply Mode is also one of the frequently used blending modes that multiplies the numbers for each pixel of the overlaying video clip with a matching pixel from the background video.

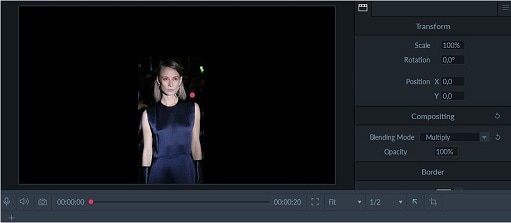
This mode will enable you to create the black background for your video effortlessly, and highlight the subjects in the video clip you intend to use as a top layer. You need to choose carefully which video clips you are going to use and how are they going to look on a dark background if you want to produce visually pleasing videos that captivate the viewer’s attention.

How to use Blending Modes?
Applying different blending modes and switching between them is easy, and it won’t take more than a few minutes of your time, once you get a hold of it. Filmora Scrn features a number of different blending modes, so figuring out what each mode can do may take some time and practice. Let’s have a look at how you can add multiple layers to your videos and how to use blending modes.
Step 1 - Importing files into Filmora Scrn
In case you’ve used Filmora Scrn’s screen recorder to capture your video, the video clip will be opened in the software’s video editor and placed in the media bin, immediately after the recording session is over. However, the Wondershare’s software also allows you to import the footage you’ve captured with a video camera or any other video recording software or device.
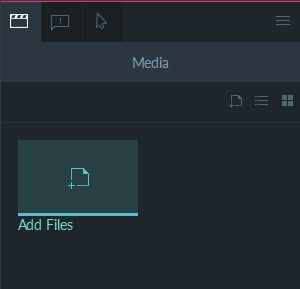
Click on the Add Files icon in the Media bin, and select the footage you want to use in your project. Drag the video clip you’d like to use as a background to a track on the timeline and then drag and drop the video or a photo to a timeline above the one on which the background clip is located.
Adjust the duration of the video clips or photos you’ve placed on the timeline and use the preview window to determine whether or not you should readjust the size and position of the overlaying image.
 The Tube Sites Submitter is a fast and efficient tool for anyone who needs to upload videos quickly, easily and automatically to hundreds of tube sites in mere minutes .
Step 2 - Select the Blending mode
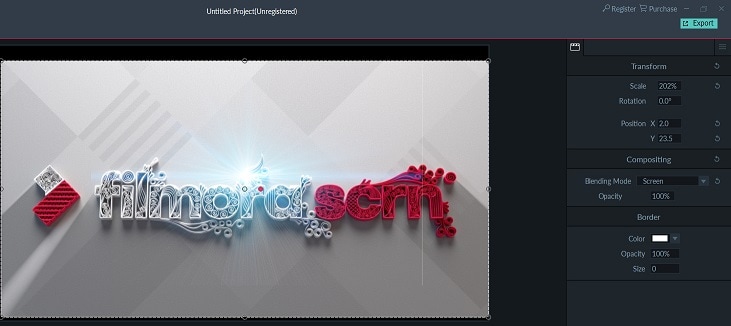
On the right side of the screen you’ll be able to see several options such as Transform, Compositing, Border, and Speed, but before you proceed to select the Blending Mode you must first make sure that you’ve selected the video clip you want to enhance.
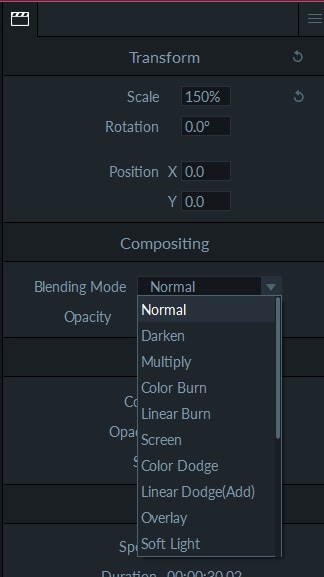
In the Compositing menu, you will be able to see the Blending Mode feature. Click on the drop-down menu and select one of the modes.
Changing the Opacity value will enable you to reduce the transparency level of a layer while changing the values in the Transform menu will help you find the perfect position on the background for the overlaying image.
Step 3 - Export the video
Click on the Export button if you like the results and choose whether you want to save the file on your hard-disc or upload it to YouTube, Facebook or Vimeo directly from Filmora Scrn.
Conclusion
Overlaying two video clips and blending them to each other can be an effective way to make your videos look more creative or more professional by adding logos and all other information you’d like the potential viewers of your videos to see. The blending modes Filmora Scrn offers can help you achieve the visual style you want to get in your videos, but it may take you some time to learn when is the best time to use a certain mode.
Max Wales
Max Wales is a writer and a lover of all things video.
Follow @Max Wales
Max Wales
Mar 27, 2024• Proven solutions
Producing a visually impressive video requires much more effort than just recording the footage and posting it online as fast as possible. Combining several images or videos into a single shot is one of the most frequently used techniques which allows you to create videos that meet the highest aesthetic standards. A layer can be described as any type of image, moving or still, that is superimposed over a background image. However, just adding one layer over another will not create a strong visual impact on the spectator, which is why using Blending Modes is recommended if you want to blend two overlaying videos or images seamlessly.
It is a widely accepted opinion that Blend Modes can only be used in Adobe Premiere Pro or After Effects, but in this article, we are going to bust that myth and show you how to utilize Blending Modes in Filmora Scrn. Before we get started, let’s figure out what blending modes is.

WPS Office Premium ( File Recovery, Photo Scanning, Convert PDF)–Yearly
![]()

The All-in-One Screen Recorder & Video Editor
- Record desktop screen, voiceover, and webcam simultaneously
- Edit recorded clips quickly with a wide range of professional tools
- Built-in plentiful templates and effects
- Export to MP4, MOV, MKV, GIF and multiple formats
For Win 7 or later (64-bit)
For macOS 10.12 or later
Secure Download
What are Blending Modes in Filmora?
Combining videos or images into a single frame is an art that is much older than digital pictures, so when trying to understand Blend Modes in Filmora Scrn it is best to try to visualize two pieces of celluloid film, one over another. Two pieces of film are transparent, but the images they contain do not mix with each other, that is why when you are using Blend Modes in Filmora Scrn you are actually merging videos and allowing their pixels to mix.
Different ways of combining pixels are called modes, and for that reason, the properties of the Linear Burn mode are not the same as the properties of the Multiply blending mode. Each mode you select, brings preset image transparency as well as brightness, contrast and color values. Which mode you will use depends mostly on the context and the images you want to use in your video.
The Normal mode is a part of the standard set of blending modes in almost all photo and video editing programs. It enables you to keep the top layer intact, by preventing the pixels from two images to merge. It is a perfect PIP blending mode since it allows you to keep two overlaying images separate and have two different narratives within the same shot. Producers of YouTube videos and tutorials of any kind or gamers who want to entertain their audiences should use the Normal mode when editing their footage captured with Filmora Scrn.
 Nero Burning ROM:
The ultimate burning program for all your needs!
The Screen Mode is best used when you are working with dark monochrome backgrounds because it reduces the dark areas in the video thus enabling you to blend the top layer into the background seamlessly.
 PaperScan Professional: PaperScan Scanner Software is a powerful TWAIN & WIA scanning application centered on one idea: making document acquisition an unparalleled easy task for anyone.
Utilizing this mode successfully requires previous preparation because the effects you’ll get if you use the Screen mode with a footage that is not best suited for this mode are far from impressive. Therefore, the video clips you want to overlay and blend with each other must be recorded perfectly in order to get the best results.
The Multiply Mode is also one of the frequently used blending modes that multiplies the numbers for each pixel of the overlaying video clip with a matching pixel from the background video.

This mode will enable you to create the black background for your video effortlessly, and highlight the subjects in the video clip you intend to use as a top layer. You need to choose carefully which video clips you are going to use and how are they going to look on a dark background if you want to produce visually pleasing videos that captivate the viewer’s attention.
Applying different blending modes and switching between them is easy, and it won’t take more than a few minutes of your time, once you get a hold of it. Filmora Scrn features a number of different blending modes, so figuring out what each mode can do may take some time and practice. Let’s have a look at how you can add multiple layers to your videos and how to use blending modes.
Step 1 - Importing files into Filmora Scrn
In case you’ve used Filmora Scrn’s screen recorder to capture your video, the video clip will be opened in the software’s video editor and placed in the media bin, immediately after the recording session is over. However, the Wondershare’s software also allows you to import the footage you’ve captured with a video camera or any other video recording software or device.
Click on the Add Files icon in the Media bin, and select the footage you want to use in your project. Drag the video clip you’d like to use as a background to a track on the timeline and then drag and drop the video or a photo to a timeline above the one on which the background clip is located.
Adjust the duration of the video clips or photos you’ve placed on the timeline and use the preview window to determine whether or not you should readjust the size and position of the overlaying image.
Step 2 - Select the Blending mode
On the right side of the screen you’ll be able to see several options such as Transform, Compositing, Border, and Speed, but before you proceed to select the Blending Mode you must first make sure that you’ve selected the video clip you want to enhance.
In the Compositing menu, you will be able to see the Blending Mode feature. Click on the drop-down menu and select one of the modes.
Changing the Opacity value will enable you to reduce the transparency level of a layer while changing the values in the Transform menu will help you find the perfect position on the background for the overlaying image.
Step 3 - Export the video
Click on the Export button if you like the results and choose whether you want to save the file on your hard-disc or upload it to YouTube, Facebook or Vimeo directly from Filmora Scrn.
Conclusion
Overlaying two video clips and blending them to each other can be an effective way to make your videos look more creative or more professional by adding logos and all other information you’d like the potential viewers of your videos to see. The blending modes Filmora Scrn offers can help you achieve the visual style you want to get in your videos, but it may take you some time to learn when is the best time to use a certain mode.
Max Wales
Max Wales is a writer and a lover of all things video.
Follow @Max Wales
Max Wales
Mar 27, 2024• Proven solutions
Producing a visually impressive video requires much more effort than just recording the footage and posting it online as fast as possible. Combining several images or videos into a single shot is one of the most frequently used techniques which allows you to create videos that meet the highest aesthetic standards. A layer can be described as any type of image, moving or still, that is superimposed over a background image. However, just adding one layer over another will not create a strong visual impact on the spectator, which is why using Blending Modes is recommended if you want to blend two overlaying videos or images seamlessly.
It is a widely accepted opinion that Blend Modes can only be used in Adobe Premiere Pro or After Effects, but in this article, we are going to bust that myth and show you how to utilize Blending Modes in Filmora Scrn. Before we get started, let’s figure out what blending modes is.
![]()
The All-in-One Screen Recorder & Video Editor
- Record desktop screen, voiceover, and webcam simultaneously
- Edit recorded clips quickly with a wide range of professional tools
- Built-in plentiful templates and effects
- Export to MP4, MOV, MKV, GIF and multiple formats
For Win 7 or later (64-bit)
For macOS 10.12 or later
Secure Download
What are Blending Modes in Filmora?
Combining videos or images into a single frame is an art that is much older than digital pictures, so when trying to understand Blend Modes in Filmora Scrn it is best to try to visualize two pieces of celluloid film, one over another. Two pieces of film are transparent, but the images they contain do not mix with each other, that is why when you are using Blend Modes in Filmora Scrn you are actually merging videos and allowing their pixels to mix.
Different ways of combining pixels are called modes, and for that reason, the properties of the Linear Burn mode are not the same as the properties of the Multiply blending mode. Each mode you select, brings preset image transparency as well as brightness, contrast and color values. Which mode you will use depends mostly on the context and the images you want to use in your video.
The Normal mode is a part of the standard set of blending modes in almost all photo and video editing programs. It enables you to keep the top layer intact, by preventing the pixels from two images to merge. It is a perfect PIP blending mode since it allows you to keep two overlaying images separate and have two different narratives within the same shot. Producers of YouTube videos and tutorials of any kind or gamers who want to entertain their audiences should use the Normal mode when editing their footage captured with Filmora Scrn.
The Screen Mode is best used when you are working with dark monochrome backgrounds because it reduces the dark areas in the video thus enabling you to blend the top layer into the background seamlessly.
Utilizing this mode successfully requires previous preparation because the effects you’ll get if you use the Screen mode with a footage that is not best suited for this mode are far from impressive. Therefore, the video clips you want to overlay and blend with each other must be recorded perfectly in order to get the best results.
The Multiply Mode is also one of the frequently used blending modes that multiplies the numbers for each pixel of the overlaying video clip with a matching pixel from the background video.
This mode will enable you to create the black background for your video effortlessly, and highlight the subjects in the video clip you intend to use as a top layer. You need to choose carefully which video clips you are going to use and how are they going to look on a dark background if you want to produce visually pleasing videos that captivate the viewer’s attention.
 ZoneAlarm Pro Antivirus + Firewall NextGen
How to use Blending Modes?
Applying different blending modes and switching between them is easy, and it won’t take more than a few minutes of your time, once you get a hold of it. Filmora Scrn features a number of different blending modes, so figuring out what each mode can do may take some time and practice. Let’s have a look at how you can add multiple layers to your videos and how to use blending modes.
Step 1 - Importing files into Filmora Scrn
In case you’ve used Filmora Scrn’s screen recorder to capture your video, the video clip will be opened in the software’s video editor and placed in the media bin, immediately after the recording session is over. However, the Wondershare’s software also allows you to import the footage you’ve captured with a video camera or any other video recording software or device.
Click on the Add Files icon in the Media bin, and select the footage you want to use in your project. Drag the video clip you’d like to use as a background to a track on the timeline and then drag and drop the video or a photo to a timeline above the one on which the background clip is located.
Adjust the duration of the video clips or photos you’ve placed on the timeline and use the preview window to determine whether or not you should readjust the size and position of the overlaying image.
Step 2 - Select the Blending mode
On the right side of the screen you’ll be able to see several options such as Transform, Compositing, Border, and Speed, but before you proceed to select the Blending Mode you must first make sure that you’ve selected the video clip you want to enhance.
In the Compositing menu, you will be able to see the Blending Mode feature. Click on the drop-down menu and select one of the modes.
Changing the Opacity value will enable you to reduce the transparency level of a layer while changing the values in the Transform menu will help you find the perfect position on the background for the overlaying image.
Step 3 - Export the video
Click on the Export button if you like the results and choose whether you want to save the file on your hard-disc or upload it to YouTube, Facebook or Vimeo directly from Filmora Scrn.
Conclusion
Overlaying two video clips and blending them to each other can be an effective way to make your videos look more creative or more professional by adding logos and all other information you’d like the potential viewers of your videos to see. The blending modes Filmora Scrn offers can help you achieve the visual style you want to get in your videos, but it may take you some time to learn when is the best time to use a certain mode.
Max Wales
Max Wales is a writer and a lover of all things video.
Follow @Max Wales
Max Wales
Mar 27, 2024• Proven solutions
Producing a visually impressive video requires much more effort than just recording the footage and posting it online as fast as possible. Combining several images or videos into a single shot is one of the most frequently used techniques which allows you to create videos that meet the highest aesthetic standards. A layer can be described as any type of image, moving or still, that is superimposed over a background image. However, just adding one layer over another will not create a strong visual impact on the spectator, which is why using Blending Modes is recommended if you want to blend two overlaying videos or images seamlessly.
It is a widely accepted opinion that Blend Modes can only be used in Adobe Premiere Pro or After Effects, but in this article, we are going to bust that myth and show you how to utilize Blending Modes in Filmora Scrn. Before we get started, let’s figure out what blending modes is.
![]()

The All-in-One Screen Recorder & Video Editor
- Record desktop screen, voiceover, and webcam simultaneously
- Edit recorded clips quickly with a wide range of professional tools
- Built-in plentiful templates and effects
- Export to MP4, MOV, MKV, GIF and multiple formats
For Win 7 or later (64-bit)
For macOS 10.12 or later
Secure Download
What are Blending Modes in Filmora?
Combining videos or images into a single frame is an art that is much older than digital pictures, so when trying to understand Blend Modes in Filmora Scrn it is best to try to visualize two pieces of celluloid film, one over another. Two pieces of film are transparent, but the images they contain do not mix with each other, that is why when you are using Blend Modes in Filmora Scrn you are actually merging videos and allowing their pixels to mix.
Different ways of combining pixels are called modes, and for that reason, the properties of the Linear Burn mode are not the same as the properties of the Multiply blending mode. Each mode you select, brings preset image transparency as well as brightness, contrast and color values. Which mode you will use depends mostly on the context and the images you want to use in your video.
The Normal mode is a part of the standard set of blending modes in almost all photo and video editing programs. It enables you to keep the top layer intact, by preventing the pixels from two images to merge. It is a perfect PIP blending mode since it allows you to keep two overlaying images separate and have two different narratives within the same shot. Producers of YouTube videos and tutorials of any kind or gamers who want to entertain their audiences should use the Normal mode when editing their footage captured with Filmora Scrn.
The Screen Mode is best used when you are working with dark monochrome backgrounds because it reduces the dark areas in the video thus enabling you to blend the top layer into the background seamlessly.
Utilizing this mode successfully requires previous preparation because the effects you’ll get if you use the Screen mode with a footage that is not best suited for this mode are far from impressive. Therefore, the video clips you want to overlay and blend with each other must be recorded perfectly in order to get the best results.
The Multiply Mode is also one of the frequently used blending modes that multiplies the numbers for each pixel of the overlaying video clip with a matching pixel from the background video.
 Project Manager - Asset Browser for 3Ds Max
This mode will enable you to create the black background for your video effortlessly, and highlight the subjects in the video clip you intend to use as a top layer. You need to choose carefully which video clips you are going to use and how are they going to look on a dark background if you want to produce visually pleasing videos that captivate the viewer’s attention.
How to use Blending Modes?
Applying different blending modes and switching between them is easy, and it won’t take more than a few minutes of your time, once you get a hold of it. Filmora Scrn features a number of different blending modes, so figuring out what each mode can do may take some time and practice. Let’s have a look at how you can add multiple layers to your videos and how to use blending modes.
Step 1 - Importing files into Filmora Scrn
In case you’ve used Filmora Scrn’s screen recorder to capture your video, the video clip will be opened in the software’s video editor and placed in the media bin, immediately after the recording session is over. However, the Wondershare’s software also allows you to import the footage you’ve captured with a video camera or any other video recording software or device.
Click on the Add Files icon in the Media bin, and select the footage you want to use in your project. Drag the video clip you’d like to use as a background to a track on the timeline and then drag and drop the video or a photo to a timeline above the one on which the background clip is located.
Adjust the duration of the video clips or photos you’ve placed on the timeline and use the preview window to determine whether or not you should readjust the size and position of the overlaying image.
Step 2 - Select the Blending mode
On the right side of the screen you’ll be able to see several options such as Transform, Compositing, Border, and Speed, but before you proceed to select the Blending Mode you must first make sure that you’ve selected the video clip you want to enhance.
In the Compositing menu, you will be able to see the Blending Mode feature. Click on the drop-down menu and select one of the modes.
Changing the Opacity value will enable you to reduce the transparency level of a layer while changing the values in the Transform menu will help you find the perfect position on the background for the overlaying image.
Step 3 - Export the video
Click on the Export button if you like the results and choose whether you want to save the file on your hard-disc or upload it to YouTube, Facebook or Vimeo directly from Filmora Scrn.
Conclusion
Overlaying two video clips and blending them to each other can be an effective way to make your videos look more creative or more professional by adding logos and all other information you’d like the potential viewers of your videos to see. The blending modes Filmora Scrn offers can help you achieve the visual style you want to get in your videos, but it may take you some time to learn when is the best time to use a certain mode.

Max Wales
Max Wales is a writer and a lover of all things video.
Follow @Max Wales
- Title: Optimizing Video Sequences Blend Modes Application for 2024
- Author: Princess Diana
- Created at : 2024-07-24 04:16:55
- Updated at : 2024-07-25 04:16:55
- Link: https://digital-screen-recording.techidaily.com/optimizing-video-sequences-blend-modes-application-for-2024/
- License: This work is licensed under CC BY-NC-SA 4.0.