![[Updated] Elevate Your Storytelling with Strategic Video Callouts for 2024](https://thmb.techidaily.com/1f190d8040197877fe9d91a786d037cb715f0068f8eaaf0f310614210c430f98.jpg)
[Updated] Elevate Your Storytelling with Strategic Video Callouts for 2024
Elevate Your Storytelling with Strategic Video Callouts
How to Use Markers in Video Recording and Editing


Max Wales
Mar 27, 2024• Proven solutions
The production of visually impressive videos, you’ll be proud to share on your YouTube channel or any other video sharing web-based platform, often means that you’ll have to create a lot of footage, although most of it will not make the final cut. Organizing footage and knowing exactly where a certain shot is in that sea of unsorted material will increase your efficiency during the post-production period, thus enabling you to shorten the amount of time you have to spend editing it.
Markers can be used during the video editing and after the screen recording to make post-production, to help you mark the places in the footage where you’ve made a mistake, where the new take starts or to indicate a spot on the timeline where you would like to place a particular video clip. In this article, we are going to show you how to utilize markers during the screen capturing sessions or while you’re editing videos with Filmora.

![]()

The All-in-One Screen Recorder & Video Editor
- Record desktop screen , voiceover, and webcam simultaneously
- Edit recorded clips quickly with a wide range of professional tools
- Built-in plentiful templates and effects
- Export to MP4, MOV, MKV, GIF and multiple formats
For Win 7 or later (64-bit)
For macOS 10.12 or later
 Secure Download
Distinctions Between the Two Types of Markers
Watching the footage you’ve captured over and over can be a tiresome process that consumes both time and energy, so in order to increase your efficiency during the process of capturing and editing videos, you can simply add markers both to the files you’re creating while recording or to your project’s timeline.
The media markers are the markers you can add directly to the video file you are creating with Filmora during the screen recording session. You won’t be able to see these markers until the video clip is imported into the software’s video editor and placed on the timeline.
You can use them to mark a place in the screen recording you’re not too happy with, or to highlight the part of the video clip that you intend on featuring in the final cut of the video you’ve created with Wondershare’s screen capturing and screen recording software. By doing so you’ll save time on going through all the material just to find a few seconds of footage that fit perfectly to your video.

The timeline markers, on the other hand, can only be added to a project once you’ve completed the recording session, during the post-production period. You can utilize them to highlight the parts of the video clip you want to remove from the final version of your video or to mark the spots on the timeline where you’d like to switch from one take to another.
This type of marker is immensely useful if you want to organize the timeline in your project better and to know exactly where every clip you want to use in your video is located at all times. Besides being a highly efficient tool for organizing vast amounts of footage, timeline markers can also help you denote the beats in the audio file and then sync the video clip perfectly to the beat of the tune you’re using as a soundtrack to your video.

How to Add Markers During Video Editing and After Screen Recording in Filmora?
For Win 7 or later (64-bit)
For macOS 10.12 or later

1. How to Add a Marker During Video Editing
Adding Markers During Video Editing is essential for efficient editing process, as they help save time when reviewing the video. This section provides a detailed step-by-step guide on how to add markers before starting to edit a video with two methods:
Method 1: Adding Markers through the Timeline Toolbar
Step 1: Add Markers from the Timeline Toolbar
To add markers, watch your video and find the mistake. Pause the video, then click the “Add Marker” icon on the timeline toolbar to place a marker at that point. Do this for any additional markers you want to add.

Step 2: Access the Modification Option
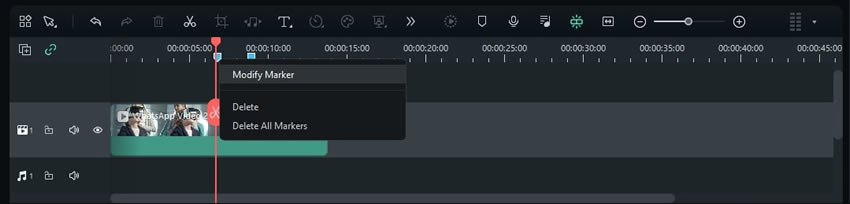
Filmora lets you adjust your marker settings for your video. Right-click on the marker and select “Modify Marker” from the control panel.
Step 3: Customize the Markers
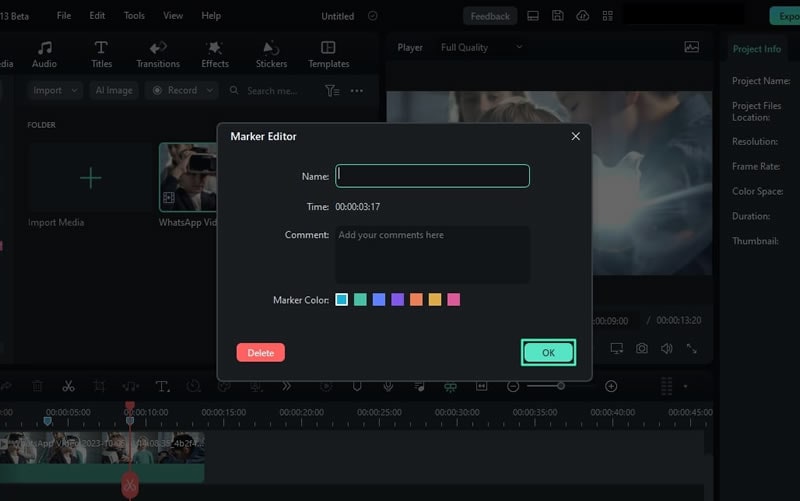
In the Marker Editor window, make relevant changes such as naming the marker, adding a comment in the “Comment” box, and changing the marker color.
Method 2: Adding Markers through the Keyboard
After importing the clip into the timeline and identifying the points of error in your video, place the playhead on these points and press the “M” key on your keyboard to add a marker at the chosen timeframes.
2. How to Remove a Marker After Screen Recording
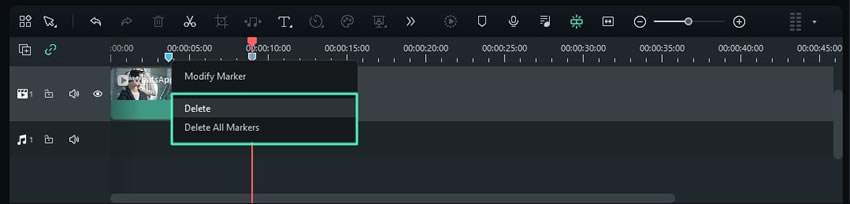
Once you have finished editing your mistakes, it’s important to remove the markers. To do this, right-click on the marker and select “Delete” from the options menu to remove a specific marker, or choose “Delete All Markers” to remove them collectively.
Conclusion
In conclusion, markers are a valuable tool for video recording and editing. They can help editors keep track of important moments, make precise edits, and streamline your workflow. By utilizing markers effectively, you can save time and ensure a more polished final result. Furthermore, you can try to use Wondershare Filmora to incorporate markers into the screen recording and video editing process. It is a great way to enhance the quality and efficiency of your work greatly. So, don’t hesitate to start using markers in your video recording and editing projects today with Filmora!
Max Wales
Max Wales is a writer and a lover of all things video.
Follow @Max Wales
Max Wales
Mar 27, 2024• Proven solutions
The production of visually impressive videos, you’ll be proud to share on your YouTube channel or any other video sharing web-based platform, often means that you’ll have to create a lot of footage, although most of it will not make the final cut. Organizing footage and knowing exactly where a certain shot is in that sea of unsorted material will increase your efficiency during the post-production period, thus enabling you to shorten the amount of time you have to spend editing it.
Markers can be used during the video editing and after the screen recording to make post-production, to help you mark the places in the footage where you’ve made a mistake, where the new take starts or to indicate a spot on the timeline where you would like to place a particular video clip. In this article, we are going to show you how to utilize markers during the screen capturing sessions or while you’re editing videos with Filmora.
![]()
The All-in-One Screen Recorder & Video Editor
- Record desktop screen , voiceover, and webcam simultaneously
- Edit recorded clips quickly with a wide range of professional tools
- Built-in plentiful templates and effects
- Export to MP4, MOV, MKV, GIF and multiple formats
For Win 7 or later (64-bit)
For macOS 10.12 or later
Secure Download
Distinctions Between the Two Types of Markers
Watching the footage you’ve captured over and over can be a tiresome process that consumes both time and energy, so in order to increase your efficiency during the process of capturing and editing videos, you can simply add markers both to the files you’re creating while recording or to your project’s timeline.
The media markers are the markers you can add directly to the video file you are creating with Filmora during the screen recording session. You won’t be able to see these markers until the video clip is imported into the software’s video editor and placed on the timeline.
You can use them to mark a place in the screen recording you’re not too happy with, or to highlight the part of the video clip that you intend on featuring in the final cut of the video you’ve created with Wondershare’s screen capturing and screen recording software. By doing so you’ll save time on going through all the material just to find a few seconds of footage that fit perfectly to your video.
The timeline markers, on the other hand, can only be added to a project once you’ve completed the recording session, during the post-production period. You can utilize them to highlight the parts of the video clip you want to remove from the final version of your video or to mark the spots on the timeline where you’d like to switch from one take to another.
This type of marker is immensely useful if you want to organize the timeline in your project better and to know exactly where every clip you want to use in your video is located at all times. Besides being a highly efficient tool for organizing vast amounts of footage, timeline markers can also help you denote the beats in the audio file and then sync the video clip perfectly to the beat of the tune you’re using as a soundtrack to your video.
How to Add Markers During Video Editing and After Screen Recording in Filmora?
For Win 7 or later (64-bit)
For macOS 10.12 or later
1. How to Add a Marker During Video Editing
Adding Markers During Video Editing is essential for efficient editing process, as they help save time when reviewing the video. This section provides a detailed step-by-step guide on how to add markers before starting to edit a video with two methods:
Method 1: Adding Markers through the Timeline Toolbar
Step 1: Add Markers from the Timeline Toolbar
To add markers, watch your video and find the mistake. Pause the video, then click the “Add Marker” icon on the timeline toolbar to place a marker at that point. Do this for any additional markers you want to add.
Step 2: Access the Modification Option
Filmora lets you adjust your marker settings for your video. Right-click on the marker and select “Modify Marker” from the control panel.
Step 3: Customize the Markers
In the Marker Editor window, make relevant changes such as naming the marker, adding a comment in the “Comment” box, and changing the marker color.
Method 2: Adding Markers through the Keyboard
After importing the clip into the timeline and identifying the points of error in your video, place the playhead on these points and press the “M” key on your keyboard to add a marker at the chosen timeframes.
 Glarysoft File Recovery Pro Annually - Helps to recover your lost file/data, even permanently deleted data.
2. How to Remove a Marker After Screen Recording
Once you have finished editing your mistakes, it’s important to remove the markers. To do this, right-click on the marker and select “Delete” from the options menu to remove a specific marker, or choose “Delete All Markers” to remove them collectively.
Conclusion
In conclusion, markers are a valuable tool for video recording and editing. They can help editors keep track of important moments, make precise edits, and streamline your workflow. By utilizing markers effectively, you can save time and ensure a more polished final result. Furthermore, you can try to use Wondershare Filmora to incorporate markers into the screen recording and video editing process. It is a great way to enhance the quality and efficiency of your work greatly. So, don’t hesitate to start using markers in your video recording and editing projects today with Filmora!
Max Wales
Max Wales is a writer and a lover of all things video.
Follow @Max Wales
Max Wales
Mar 27, 2024• Proven solutions
The production of visually impressive videos, you’ll be proud to share on your YouTube channel or any other video sharing web-based platform, often means that you’ll have to create a lot of footage, although most of it will not make the final cut. Organizing footage and knowing exactly where a certain shot is in that sea of unsorted material will increase your efficiency during the post-production period, thus enabling you to shorten the amount of time you have to spend editing it.
Markers can be used during the video editing and after the screen recording to make post-production, to help you mark the places in the footage where you’ve made a mistake, where the new take starts or to indicate a spot on the timeline where you would like to place a particular video clip. In this article, we are going to show you how to utilize markers during the screen capturing sessions or while you’re editing videos with Filmora.
![]()
The All-in-One Screen Recorder & Video Editor
- Record desktop screen , voiceover, and webcam simultaneously
- Edit recorded clips quickly with a wide range of professional tools
- Built-in plentiful templates and effects
- Export to MP4, MOV, MKV, GIF and multiple formats
For Win 7 or later (64-bit)
For macOS 10.12 or later
Secure Download

Distinctions Between the Two Types of Markers
Watching the footage you’ve captured over and over can be a tiresome process that consumes both time and energy, so in order to increase your efficiency during the process of capturing and editing videos, you can simply add markers both to the files you’re creating while recording or to your project’s timeline.
The media markers are the markers you can add directly to the video file you are creating with Filmora during the screen recording session. You won’t be able to see these markers until the video clip is imported into the software’s video editor and placed on the timeline.
You can use them to mark a place in the screen recording you’re not too happy with, or to highlight the part of the video clip that you intend on featuring in the final cut of the video you’ve created with Wondershare’s screen capturing and screen recording software. By doing so you’ll save time on going through all the material just to find a few seconds of footage that fit perfectly to your video.

WPS Office Premium ( File Recovery, Photo Scanning, Convert PDF)–Yearly
The timeline markers, on the other hand, can only be added to a project once you’ve completed the recording session, during the post-production period. You can utilize them to highlight the parts of the video clip you want to remove from the final version of your video or to mark the spots on the timeline where you’d like to switch from one take to another.
This type of marker is immensely useful if you want to organize the timeline in your project better and to know exactly where every clip you want to use in your video is located at all times. Besides being a highly efficient tool for organizing vast amounts of footage, timeline markers can also help you denote the beats in the audio file and then sync the video clip perfectly to the beat of the tune you’re using as a soundtrack to your video.
 dotConnect for Oracle is an ADO.NET data provider for Oracle with Entity Framework Support.
How to Add Markers During Video Editing and After Screen Recording in Filmora?
For Win 7 or later (64-bit)
For macOS 10.12 or later
1. How to Add a Marker During Video Editing
Adding Markers During Video Editing is essential for efficient editing process, as they help save time when reviewing the video. This section provides a detailed step-by-step guide on how to add markers before starting to edit a video with two methods:
Method 1: Adding Markers through the Timeline Toolbar
Step 1: Add Markers from the Timeline Toolbar
To add markers, watch your video and find the mistake. Pause the video, then click the “Add Marker” icon on the timeline toolbar to place a marker at that point. Do this for any additional markers you want to add.
Step 2: Access the Modification Option
Filmora lets you adjust your marker settings for your video. Right-click on the marker and select “Modify Marker” from the control panel.
Step 3: Customize the Markers
In the Marker Editor window, make relevant changes such as naming the marker, adding a comment in the “Comment” box, and changing the marker color.
Method 2: Adding Markers through the Keyboard
After importing the clip into the timeline and identifying the points of error in your video, place the playhead on these points and press the “M” key on your keyboard to add a marker at the chosen timeframes.
2. How to Remove a Marker After Screen Recording
Once you have finished editing your mistakes, it’s important to remove the markers. To do this, right-click on the marker and select “Delete” from the options menu to remove a specific marker, or choose “Delete All Markers” to remove them collectively.
Conclusion
In conclusion, markers are a valuable tool for video recording and editing. They can help editors keep track of important moments, make precise edits, and streamline your workflow. By utilizing markers effectively, you can save time and ensure a more polished final result. Furthermore, you can try to use Wondershare Filmora to incorporate markers into the screen recording and video editing process. It is a great way to enhance the quality and efficiency of your work greatly. So, don’t hesitate to start using markers in your video recording and editing projects today with Filmora!
Max Wales
Max Wales is a writer and a lover of all things video.
Follow @Max Wales
Max Wales
Mar 27, 2024• Proven solutions
The production of visually impressive videos, you’ll be proud to share on your YouTube channel or any other video sharing web-based platform, often means that you’ll have to create a lot of footage, although most of it will not make the final cut. Organizing footage and knowing exactly where a certain shot is in that sea of unsorted material will increase your efficiency during the post-production period, thus enabling you to shorten the amount of time you have to spend editing it.
Markers can be used during the video editing and after the screen recording to make post-production, to help you mark the places in the footage where you’ve made a mistake, where the new take starts or to indicate a spot on the timeline where you would like to place a particular video clip. In this article, we are going to show you how to utilize markers during the screen capturing sessions or while you’re editing videos with Filmora.
![]()
 PDF application, powered by AI-based OCR, for unified workflows with both digital and scanned documents.
 The All-in-One Screen Recorder & Video Editor
- Record desktop screen , voiceover, and webcam simultaneously
- Edit recorded clips quickly with a wide range of professional tools
- Built-in plentiful templates and effects
- Export to MP4, MOV, MKV, GIF and multiple formats
For Win 7 or later (64-bit)
For macOS 10.12 or later
 EmEditor Professional (Lifetime License, non-store app)
Secure Download
Distinctions Between the Two Types of Markers
Watching the footage you’ve captured over and over can be a tiresome process that consumes both time and energy, so in order to increase your efficiency during the process of capturing and editing videos, you can simply add markers both to the files you’re creating while recording or to your project’s timeline.
The media markers are the markers you can add directly to the video file you are creating with Filmora during the screen recording session. You won’t be able to see these markers until the video clip is imported into the software’s video editor and placed on the timeline.
You can use them to mark a place in the screen recording you’re not too happy with, or to highlight the part of the video clip that you intend on featuring in the final cut of the video you’ve created with Wondershare’s screen capturing and screen recording software. By doing so you’ll save time on going through all the material just to find a few seconds of footage that fit perfectly to your video.
The timeline markers, on the other hand, can only be added to a project once you’ve completed the recording session, during the post-production period. You can utilize them to highlight the parts of the video clip you want to remove from the final version of your video or to mark the spots on the timeline where you’d like to switch from one take to another.
This type of marker is immensely useful if you want to organize the timeline in your project better and to know exactly where every clip you want to use in your video is located at all times. Besides being a highly efficient tool for organizing vast amounts of footage, timeline markers can also help you denote the beats in the audio file and then sync the video clip perfectly to the beat of the tune you’re using as a soundtrack to your video.
 vMix Pro - Software based live production. vMix Pro includes everything in vMix 4K plus 8 channels of Replay and 8 vMix Call
How to Add Markers During Video Editing and After Screen Recording in Filmora?
For Win 7 or later (64-bit)
For macOS 10.12 or later
1. How to Add a Marker During Video Editing
Adding Markers During Video Editing is essential for efficient editing process, as they help save time when reviewing the video. This section provides a detailed step-by-step guide on how to add markers before starting to edit a video with two methods:
Method 1: Adding Markers through the Timeline Toolbar
Step 1: Add Markers from the Timeline Toolbar
To add markers, watch your video and find the mistake. Pause the video, then click the “Add Marker” icon on the timeline toolbar to place a marker at that point. Do this for any additional markers you want to add.
Step 2: Access the Modification Option
Filmora lets you adjust your marker settings for your video. Right-click on the marker and select “Modify Marker” from the control panel.
.png) Kanto Player Professional
Kanto Player Professional
Step 3: Customize the Markers
In the Marker Editor window, make relevant changes such as naming the marker, adding a comment in the “Comment” box, and changing the marker color.

Method 2: Adding Markers through the Keyboard
After importing the clip into the timeline and identifying the points of error in your video, place the playhead on these points and press the “M” key on your keyboard to add a marker at the chosen timeframes.
2. How to Remove a Marker After Screen Recording
Once you have finished editing your mistakes, it’s important to remove the markers. To do this, right-click on the marker and select “Delete” from the options menu to remove a specific marker, or choose “Delete All Markers” to remove them collectively.
Conclusion
In conclusion, markers are a valuable tool for video recording and editing. They can help editors keep track of important moments, make precise edits, and streamline your workflow. By utilizing markers effectively, you can save time and ensure a more polished final result. Furthermore, you can try to use Wondershare Filmora to incorporate markers into the screen recording and video editing process. It is a great way to enhance the quality and efficiency of your work greatly. So, don’t hesitate to start using markers in your video recording and editing projects today with Filmora!
Max Wales
Max Wales is a writer and a lover of all things video.
Follow @Max Wales
- Title: [Updated] Elevate Your Storytelling with Strategic Video Callouts for 2024
- Author: Princess Diana
- Created at : 2024-07-24 04:51:34
- Updated at : 2024-07-25 04:51:34
- Link: https://digital-screen-recording.techidaily.com/updated-elevate-your-storytelling-with-strategic-video-callouts-for-2024/
- License: This work is licensed under CC BY-NC-SA 4.0.