![[Updated] SmallFile Recorder Review and Alternatives for 2024](https://thmb.techidaily.com/97d650cd0f6e07d2facd0c86f96f609a10afc326cf6eb9f144fb267795cd5a9a.jpg)
[Updated] SmallFile Recorder Review and Alternatives for 2024
SmallFile Recorder Review and Alternatives
TinyTake is the thing that you might be searching for. Accessible in Microsoft, Windows, and Mac, TinyTake is a free screen catch and video recording program. It assists you with recording your PC screen pictures and recordings, adding criticism, and offering them to others in minutes. Actually, like the majority of the other screen catch instruments out there, it can record the full screen or even a client characterized region other than including comments. Therefore, you won’t be a specialist media editorial manager since TinyTake has you covered to kill a portion of the examples that you would require a video supervisor later.
TinyTake Is a screen catch and recording application that is accessible in both free and premium variants. we will survey the TinyTake application, which is not difficult to utilize, has Free distributed storage, and, above all, a sensible premium arrangement. This blog will cover all essential subtleties to go through the TinyTake application. TinyTake is best for somebody who is doing client care on the web, customer documentation, informative recordings, or doesn’t have any desire to get in all the problem of catching screen captures. TinyTake makes it exceptionally simple and speedy to catch or record an entire interaction. Other than video recording, this application from MangoApps likewise permits clients to catch screen captures including the webcam and apply fundamental comments. You are likewise opened up to both a free and premium arrangement for this application relying upon the amount you need to achieve.
Part 1. Key Features of TinyTake
Part 2. How to Use TinyTake to Record Videos
Part 3. TinyTake Alternative to Record Videos
1. Key Features of TinyTake
With TinyTake, you can catch pictures and recordings of your PC screen, add remarks and offer them to others in minutes. TinyTake is appropriate for any individual who is doing on the web client service, client documentation, instructive recordings or without a doubt needs to remove the problem from catching screen captures. TinyTake makes the entire course of catching or recording very simple and quick. Assuming you need to make a product instructional exercise, record a show or take screen catches, TinyTake may be by and large what you want.
Convenience in Usability: The cycle includes only 3 Steps that you embrace on a basic and natural UI. Effectively add a note to what you have caught or draw there with a highlighter. Additionally, obscuring is extremely simple in TinyTake assuming you need to conceal some screen parts.
Free Online Storage: Cloud stockpiling, beginning from 2GB, allows you to save your documents on the web and when you want to share records, you need to snatch the connection and send it to the objective party.
Best Premium Plans: TinyTake has a major in addition to here as it is far more reasonable than what other premium applications bring to the table as far as evaluating. The video player is intended for the powerful procedure on cell phones. Also, it streams huge records to give a more steady and swifter experience.
Captioning and Titles Editing: Instead of just video recording and taking screen captures, you have explanations to assist with effectively expressing your idea better. You can utilize the editing menu with cool captions and titles.
Customized Screen Recording: You can take screen captures from a picked region, window, or full screen in a brief time frame. Furthermore, pictures can be taken straightforwardly from your webcam.
Window Capturing: With TinyTake, you can record a solitary application window in any event, when you have different windows open on the screen. Simple simplified choice.
Webcam Recording: This is valuable to get film utilizing the webcam and go far to assist you with accomplishing personalization through picture-in-picture mode.
2. How to Use TinyTake to Record Videos
TinyTake is not difficult to utilize, and the UI of the product is really direct. You can flawlessly catch screen captures and video accounts of any application, window, district, or the whole screen. Your catches are made immediately right away, and they’re generally of phenomenal quality. TinyTake for Teams is a screen catch and video recording application for Microsoft Windows and Mac. With TinyTake, you can catch pictures and recordings of your PC screen, add remarks and offer them to others in minutes.
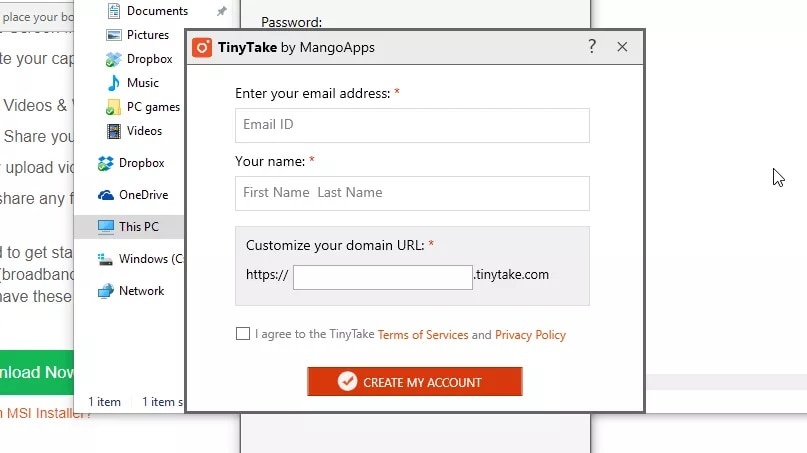
Before downloading TinyTake, you’ll be provoked to make a record utilizing your email address and make a remarkable subdomain for your distributed storage. You’ll get an underlying secret phrase by email, which you’ll be incited to change in the wake of signing in interestingly. Whenever that is done, you’re prepared to begin recording.
Step 1: Download and Launch
This is the initial step you go through and TinyTake has a considerable number of ways you can record the screen here. By offering you different choices here, you are guaranteed of getting to achieve precisely the thing you are anticipating.
Step 2: Start Capturing
Not exclusively would you be able to utilize TinyTake to catch pictures and video from your work area, you can likewise utilize your free stockpiling portion to transfer records from your PC or Mac. There’s an incredible assortment of recording and catch choices. You can decide to catch a physically chosen space of your screen, a particular window, the whole screen, or a picture or video from your webcam, all open through helpful console easy routes.

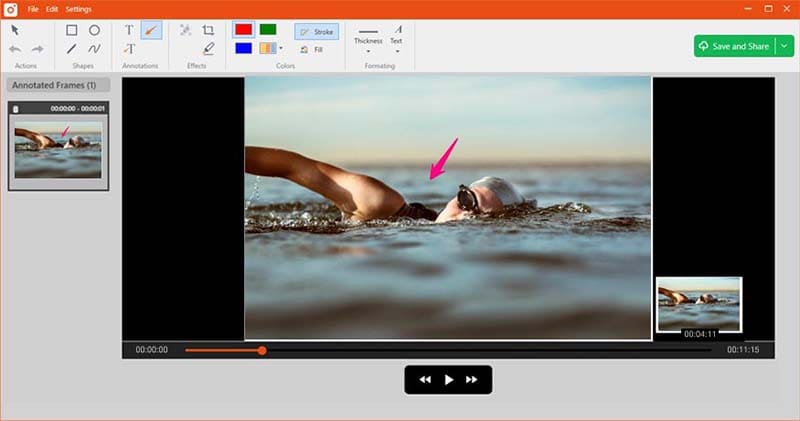
Step 3: Edit the Recording
Whenever you’ve finished your recording, the video will be opened in a straightforward proofreader. This is somewhat of a bother because the explanation and drawing choices are just accessible assuming you’ve purchased a membership, yet it allows you to review your clasp before saving it.
Step 4: Save and Share Recordings
The ‘Save and offer’ button gives both of your choices: ‘Save locally’ and ‘Transfer to YouTube’. Like the altering instruments, the last option is just really accessible if you’re a paid endorser, yet ‘Save locally’ provides you with the choice of saving the video to either a nearby drive or utilizing your TinyTake distributed storage.

Assuming you decide to transfer your video, you’ll be given a sharing URL that you can utilize right away. You can sign in and view all your transferred pictures, recordings and different documents by signing in at TinyTake.com. Here you can deal with all your substance and download anything you want with a solitary snap.
3. TinyTake Alternative to Record Videos
The free form of TinyTake permits you to record for as long as five minutes at a stretch and is for individual utilize as it were. The most serious issue is with the free form, you won’t approach explanations, altering choices, and the recording will be covered at 5 minutes top. That’s where we need an alternative video recorder and Wondershare Filmora is just the best one we can recommend for that. Filmora isn’t costly, yet it is an undeniable film making application suite reasonable for novice and expert movie producers. You can change the recording in almost any way you need, utilize whatever advances that please you. However, you can use it sparingly and elegantly, except if you are making a home film, and can work with all the typical filetypes and formats handily.
Focusing on a more extensive userbase than most video editors, Wondershare Filmora is simple enough for amateurs to utilize. However, Filmora is amazing enough to keep additional requesting clients glad. AI-based scene identification accomplishes the difficult work of separating extensive clasps into more sensible, prepared for you to add to the work area, apply impacts, and drag to various courses of events. Just as a scope of strikingly good impacts and advances, there are likewise various Split Screen choices for making different elaborate picture-in-picture designs. In general, Filmora is a decent video supervisor particularly to novices as it has an extremely easy to understand interface. Its elements are not muddled contrasted with others which simplifies this manager. Let’s know this even better with the upcoming steps.
To utilize this toolkit as the best alternative to TinyTake, follow the steps below to begin recording and saving your screen with the Filmora solution.
For Win 7 or later (64-bit)
For macOS 10.12 or later
Step 1: Install and Launch the Software
To begin with, download and install the software inside your system to get started. For that, you can use this TinyTake alternative on the go. Just visit the Wondershare official platform on the web and from there, you can find both versions of Filmora software, i-e., Windows and Mac versions with the latest version.

After the successful installation, open the application and you shall face the following UI.
Step 2: Customize the Screen Recorder Interface
Proceed with New Project afterwards and then open the Screen recorder. For that, go to the File > Record Media and then select your desired format of screen recording from the list as shown here. It’ll take you to the user-friendly UI of Filmora where you can pick up the recording feature on-spot as shown in the figure below:
Inside the recorder interface, you can customize your screen to be recorded with some perfect customizations including webcam, microphone, system sound and much more.
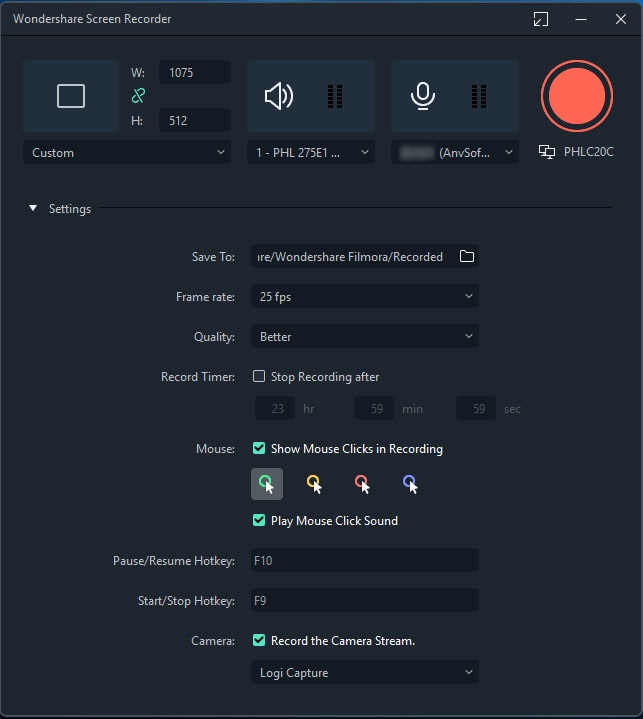
Step 3: Proceed with the Recording
Now, as everything is seemed to be set up, simply hit the Record button and it shall start recording your customized screen right away. And same is the process when you’re done with the recording, hit the Stop button that’ll take you inside the video editor to polish your recorded content.

Step 4: Edit and Share Recordings
At the point you hit the stop button; it shall take you to the editor. There, you can have basic to pro-level editing introduced to your just recorded content easily. After you’ve everything summed up, you can then export your edited recording. you have a lot of choices to select while sending out your screen catching and webcam chronicles after you’re finished with the altering part. For that, hit the Export button at the top-right corner of the product interface as follow
At the end of the editing and recording, Filmora also allows you to upload your masterpiece directly to YouTube or some other renowned platform, you can without much of a stretch select your desired platform to share from there.
The Bottom Line
TinyTake is not difficult to utilize screen catch and recorder, which you can use free of charge or purchase at an incredibly reasonable rate. You can download it from TinyTake official site. This is all that you want to know before getting TinyTake. What’s more, we trust our TinyTake application survey has assisted you with understanding this product better than anyone might have expected. However, the outcomes you can accomplish with Filmora are a long way from amateurish. It merits taking the preliminary variant of the program for a test drive, remembering that anything your product will be watermarked. Assuming you’re intrigued, as we might suspect you will be, you can move up to the paid-for variant and commodity a spotless adaptation of your creation.
Part 2. How to Use TinyTake to Record Videos
Part 3. TinyTake Alternative to Record Videos
1. Key Features of TinyTake
With TinyTake, you can catch pictures and recordings of your PC screen, add remarks and offer them to others in minutes. TinyTake is appropriate for any individual who is doing on the web client service, client documentation, instructive recordings or without a doubt needs to remove the problem from catching screen captures. TinyTake makes the entire course of catching or recording very simple and quick. Assuming you need to make a product instructional exercise, record a show or take screen catches, TinyTake may be by and large what you want.
Convenience in Usability: The cycle includes only 3 Steps that you embrace on a basic and natural UI. Effectively add a note to what you have caught or draw there with a highlighter. Additionally, obscuring is extremely simple in TinyTake assuming you need to conceal some screen parts.
Free Online Storage: Cloud stockpiling, beginning from 2GB, allows you to save your documents on the web and when you want to share records, you need to snatch the connection and send it to the objective party.
Best Premium Plans: TinyTake has a major in addition to here as it is far more reasonable than what other premium applications bring to the table as far as evaluating. The video player is intended for the powerful procedure on cell phones. Also, it streams huge records to give a more steady and swifter experience.
Captioning and Titles Editing: Instead of just video recording and taking screen captures, you have explanations to assist with effectively expressing your idea better. You can utilize the editing menu with cool captions and titles.
Customized Screen Recording: You can take screen captures from a picked region, window, or full screen in a brief time frame. Furthermore, pictures can be taken straightforwardly from your webcam.
Window Capturing: With TinyTake, you can record a solitary application window in any event, when you have different windows open on the screen. Simple simplified choice.
Webcam Recording: This is valuable to get film utilizing the webcam and go far to assist you with accomplishing personalization through picture-in-picture mode.
2. How to Use TinyTake to Record Videos
TinyTake is not difficult to utilize, and the UI of the product is really direct. You can flawlessly catch screen captures and video accounts of any application, window, district, or the whole screen. Your catches are made immediately right away, and they’re generally of phenomenal quality. TinyTake for Teams is a screen catch and video recording application for Microsoft Windows and Mac. With TinyTake, you can catch pictures and recordings of your PC screen, add remarks and offer them to others in minutes.
Before downloading TinyTake, you’ll be provoked to make a record utilizing your email address and make a remarkable subdomain for your distributed storage. You’ll get an underlying secret phrase by email, which you’ll be incited to change in the wake of signing in interestingly. Whenever that is done, you’re prepared to begin recording.
Step 1: Download and Launch
This is the initial step you go through and TinyTake has a considerable number of ways you can record the screen here. By offering you different choices here, you are guaranteed of getting to achieve precisely the thing you are anticipating.
Step 2: Start Capturing
Not exclusively would you be able to utilize TinyTake to catch pictures and video from your work area, you can likewise utilize your free stockpiling portion to transfer records from your PC or Mac. There’s an incredible assortment of recording and catch choices. You can decide to catch a physically chosen space of your screen, a particular window, the whole screen, or a picture or video from your webcam, all open through helpful console easy routes.
Step 3: Edit the Recording
Whenever you’ve finished your recording, the video will be opened in a straightforward proofreader. This is somewhat of a bother because the explanation and drawing choices are just accessible assuming you’ve purchased a membership, yet it allows you to review your clasp before saving it.
Step 4: Save and Share Recordings
The ‘Save and offer’ button gives both of your choices: ‘Save locally’ and ‘Transfer to YouTube’. Like the altering instruments, the last option is just really accessible if you’re a paid endorser, yet ‘Save locally’ provides you with the choice of saving the video to either a nearby drive or utilizing your TinyTake distributed storage.
Assuming you decide to transfer your video, you’ll be given a sharing URL that you can utilize right away. You can sign in and view all your transferred pictures, recordings and different documents by signing in at TinyTake.com. Here you can deal with all your substance and download anything you want with a solitary snap.
3. TinyTake Alternative to Record Videos
The free form of TinyTake permits you to record for as long as five minutes at a stretch and is for individual utilize as it were. The most serious issue is with the free form, you won’t approach explanations, altering choices, and the recording will be covered at 5 minutes top. That’s where we need an alternative video recorder and Wondershare Filmora is just the best one we can recommend for that. Filmora isn’t costly, yet it is an undeniable film making application suite reasonable for novice and expert movie producers. You can change the recording in almost any way you need, utilize whatever advances that please you. However, you can use it sparingly and elegantly, except if you are making a home film, and can work with all the typical filetypes and formats handily.
Focusing on a more extensive userbase than most video editors, Wondershare Filmora is simple enough for amateurs to utilize. However, Filmora is amazing enough to keep additional requesting clients glad. AI-based scene identification accomplishes the difficult work of separating extensive clasps into more sensible, prepared for you to add to the work area, apply impacts, and drag to various courses of events. Just as a scope of strikingly good impacts and advances, there are likewise various Split Screen choices for making different elaborate picture-in-picture designs. In general, Filmora is a decent video supervisor particularly to novices as it has an extremely easy to understand interface. Its elements are not muddled contrasted with others which simplifies this manager. Let’s know this even better with the upcoming steps.
To utilize this toolkit as the best alternative to TinyTake, follow the steps below to begin recording and saving your screen with the Filmora solution.
For Win 7 or later (64-bit)
For macOS 10.12 or later
Step 1: Install and Launch the Software
To begin with, download and install the software inside your system to get started. For that, you can use this TinyTake alternative on the go. Just visit the Wondershare official platform on the web and from there, you can find both versions of Filmora software, i-e., Windows and Mac versions with the latest version.
After the successful installation, open the application and you shall face the following UI.
Step 2: Customize the Screen Recorder Interface
Proceed with New Project afterwards and then open the Screen recorder. For that, go to the File > Record Media and then select your desired format of screen recording from the list as shown here. It’ll take you to the user-friendly UI of Filmora where you can pick up the recording feature on-spot as shown in the figure below:
Inside the recorder interface, you can customize your screen to be recorded with some perfect customizations including webcam, microphone, system sound and much more.
Step 3: Proceed with the Recording
Now, as everything is seemed to be set up, simply hit the Record button and it shall start recording your customized screen right away. And same is the process when you’re done with the recording, hit the Stop button that’ll take you inside the video editor to polish your recorded content.
Step 4: Edit and Share Recordings
At the point you hit the stop button; it shall take you to the editor. There, you can have basic to pro-level editing introduced to your just recorded content easily. After you’ve everything summed up, you can then export your edited recording. you have a lot of choices to select while sending out your screen catching and webcam chronicles after you’re finished with the altering part. For that, hit the Export button at the top-right corner of the product interface as follow
At the end of the editing and recording, Filmora also allows you to upload your masterpiece directly to YouTube or some other renowned platform, you can without much of a stretch select your desired platform to share from there.
The Bottom Line
TinyTake is not difficult to utilize screen catch and recorder, which you can use free of charge or purchase at an incredibly reasonable rate. You can download it from TinyTake official site. This is all that you want to know before getting TinyTake. What’s more, we trust our TinyTake application survey has assisted you with understanding this product better than anyone might have expected. However, the outcomes you can accomplish with Filmora are a long way from amateurish. It merits taking the preliminary variant of the program for a test drive, remembering that anything your product will be watermarked. Assuming you’re intrigued, as we might suspect you will be, you can move up to the paid-for variant and commodity a spotless adaptation of your creation.
Also read:
- [New] In 2024, Directing the Stream A Close Look at OBS vs Twitch Studio
- [Updated] 2024 Approved Odin's Revenge Ragnarök - Coming Soon
- [Updated] 2024 Approved State-of-the-Art Gametime Documentation Tools
- [Updated] In 2024, Top 5 Tunefab Screen Recording Tips & Tricks
- CaptureZone Win 10'S Best Recorder for 2024
- Conscious Confidence | Free Book
- Easy Tutorial: Transforming Your MP4 Videos Into Playable DVDs Using a Windows Computer
- Full Guide to Hard Reset Your Oppo Find X6 | Dr.fone
- How Long Does a 20MB Video Last?
- Launching a Vlog Top Kit & Applications
- Tips & Tricks: Fine-Tuning Your Scanner's Image Clarity - Guidance by YL Computing
- Title: [Updated] SmallFile Recorder Review and Alternatives for 2024
- Author: Princess Diana
- Created at : 2024-11-27 01:35:13
- Updated at : 2024-12-02 03:18:45
- Link: https://digital-screen-recording.techidaily.com/updated-smallfile-recorder-review-and-alternatives-for-2024/
- License: This work is licensed under CC BY-NC-SA 4.0.